
Mini St. Patrick’s Day Cheesecakes are here to rescue your dessert table from being just another “meh” moment. These no-bake cuties are a festive swirl of color, creaminess, and pure joy—just the thing for anyone who loves celebrating but hates fuss. Picture a buttery graham cracker crust, layers of green-and-white cheesecake filling that are almost too pretty to eat (almost), and a dollop of buttercream that practically begs to be topped with sprinkles.
You don’t need to be a baking pro or spend all day in the kitchen. If you’ve got a few minutes and a craving for something fun, these mini cheesecakes will deliver all the magic without the stress. Whether you’re throwing a party or just looking for a sweet way to treat yourself, Mini St. Patrick’s Day Cheesecakes are a hit you’ll want on repeat. They’re creamy, colorful, and completely craveable—what more could you want?
Table of Contents
What is Mini St. Patrick’s Day Cheesecakes?
Mini St. Patrick’s Day Cheesecakes are individual-sized, no-bake desserts made with a classic graham cracker crust and a festive, swirled cheesecake filling. They’re layered with shades of white, aqua green, and neon lime—totally channeling that lucky Irish vibe. These little treats are chilled to perfection and topped with buttercream frosting and fun decorations like green sprinkles or edible gold flakes.
What makes them so special? Well, they’re not just adorable—they’re incredibly easy to make, no oven required. You just mix, color, layer, chill, and decorate. These mini cheesecakes are perfect for parties, potlucks, or even just a cozy night at home with your favorite Netflix show and a fork. Because they’re made in muffin tins or mini molds, you don’t have to worry about slicing or serving mess—everyone gets their own little pot of gold.
Reasons to Try Mini St. Patrick’s Day Cheesecakes
First off, they’re no-bake. So if the idea of turning on your oven gives you flashbacks to that one time you accidentally broiled a cake… you’re safe here. These mini cheesecakes are basically foolproof. Second, they’re perfect for time-crunched people (hello, moms juggling work emails and school lunches). You can prep them in under 30 minutes and chill them while you do life. Third, they’re just plain fun.
Between the green layers and the option to get a little wild with toppings like chocolate shamrocks or edible glitter, they’ll make your dessert table the star of the show. Oh, and let’s not forget the taste—creamy, tangy cheesecake with just the right amount of sweetness. These little treats are also freezer-friendly, so you can make a batch ahead and pull one out whenever you need a lucky little pick-me-up.
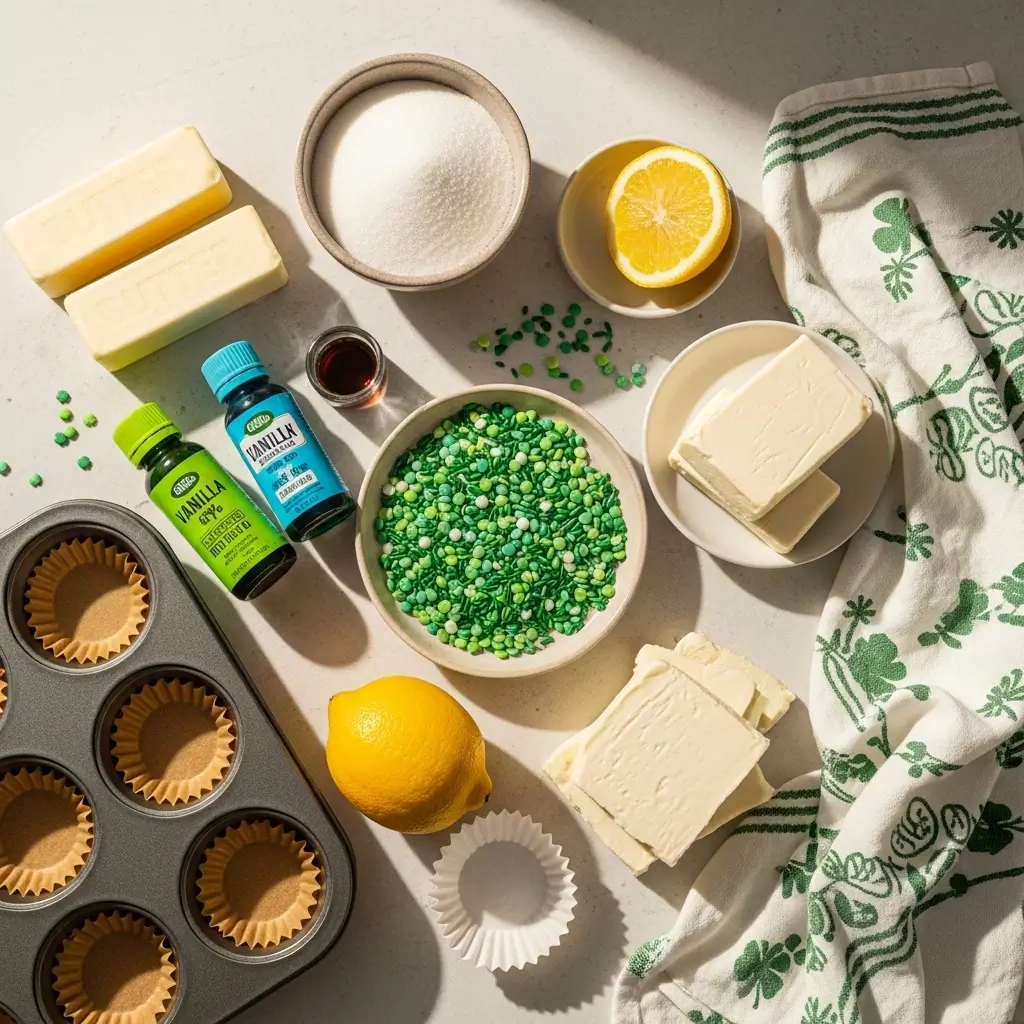
Ingredients Needed to Make Mini St. Patrick’s Day Cheesecakes
For the Graham Cracker Crust:
- 1 ½ cups graham cracker crumbs
- ¼ cup granulated sugar
- ½ cup unsalted butter, melted
For the No-Bake Cheesecake Filling:
- 16 oz cream cheese, softened
- ½ cup powdered sugar
- 1 tsp vanilla extract
- 1 tbsp lemon juice
- 1 package (3.4 oz) cheesecake-flavored instant pudding mix
- 1 cup half-and-half
- Green food coloring (neon lime and aqua green)
For the Festive Toppings:
- ½ cup buttercream frosting (store-bought or homemade)
- Green sprinkles
- Optional: edible gold flakes, chocolate shamrocks
Instructions to Make Mini St. Patrick’s Day Cheesecakes
Ready to whip up a batch of magic? This step by step guide walks you through everything you need to create the creamiest, most colorful Mini St. Patrick’s Day Cheesecakes. Whether you’re a seasoned pro or a newbie in the kitchen, these clear instructions will help you make a dessert that’s festive, fun, and totally foolproof. Don’t forget to check out our easy ingredient swaps if you need alternatives or want to put your own spin on things.
Step 1: Prep Your Graham Cracker Crust
Let’s kick things off with the buttery base that holds all the magic. In a medium bowl, combine 1½ cups graham cracker crumbs, ¼ cup granulated sugar, and ½ cup melted unsalted butter. Stir until the mixture resembles wet sand—coarse, a little crumbly, but easily moldable.
Next, line a muffin tin with paper liners or use silicone mini cheesecake molds if you have them. Scoop about a heaping tablespoon of the crust mixture into each cup and press it down firmly using the back of a spoon or the bottom of a small glass. You’re aiming for a firm, even crust across all 12 molds.
Once your crusts are packed and pretty, pop the whole tray into the freezer for 10 minutes. This helps them firm up so they don’t get soggy when you add the filling. For a crunchier base, you can also bake the crust at 325°F for 5–7 minutes before cooling—great if you’re looking for that extra snap. Want more no-bake ideas? Try our Valentine Day Swirl Cookies for another fun holiday treat.
Step 2: Make the No-Bake Cheesecake Filling
While the crust chills, let’s get to the real star of the show—the cheesecake filling. Start by beating 16 oz of softened cream cheese in a large bowl with a hand or stand mixer until smooth and creamy. Add 1 teaspoon vanilla extract and 1 tablespoon lemon juice to brighten up the flavor, then mix again until well combined.
In a separate bowl, whisk together 1 package (3.4 oz) cheesecake-flavored instant pudding mix and 1 cup half-and-half. Stir until the mixture thickens, which should take about 2–3 minutes. You’re looking for a custard-like consistency here—think silky but not runny.
Now, fold the pudding mixture into the cream cheese base and beat until the filling is fluffy and smooth. Slowly mix in ½ cup powdered sugar and beat just until it’s light and cloud-like. If it’s your first time using instant pudding in cheesecake, it might feel a little unconventional, but trust—it gives the filling amazing texture without any baking stress.
Step 3: Divide and Color the Filling
This step is where the Mini St. Patrick’s Day Cheesecakes start to come to life. Divide the filling evenly into three bowls. Leave one bowl plain (this will be your white layer).
In the second bowl, add a few drops of aqua green food coloring, and stir until you reach your desired shade. In the third, mix neon lime green coloring with a small dab of aqua to create a vibrant, swirled green that feels right on theme for St. Patrick’s Day.
Need help with food coloring tips or alternatives? We cover safe natural dyes in our healthy veggie pasta bake, which also uses colorful layering for visual appeal.
Step 4: Layer the Cheesecake Filling
Here’s the most important step by step trick for those gorgeous, clean layers: add one color at a time, and freeze between each. Start by spooning a layer of the white filling over the crusts, smoothing it out gently with the back of a spoon. Freeze for 5–10 minutes to firm it slightly before adding the next layer.
Next, add the aqua green layer, spread it evenly, then pop the tray back in the freezer for another quick chill. Finish with the neon lime green layer, which gives the cheesecake its festive pop. Once all layers are in place, refrigerate the cheesecakes for at least 4 hours, or even better—overnight. This step is key for a firm, creamy texture that holds together when you remove them from the molds.
Not sure if they’re set? Tap the tops gently—they should feel solid but slightly jiggly, like traditional cheesecake.
Step 5: Frost and Decorate
Now the fun really begins. Once chilled and set, take the cheesecakes out of the fridge and pipe buttercream frosting on top of each using a star tip or a spoon swirl (no judgment, we love messy frosting too).
Sprinkle on green sprinkles for that classic leprechaun-approved sparkle. Want to get extra with it? Add edible gold flakes or chocolate shamrocks for a bakery-style finish.
If you love decorating desserts, you might also enjoy our chocolate-covered strawberries—another easy, eye-catching option perfect for holidays or celebrations.
Step 6: Serve and Enjoy
Carefully remove the mini cheesecakes from their molds—if you used liners, just peel them back like a cupcake. Place them on a platter and let your guests ooh and aah over the colorful layers before they dive in.
If you’re hosting, serve these alongside something warm like Irish coffee or cocoa, or finish off a meal like our Easy Creamy Chicken Pot Pie with one of these chilled beauties for the perfect sweet ending.
What to Serve with Mini St. Patrick’s Day Cheesecakes
These sweet little gems go perfectly with something warm and cozy, like a rich Irish coffee or a creamy hot cocoa if kids are in the mix. For a full St. Paddy’s spread, pair them with savory bites like our Baked Cheesy Mushrooms Casserole or even this comforting Easy Creamy Chicken Pot Pie. They also make a cute and colorful finish to brunch or a themed potluck. Want to go full-on green? Serve them next to a spinach dip, green punch, or shamrock-shaped cookies for extra festive flair.
Key Tips for Making Mini St. Patrick’s Day Cheesecakes
- Soften your cream cheese: Cold cream cheese = lumpy filling. Let it sit at room temp before mixing.
- Freeze between layers: Just 5–10 minutes keeps the colors crisp and clean, so you don’t end up with St. Patrick’s Day soup.
- Use gel food coloring: It’s more vibrant and less runny than liquid dye. A little goes a long way.
- Plan ahead: These need a good chill to set. Overnight is best if you can swing it.
- Make it your own: Add peppermint extract for a minty twist, or swap toppings for whatever festive flair you love.
Storage and Reheating Tips Mini St. Patrick’s Day Cheesecakes
Storage is easy-peasy. Just place the cheesecakes in an airtight container and store them in the fridge for up to 5 days. If you want to keep them longer, wrap each one in plastic wrap and pop them into a freezer-safe bag—they’ll last up to 2 months. Thaw in the fridge overnight before serving. Do not microwave these—unless you like your cheesecake warm and weird. Frost only before serving if you’re freezing them to avoid soggy swirls.
FAQs
Can I make these ahead of time?
Absolutely! Make them a day ahead and chill overnight for best results. They’ll taste even better the next day.
Can I use a different crust?
Sure can. Try crushed Oreos or vanilla wafers if you want to switch things up.
Do I have to use food coloring?
Not at all! The green layers are for fun, but you can go all-natural if that’s more your vibe.
Can I make this gluten-free?
Yes! Just use gluten-free graham crackers for the crust and double-check your pudding mix.
Can I use whipped cream instead of buttercream?
You can, but be aware whipped cream won’t hold up as long if you’re storing these for more than a day.
Final Thoughts
Mini St. Patrick’s Day Cheesecakes are your lucky charm dessert—fun to make, beautiful to serve, and insanely delicious. Whether you’re going all out for a party or just adding a little joy to your week, these mini treats bring smiles (and maybe a little sugar rush). Don’t be surprised if they disappear faster than a leprechaun on payday. And if you’re feeling inspired to keep the dessert train rolling, don’t miss our colorful Birthday Cake Protein Balls—another no-bake winner.
Visit our Pinterest for regular slow cooker recipe updates, or join our Facebook discussions where cooking fans exchange their favorite hearty meal ideas.
Print
Mini St. Patrick’s Day Cheesecakes: No-Bake Dessert Magic
- Total Time: 4 hours 20 minutes
- Yield: 12 mini cheesecakes 1x
Description
These Mini St. Patrick’s Day Cheesecakes are a fun, festive, and no-bake dessert that brings a pop of color and a burst of creamy flavor to any celebration! With a buttery graham cracker crust, vibrant green and white cheesecake layers, and a swirl of buttercream frosting topped with festive sprinkles, these cheesecakes are the perfect St. Paddy’s treat.
Ingredients
Graham Cracker Crust:
- 1 ½ cups graham cracker crumbs
- ¼ cup granulated sugar
- ½ cup unsalted butter (melted)
No-Bake Cheesecake Filling:
- 16 ounces cream cheese (softened)
- ½ cup powdered sugar
- 1 teaspoon vanilla extract
- 1 tablespoon lemon juice
- 1 package (3.4 ounces) cheesecake-flavored instant pudding mix
- 1 cup half-and-half
- Green food coloring (neon lime & aqua green for swirled layers)
Festive Toppings:
- ½ cup buttercream frosting (store-bought or homemade)
- Green sprinkles
- Optional: Edible gold flakes or chocolate shamrocks
Instructions
1. In a bowl, mix graham cracker crumbs, sugar, and melted butter until combined.
2. Press the mixture into the bottoms of 12 lined muffin cups or mini cheesecake molds.
3. Freeze for 10 minutes while preparing the filling.
4. In a large bowl, beat cream cheese, vanilla extract, and lemon juice until smooth.
5. In a separate bowl, whisk together the pudding mix and half-and-half until thick.
6. Add the pudding mixture to the cream cheese mixture and beat until well combined.
7. Gradually mix in powdered sugar until light and fluffy.
8. Divide the cheesecake batter into three bowls: leave one plain, tint one aqua green, and the last neon lime with a drop of aqua green.
9. Layer into prepared crusts: white, aqua green, then lime green, smoothing between layers. Freeze briefly between layers.
10. Refrigerate cheesecakes for at least 4 hours or overnight to set.
11. Pipe buttercream frosting on top of chilled cheesecakes.
12. Decorate with green sprinkles, edible gold flakes, or chocolate shamrocks.
13. Carefully remove cheesecakes from molds and serve chilled.
Notes
For a firmer crust, bake at 325°F (163°C) for 5–7 minutes and cool before adding filling.
Store in an airtight container in the refrigerator for up to 5 days.
Wrap individually and freeze for up to 2 months. Thaw in fridge before serving.
For a minty variation, add ¼ teaspoon peppermint extract to the cheesecake batter.
- Prep Time: 20 minutes
- Cook Time: 4 hours
- Category: Dessert
- Method: No-Bake
- Cuisine: American
Nutrition
- Serving Size: 1 mini cheesecake
- Calories: 310
- Sugar: 20g
- Sodium: 210mg
- Fat: 21g
- Saturated Fat: 12g
- Unsaturated Fat: 7g
- Trans Fat: 0g
- Carbohydrates: 25g
- Fiber: 0g
- Protein: 4g
- Cholesterol: 55mg
")