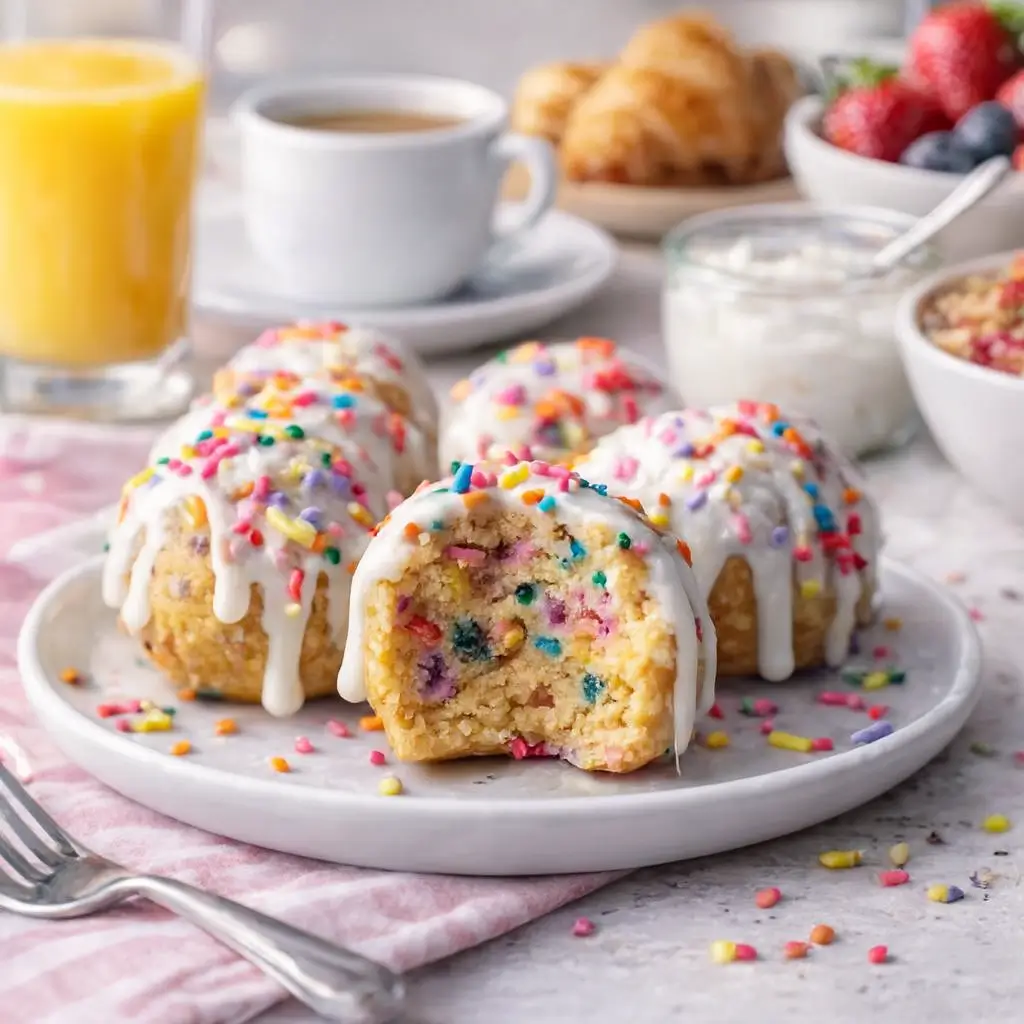
Birthday Cake Protein Balls are your new go-to snack when you’re craving something sweet but still want to stick to your health goals. Packed with protein, these no-bake treats taste just like the nostalgic vanilla birthday cake we all love—rainbow sprinkles and all.
Whether you’re trying to fuel up between meetings, need an after-school snack for the kids, or just want something to stash in your bag that won’t melt or mush, this recipe delivers. And here’s the best part—it’s fast. We’re talking 10 minutes of prep, one bowl, and zero oven drama. Plus, the ingredients are totally customizable for dietary needs (vegan, gluten-free, nut-free—you name it). Trust me, once you pop one, you’ll be making these on repeat.
Table of Contents
What is Birthday Cake Protein Balls?
Birthday Cake Protein Balls are delicious no-bake energy bites that pack a punch of protein with the cheerful taste of classic vanilla birthday cake. Imagine a soft, doughy ball that’s subtly sweet, slightly nutty, and bursting with vibrant rainbow sprinkles in every bite—like a party for your taste buds. Unlike traditional birthday cake, though, these babies don’t require an oven or hours of baking.
Instead, they come together in minutes using pantry staples like protein powder, oat flour, and nut butter. And thanks to ingredients like vanilla and almond extract, the flavor seriously hits that bakery-style “funfetti” note. Perfect for lunchboxes, gym bags, or late-night cravings, they’re a healthier, grown-up way to indulge in something sweet—without the sugar crash or guilt.
Reasons to Try Birthday Cake Protein Balls
First off, Birthday Cake Protein Balls are just plain fun. Who says healthy snacks have to be boring? These are colorful, cute, and actually make you smile when you open the fridge. But beyond the good looks, they’re loaded with real benefits. Each bite is filled with protein (hello, post-workout fuel), fiber, and healthy fats to keep you full and satisfied.
You don’t need to be a bodybuilder or a baker to enjoy them—just someone who appreciates snacks that taste like dessert but act like a superfood. Plus, the recipe is no-bake and quick, making it a total win for busy moms, students, or anyone who’s got about five minutes and a sweet tooth. They’re portable, kid-friendly, and endlessly adaptable. Want to go nut-free? No problem. Need it vegan? Easy switch. Basically, they’re snack gold.
Ingredients Needed to Make Birthday Cake Protein Balls
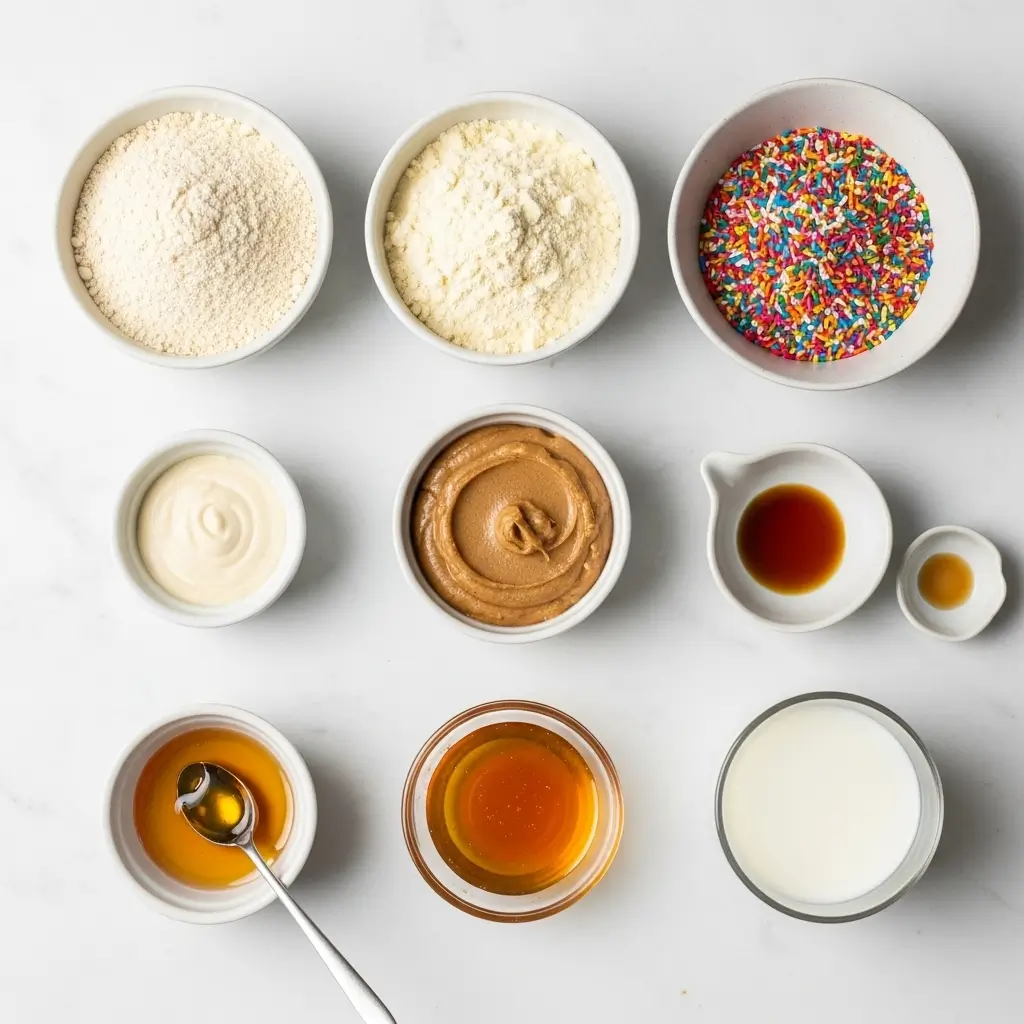
- 1 cup vanilla protein powder (whey or plant-based)
- 1 cup oat flour (or almond flour for grain-free)
- ½ cup cashew or almond butter (or sunflower butter for nut-free)
- ¼ cup honey or maple syrup (maple syrup for vegan)
- 1 tsp vanilla extract
- ½ tsp almond extract
- ½ cup rainbow sprinkles (naturally colored if preferred)
- 1 pinch of salt
- 3–4 tbsp milk of choice (plant or dairy)
Instructions to Make Birthday Cake Protein Balls
Making Birthday Cake Protein Balls is easier than blowing out candles on a cupcake—and a whole lot less messy. Here’s your ultimate step by step guide to creating these colorful, protein-packed bites of joy. Whether you’re new to the no-bake snack scene or a seasoned energy ball expert, each step is broken down clearly so you can make a batch with confidence (and maybe a little fun, too). For ingredient swaps and helpful snack tips, don’t forget to visit our Protein Balls for Healthy Snacking Delight page for more ideas.
Step 1: Mix the Dry Ingredients First
Start by grabbing a large mixing bowl—nothing fancy, just one big enough to give you room to stir without making a flour cloud. Into the bowl, add 1 cup of vanilla protein powder, 1 cup of oat flour, and a pinch of salt. Use a whisk or fork to combine them well, breaking up any lumps. This step helps distribute the salt and protein evenly so you don’t end up with salty or bland bites later.
Tip: If you’re out of oat flour, don’t worry! Just toss rolled oats into a food processor and blend until fine. You can find more on this trick over in our guide to Chia Oatmeal Energy Balls, which also uses pantry staples.
Step 2: Add the Wet Ingredients
Once your dry base is smooth and ready, it’s time to bring in the sticky stuff. Add ½ cup of cashew or almond butter, ¼ cup of honey or maple syrup, 1 teaspoon of vanilla extract, and ½ teaspoon of almond extract. Use a sturdy spoon or silicone spatula to mix everything together until a thick dough starts to form. This step takes a little elbow grease, so don’t be shy about leaning in!
The almond extract is the secret here—it’s what gives these protein balls that real-deal birthday cake flavor. You can learn more about how small ingredients make a big impact in our post on Cinnamon Roll Protein Muffins.
Step 3: Adjust the Texture with Milk
Here’s where things get personal. Start adding your milk of choice (dairy or plant-based), one tablespoon at a time, mixing after each pour. You’ll need about 3–4 tablespoons, but go slow—you’re aiming for a dough that’s soft and rollable, slightly tacky but not sticking to your fingers.
Step by step, it should look like cookie dough that holds together well. If your dough is too dry, add another splash of milk. Too wet? Sprinkle in more oat flour until it firms up again. You’ve got this.
Step 4: Gently Fold in the Sprinkles
Time for the fun part: sprinkles! Gently fold in ½ cup of rainbow sprinkles, trying not to overmix. If you stir too much, the colors can bleed and turn your dough into a pastel swirl (which, hey, could be a vibe, too).
If you’re using naturally colored or vegan sprinkles, even better—they hold up beautifully and make this a more allergy-friendly recipe. This step is also perfect to get your kids involved, especially if you’re already making Flourless Banana Muffins or other lunchbox snacks.
Step 5: Roll Into Balls
Now, use a cookie scoop or tablespoon to portion out the dough. Roll each scoop between your hands to form round, bite-sized balls. This is where you’ll feel the dough’s texture come into play—if it’s cracking, add a tiny splash of milk. If it’s sticking to your hands, wet your palms slightly.
Set the protein balls onto a parchment-lined plate or baking sheet. You should get around 12 pieces, depending on the size of your scoops.
Step 6: Chill and Set
Last but not least in this step by step process—chill time! Pop the tray into the fridge for at least 30 minutes. This allows the protein balls to firm up and hold their shape, plus it enhances the flavor and makes them extra satisfying to bite into.
They’re ready to eat right after chilling, but you can also store them for later (details in our Storage Tips section)—or make a double batch and freeze half. That way, future-you always has a birthday treat ready to go.
What to Serve with Birthday Cake Protein Balls
These little bites are fantastic all on their own, but they also play well with others. Pair them with a cup of cold brew or your favorite herbal tea for a midday treat. They’re also great tucked next to some fruit and yogurt for a quick breakfast board or added to your kid’s lunchbox alongside some Cottage Cheese Egg Muffins for a protein-packed meal. Want to turn them into dessert? Dip them in melted white chocolate for an extra indulgent twist. Or, serve them at a party next to Chocolate Covered Strawberries for a healthy-ish dessert table everyone will rave about.
Key Tips for Making Birthday Cake Protein Balls
- Chill the dough before rolling if it feels too sticky—it’ll firm up quickly and make shaping easier.
- Use a cookie scoop for even portioning. It’s faster, and your hands stay (slightly) cleaner.
- Store them in a sealed container so they don’t dry out.
- Don’t skip the almond extract! It’s the secret to that classic birthday cake flavor.
- Customize it—add in coconut flakes, mini white chocolate chips, or even some chopped dried fruit if you want to switch things up.
Storage and Reheating Tips for Birthday Cake Protein Balls
These bites are the definition of grab-and-go convenience. Store your Birthday Cake Protein Balls in an airtight container in the fridge for up to 7 days. They hold up well and don’t dry out if stored properly. For longer storage, freeze them in a zip-top bag or freezer-safe container for up to 3 months. Just let them thaw for a few minutes at room temp before snacking. No reheating needed (woohoo!). Want to soften them slightly for a warmish vibe? Pop one in the microwave for 5 seconds—but really, they’re best straight from the fridge. Great for packing in lunchboxes or gym bags without melting or making a mess.
FAQs
Can I make these vegan?
Yep! Just use maple syrup instead of honey and pick a plant-based protein powder and milk.
What if I don’t have oat flour?
No worries—just blend rolled oats in a blender or food processor until finely ground.
Are these safe for kids?
Absolutely! Just double-check your ingredients (like sprinkles and protein powder) for age-appropriate options.
Can I add more protein?
Sure! Swap in more protein powder for some of the oat flour or add collagen peptides.
Do I have to use rainbow sprinkles?
Technically, no—but c’mon, they’re half the fun.
Final Thoughts
If you’re looking for a snack that feels like a treat but acts like fuel, Birthday Cake Protein Balls are a must-try. They hit that perfect sweet spot (literally) between indulgence and nutrition, without making you feel like you’ve compromised. Whether you’re a busy mom, gym regular, or snack-loving human just trying to get through a 3 PM slump, this recipe’s a keeper. For more delicious ways to level up your snack game, check out our Strawberry Cheesecake Protein Balls or Cookie Dough Protein Balls—because life’s too short for boring snacks.
Visit our Pinterest for regular slow cooker recipe updates, or join our Facebook discussions where cooking fans exchange their favorite hearty meal ideas.

Birthday Cake Protein Balls – Sweet, Healthy & Protein-Packed Snack
- Total Time: 40 minutes
- Yield: 12 pieces 1x
- Diet: Vegetarian
Description
Delicious no-bake protein balls that capture the classic flavor of vanilla birthday cake, packed with protein and colorful sprinkles for a fun, healthy snack.
Ingredients
- 1 cup Vanilla protein powder (use whey or plant-based)
- 1 cup Oat flour (can be swapped with almond flour for a grain-free version)
- 1/2 cup Cashew or almond butter (sunflower butter works for a nut-free option)
- 1/4 cup Honey or maple syrup (maple syrup makes it vegan-friendly)
- 1 teaspoon Vanilla extract
- 1/2 teaspoon Almond extract
- 1/2 cup Rainbow sprinkles (choose naturally colored or vegan sprinkles if needed)
- 1 pinch Salt
- 3–4 tablespoons Milk of choice (any plant or dairy milk works)
Instructions
1. In a large bowl, combine the vanilla protein powder, oat flour, and salt. Whisk until smooth and lump-free.
2. Mix in the cashew or almond butter, honey or maple syrup, vanilla extract, and almond extract. Stir until a thick dough forms.
3. Pour in milk a tablespoon at a time, mixing, until the dough is soft and rollable, tacky, but not sticky.
4. Gently stir in rainbow sprinkles, being careful not to overmix so the colors stay vibrant.
5. Scoop about 1 tablespoon of dough and roll between your hands to form balls. Set on a parchment-lined plate.
6. Place the plate in the refrigerator for at least 30 minutes to firm up the texture.
7. Enjoy as a snack, share, or pack for later, no fork needed!
Notes
For best texture, chill before serving. You can freeze half for convenient grab-and-go snacks. Customize flavors with mini white chocolate chips or coconut flakes.
- Prep Time: 10 minutes
- Cook Time: 0 minutes
- Category: Dessert, Snack
- Method: No-bake
- Cuisine: American
Nutrition
- Serving Size: 1 ball
- Calories: 120
- Sugar: 5g
- Sodium: 50mg
- Fat: 4g
- Saturated Fat: 1g
- Trans Fat: 0g
- Carbohydrates: 18g
- Fiber: 2g
- Protein: 6g
")