
Crispy Chinese Takeout Sesame Chicken is one of those dishes that makes your whole kitchen smell like magic. It’s the kind of dinner that feels like a Friday night treat, even if you’re making it on a Tuesday in your PJs. This homemade version is everything you love about your favorite Chinese takeout: crispy on the outside, juicy inside, and drenched in a sweet-savory sesame glaze that clings to every bite.
Whether you’re juggling work emails with one hand and flipping chicken with the other or trying to impress your picky eater who “doesn’t like anything with sauce,” this recipe hits the sweet spot. Bonus? It’s make-ahead friendly, freezer safe, and customizable. So yes—you can absolutely double it and stash a batch for one of “those” nights. It’s easy, satisfying, and ridiculously delicious, making Crispy Chinese Takeout Sesame Chicken a dinner worth repeating.
Table of Contents
What is Crispy Chinese Takeout Sesame Chicken?
Crispy Chinese Takeout Sesame Chicken is that golden, saucy, slightly sticky dish you’ve probably ordered too many times to count—but made even better in your own kitchen. It starts with tender chunks of chicken thigh, marinated just right, coated in a crispy cornstarch-flour blend, then fried to a perfect crunch. The secret weapon? That glossy sesame sauce that’s a little sweet, a little tangy, with just a whisper of ginger warmth. Think of it like General Tso’s more balanced cousin—less heat, more honey.
What makes it “takeout-style” is the deep-fried texture and bold sauce that instantly transports you to your favorite Chinese restaurant. But the homemade version is fresher, cleaner, and honestly, even more flavorful. Plus, you get to control everything—from the sodium to the spice. Whether you’re cooking for the whole family or just treating yourself, this dish makes every meal feel special without needing to leave your kitchen.
Reasons to Try Crispy Chinese Takeout Sesame Chicken
First, let’s state the obvious: Crispy Chinese Takeout Sesame Chicken tastes amazing. But beyond the flavor bomb, there are some practical, real-life reasons this dish deserves a spot in your dinner rotation. For one, it’s faster than waiting on delivery (yes, seriously—about 50 minutes total), and you don’t have to guess what’s hiding in the sauce. Secondly, it’s super forgiving. Forgot to marinate for 30 minutes? Ten will still do the trick. Out of fresh ginger? Ground works in a pinch.
Third, it’s make-ahead and freezer-friendly, which is a godsend for those of us who like to cook once and eat twice. And let’s not forget how kid-friendly this is—crispy + sweet = instant winner with little ones. Want to keep things light? Serve it over cauliflower rice or steamed broccoli. Feeling indulgent? Pile it on sticky white rice and don’t look back. Basically, this dish adapts to your vibe.
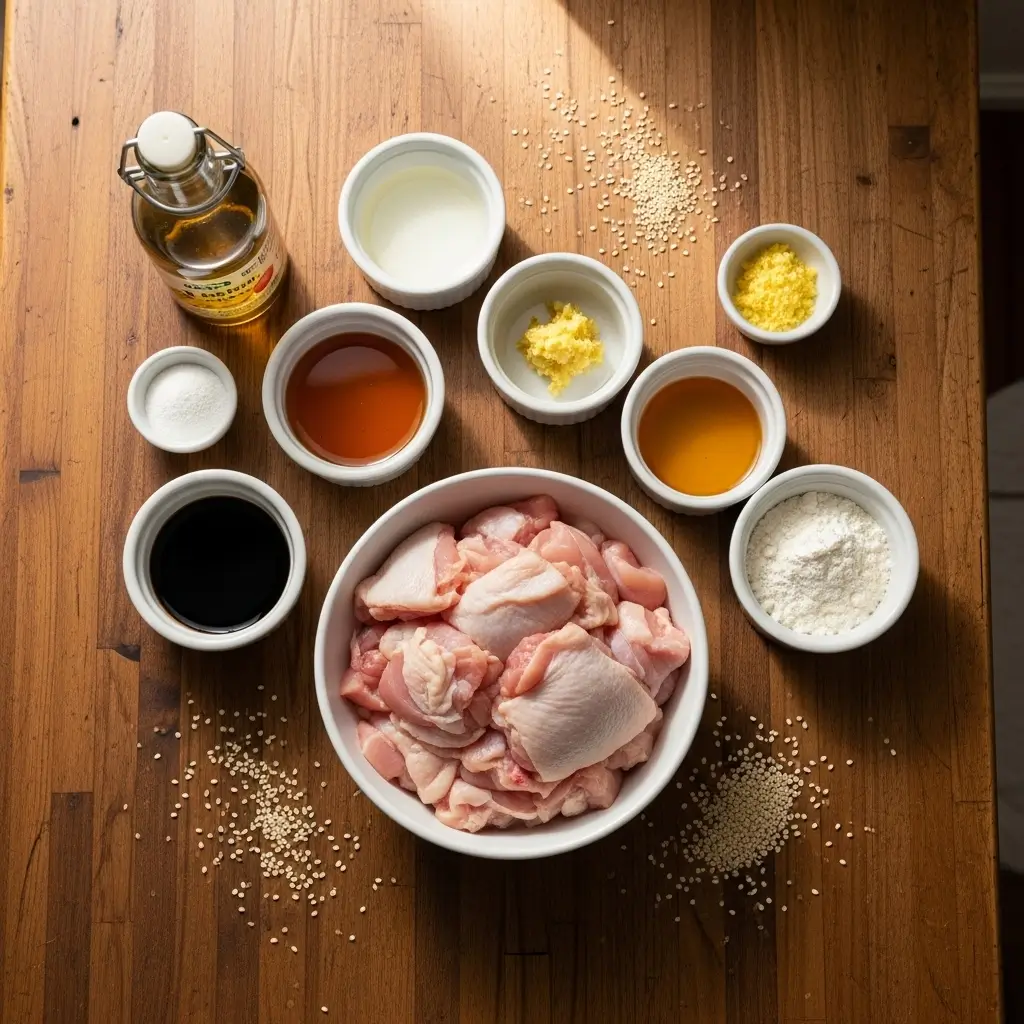
Ingredients Needed to Make Crispy Chinese Takeout Sesame Chicken
- 1½ pounds boneless, skinless chicken thighs, cut into 1‑inch pieces
- 2 cups vegetable oil (for shallow frying)
- ¼ cup low‑sodium soy sauce
- 2 tablespoons rice vinegar
- 1 tablespoon honey
- 1 teaspoon freshly grated ginger
- ¼ cup cornstarch
- ¼ cup all‑purpose flour
- ½ teaspoon baking soda (optional, for extra fluff)
- 3 tablespoons soy sauce
- 2 tablespoons honey
- 1 tablespoon rice vinegar
- 1 teaspoon toasted sesame oil
- ¼ cup water
- 1 tablespoon cornstarch mixed with 2 tablespoons cold water (slurry)
- Toasted sesame seeds, scallions, and red pepper flakes (for garnish)
Instructions to Make Crispy Chinese Takeout Sesame Chicken
Making Crispy Chinese Takeout Sesame Chicken at home might sound like a culinary feat, but trust me—it’s easier than you think. We’re walking through each part step by step so that even if you’re short on time, energy, or kitchen confidence, you’ll still end up with a mouthwatering plate of crispy, saucy perfection. This guide covers everything from prep to plate with clear details, and I’ve included some helpful links along the way in case you need ingredient swaps or more prep tips. Let’s dive into the deliciousness!
Step 1: Marinate the Chicken
Start by placing your chicken thighs (cut into 1-inch pieces) in a large bowl. Add ¼ cup of low-sodium soy sauce, 2 tablespoons of rice vinegar, 1 tablespoon of honey, and 1 teaspoon of freshly grated ginger. Give everything a good toss so the chicken is evenly coated. Let it marinate for at least 10 minutes at room temperature—just enough time to let the flavors sink in.
Want to boost flavor or prepping earlier? You can marinate this chicken up to 24 hours in the fridge. If you’re using chicken breasts instead, be careful not to over-marinate—they can turn rubbery. Check out this guide to chicken marinade timing for more details.
Pro Tip: If your family doesn’t love ginger, reduce it by half or substitute with a pinch of ground ginger. Want it spicy? Add a splash of chili garlic sauce here to build heat early on.
Step 2: Coat the Chicken (for Ultimate Crispiness)
In a separate bowl, mix ¼ cup cornstarch, ¼ cup all-purpose flour, and ½ teaspoon of baking soda (optional but gives a fluffier texture). This step-by-step coating process is what makes your chicken extra crispy and golden—just like your favorite takeout.
Drain the chicken slightly before tossing it into the flour mixture. Work in small batches, making sure each piece is evenly coated. You want the batter to cling to the chicken, but not be gummy or thick.
Looking for a gluten-free option? Try swapping the all-purpose flour with rice flour or a gluten-free flour blend. More on that in our ingredient substitution guide.
Step 3: Fry the Chicken
Heat about 2 cups of vegetable oil in a deep skillet or wok over medium heat. You’ll know it’s ready when a tiny piece of flour dropped in sizzles immediately. Working in batches (don’t overcrowd the pan), fry the coated chicken pieces for about 5–6 minutes, flipping once, until golden brown and crisp on all sides.
Drain the cooked chicken on a paper towel-lined plate or wire rack. This keeps everything crispy while you fry the next batch. Want less mess? Try shallow frying in a cast iron skillet—it holds heat beautifully and is great for consistent browning.
Short on oil or calories? You can also air fry or oven-bake your chicken—just know it won’t be as crispy. But it’s still super satisfying. You can explore these lighter cooking methods in my Crispy Baked Ranch Chicken Wings recipe.
Step 4: Make the Sesame Sauce
While your chicken is cooling, it’s time to whip up that magical sesame sauce. In a small saucepan over medium heat, combine:
- 3 tablespoons soy sauce
- 2 tablespoons honey
- 1 tablespoon rice vinegar
- 1 teaspoon toasted sesame oil
- ¼ cup water
Whisk everything together and bring it to a gentle simmer. Once it’s bubbling, stir in your cornstarch slurry (1 tablespoon cornstarch mixed with 2 tablespoons cold water). This is a crucial step—don’t skip it! The slurry thickens your sauce into that classic glossy texture you know and love.
Stir constantly for 2–3 minutes, until the sauce thickens and clings to your spoon. If it gets too thick, just add a tablespoon of water at a time to loosen it up.
Want to make this a little sweet & spicy? Add a dash of red pepper flakes or sriracha. Or go fully sweet-savory with a splash of hoisin. For more sauce customization ideas, check out my Sweet and Spicy Thai Chicken recipe—it’s loaded with flavor tips.
Step 5: Toss Everything Together
Now comes the best part! Add your crispy chicken pieces to a large mixing bowl. Pour the hot sesame sauce over the chicken and gently toss until every piece is coated in that rich, sticky glaze.
Use a rubber spatula or tongs to make sure you get full, even coverage without breaking the crispy coating. This step by step sauce-tossing process might seem simple, but it’s what transforms your chicken into the takeout-style version you’re craving.
Finish with a sprinkle of toasted sesame seeds, sliced scallions, and (if you’re into it) a dash of red pepper flakes for that restaurant-style touch.
What to Serve with Crispy Chinese Takeout Sesame Chicken
This dish begs for something to soak up all that saucy goodness. Fluffy jasmine rice is the classic go-to, but don’t sleep on garlic noodles or even cauliflower rice if you’re keeping things lighter. A quick veggie side like steamed broccoli, snow peas, or a crisp Asian cucumber salad adds freshness and crunch. For a fuller meal, pair it with a warming bowl of Ginger Garlic Chicken Noodle Soup or these Garlic Sesame Noodles for double the flavor. It also works beautifully in a bowl setup—rice on the bottom, sesame chicken, quick pickled carrots, and a drizzle of sriracha mayo. Easy to build, hard to mess up.
Key Tips for Making Crispy Chinese Takeout Sesame Chicken
First, use chicken thighs—they stay juicier than breasts and stand up better to frying. Don’t skip the cornstarch-flour combo—it’s what gives you that signature crispy-crunchy shell. Fry in batches so you don’t steam your chicken, and use a wire rack or paper towels to drain excess oil. For the sauce, don’t walk away—stirring constantly helps avoid clumps once the slurry goes in. Want it spicier? Add chili garlic sauce or red pepper flakes to the sauce base. You can double the recipe easily (and trust me, people will ask you to). And if you’re meal-prepping, cook the chicken and sauce separately, then combine when reheating for the best texture.
Storage and Reheating Tips Crispy Chinese Takeout Sesame Chicken
Leftovers? Lucky you. Store any extra Crispy Chinese Takeout Sesame Chicken in an airtight container in the fridge for up to 4 days. For longer storage, freeze it in a single layer, then transfer to a freezer bag—it’ll keep for up to 3 months. To reheat, skip the microwave if possible—it makes the coating soggy. Instead, pop it in a 375°F oven or air fryer for about 8–10 minutes to bring back that crispy texture. If the sauce thickens too much in the fridge, add a splash of water while reheating to loosen it up.
FAQs
Can I use chicken breast instead of thighs?
Totally! Thighs stay juicier, but if you prefer breast, just be careful not to overcook it.
Can I bake instead of fry?
You can! It won’t be quite as crispy, but baking at 425°F with a light spray of oil on a wire rack works surprisingly well.
Is this dish gluten-free?
With tamari instead of soy sauce and gluten-free flour, yes! Just double-check all your labels.
Can I make this ahead?
Absolutely. Prep and fry the chicken, then freeze. Reheat and toss with fresh sauce when ready to eat.
Final Thoughts
Crispy Chinese Takeout Sesame Chicken is that comfort food unicorn—crispy, saucy, sweet, and savory—all in one bite. Whether you’re feeding a crowd, meal prepping, or just craving something wildly satisfying, this dish is a keeper. It brings the takeout magic to your own kitchen, without the wait, and honestly, without the mystery. And hey, if you’re already in the dinner groove, why not check out this crowd-pleasing Hibachi Chicken or my cozy Sweet and Spicy Thai Chicken? There’s a whole world of flavor waiting for you at First Tasting.
Visit our Pinterest for regular slow cooker recipe updates, or join our Facebook discussions where cooking fans exchange their favorite hearty meal ideas.
Print
Crispy Chinese Takeout Sesame Chicken Recipe (Quick & Easy)
- Total Time: 50 min
- Yield: 4 servings 1x
Description
Crispy Chinese Takeout Sesame Chicken is a sweet, tangy, and savory dish featuring golden-fried chicken tossed in a sticky sesame sauce — just like your favorite takeout, but made at home.
Ingredients
- 1½ pounds boneless, skinless chicken thighs, cut into 1‑inch pieces
- 2 cups vegetable oil (for shallow frying)
- ¼ cup low‑sodium soy sauce
- 2 tablespoons rice vinegar
- 1 tablespoon honey
- 1 teaspoon freshly grated ginger
- ¼ cup cornstarch
- ¼ cup all‑purpose flour
- ½ teaspoon baking soda (optional, for extra fluff)
- 3 tablespoons soy sauce
- 2 tablespoons honey
- 1 tablespoon rice vinegar
- 1 teaspoon toasted sesame oil
- ¼ cup water
- 1 tablespoon cornstarch mixed with 2 tablespoons cold water (slurry)
Instructions
1. In a large bowl, combine the chicken pieces with soy sauce, rice vinegar, honey, and grated ginger. Toss to coat evenly and let it marinate for at least 10 minutes at room temperature. While it marinates, prepare the coating and sauce.
2. In a mixing bowl, whisk together cornstarch, flour, and baking soda. Dredge each piece of marinated chicken in the mixture, pressing to adhere. Heat vegetable oil in a deep skillet over medium-high heat. Fry the chicken in batches until golden and crispy, about 4–5 minutes per batch. Drain on paper towels.
3. In a saucepan over medium heat, whisk together soy sauce, honey, rice vinegar, toasted sesame oil, and water. Bring to a gentle simmer, then stir in the cornstarch slurry. Cook for 2–3 minutes, stirring constantly, until the sauce thickens and becomes glossy.
4. Return the fried chicken to a large mixing bowl. Pour the hot sesame sauce over the pieces and toss gently until each morsel is fully coated. Sprinkle toasted sesame seeds, sliced scallions, and red-pepper flakes if desired. Serve hot with steamed rice.
Notes
This dish is great for meal prep — the fried chicken can be frozen (before saucing) for up to 3 months. Reheat in the oven or air fryer for best texture. Double the sauce if you prefer extra coating or plan to serve with rice or noodles. Adjust the honey and vinegar to suit your taste preference.
- Prep Time: 20 min
- Cook Time: 30 min
- Category: Chicken Recipes
- Method: Frying
- Cuisine: International
Nutrition
- Serving Size: 1 plate
- Calories: 520
- Sugar: 15g
- Sodium: 680mg
- Fat: 28g
- Saturated Fat: 5g
- Unsaturated Fat: 20g
- Trans Fat: 0g
- Carbohydrates: 35g
- Fiber: 1g
- Protein: 32g
- Cholesterol: 110mg
")