Viral Pine Cone Brownies are taking the internet by storm—and for good reason. They’re irresistibly cute, wildly festive, and surprisingly easy to make (yes, even if your last “Pinterest attempt” turned into a chocolate landslide). With the primary keyword “Viral Pine Cone Brownies” leading the way, let’s dig into why these crunchy, gooey, snow-dusted bites are about to become your new holiday favorite.
Whether you’re baking for a cookie exchange, crafting a fun afternoon with the kids, or just need a dessert that makes everyone go “awww,” this one’s a keeper. And here’s the best part: you can use a simple boxed mix to get things started. Want more reasons to love it? It’s gluten-free, dairy-free, egg-free, and refined sugar-free—without sacrificing any of that chocolatey joy.
Table of Contents
What Are Viral Pine Cone Brownies?
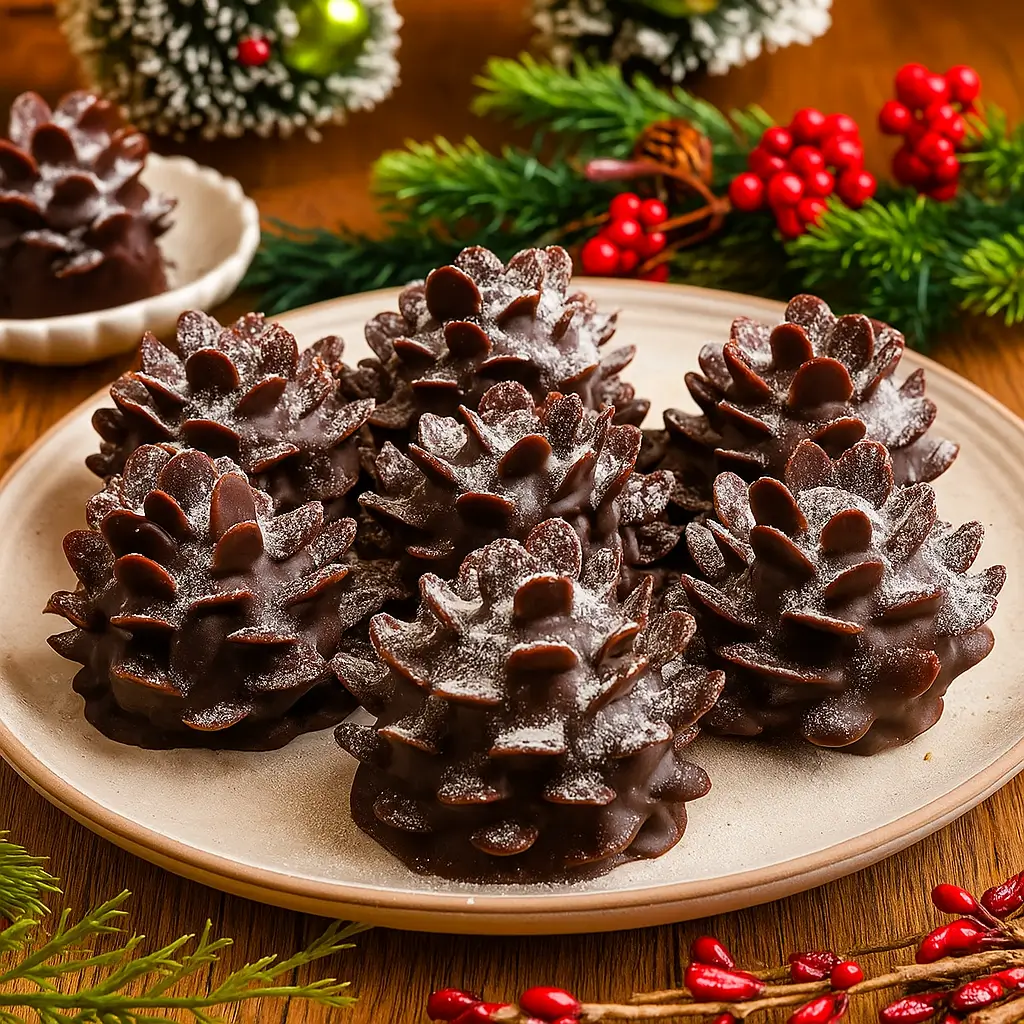
So, what exactly are Viral Pine Cone Brownies? Think: rich, fudgy brownie bites molded into the shape of a pine cone, then dressed up with almond slices or cereal flakes to look like little woodland treasures. It’s like your classic brownie decided to get dressed up for a winter gala.
These sweet treats first started buzzing on TikTok and Pinterest because they look super fancy—but here’s the kicker: they’re really just a mix of brownies, melted chocolate, and some strategic nut placement. You don’t need to be a pastry chef or own a piping bag. If you can roll a meatball and sprinkle powdered sugar, you’re golden. Plus, they freeze well and double as edible table décor. I mean, come on. How often does your dessert also make your table look like Martha Stewart showed up?
Reasons to Try Viral Pine Cone Brownies
First of all, they’re ridiculously fun to make. If you’ve got little hands around, this is a great way to keep them busy (and sneak a little kitchen bonding in before they run off to rewatch Frozen for the 47th time). Second, Viral Pine Cone Brownies work for nearly every diet—gluten-free, dairy-free, egg-free, refined sugar-free—you name it.
Third, they’re freezer-friendly, make-ahead friendly, and guaranteed to get oohs and ahhs at any potluck or holiday party. And did I mention you don’t even have to make brownies from scratch? Grab a box of your favorite clean brownie mix (Simple Mills is a fave in our house), and you’re off to the races. They’re also a sweet, low-stress alternative to cutout cookies, which—let’s be honest—often require more patience than most of us have between holiday shopping and work emails.
Ingredients Needed to Make Viral Pine Cone Brownies
- 1 gluten-free or grain-free boxed brownie mix (plus required ingredients)
- 1 cup sliced almonds (or sub cereal flakes)
- 9 oz chocolate chips (semi-sweet or dark preferred)
- 1 tsp coconut oil
- Powdered sugar or powdered monk fruit (for dusting)

Instructions to Make Viral Pine Cone Brownies
Making Viral Pine Cone Brownies might look like a Pinterest-level challenge, but follow this step-by-step guide and you’ll be surprised how fun and doable it is—even for beginners. From mixing to decorating, every part of this process is meant to be easy, enjoyable, and impressively festive. Here’s your full step-by-step breakdown to help you create these adorable treats with confidence.
Step 1: Bake Your Brownie Base (Step by Step)
Start by preparing your brownie mix. For this recipe, we recommend a gluten-free or grain-free boxed brownie mix like Simple Mills for a clean-eating option, but any brand you love will do. Follow the instructions on the box to mix your batter—usually just requiring water, oil, and an egg substitute if you’re avoiding eggs.
Now here’s the trick: don’t overbake. Pull the brownies from the oven when they’re just set in the center and still a little gooey. This makes them easier to shape later. Aim for baking them in an 8×8 dish at the time and temperature listed on your mix. Once baked, allow them to cool for just about 10 minutes. If you let them cool completely, they’ll harden and become difficult to mold.
For tips on avoiding common baking mishaps, check out our Soft Baked Apple Cinnamon Rolls for more advice on achieving the perfect texture.
Step 2: Shape Into Cone Forms (Step by Step)
Once your brownies are cool enough to handle but still soft, use a spoon or your hands to scoop out portions of the brownie. Then, shape each one into a cone shape, similar to a small pine cone or cake pop. You should get about 12 cones from one batch. Damp hands help reduce sticking, and don’t worry if it’s not perfect—rustic is part of the charm!
If your brownies are falling apart while shaping, that’s your cue to mix in a spoonful of chocolate frosting or dairy-free cream cheese to help bind everything. This is especially helpful if you’re using a drier mix or baking at high altitude.
Step 3: Add Almond “Scales” (Step by Step)
Here’s where the pine cone magic happens. Take sliced almonds or cereal flakes and gently press them into the cone-shaped brownies. Start from the bottom and layer upward in rows, mimicking the scale pattern of a pine cone. Be gentle—your cones will be delicate at this point. If one breaks, don’t panic. Just press it back together and keep going.
Want a nut-free version? Cornflakes or bran flakes work wonderfully. You can explore more ingredient swaps and allergy-friendly tips in our Easy Stuffed Bell Peppers, which includes family-friendly and flexible substitutions.
Step 4: Freeze to Set the Shape (Step by Step)
Place your decorated pine cones on a parchment-lined baking sheet and stick them in the freezer for about 30 minutes. This step is essential to help the cones firm up so they don’t fall apart during chocolate coating.
Don’t skip this part! Freezing also makes the next step—coating them in melted chocolate—a breeze.
Step 5: Melt and Prepare the Chocolate Coating (Step by Step)
While the pine cones are chilling, melt your chocolate chips and coconut oil. Place the chocolate and oil in a microwave-safe bowl and heat in 30-second intervals, stirring in between, until smooth and pourable.
If the mixture feels too thick, stir in a bit more coconut oil until you get a silky consistency that’s easy to coat with. Using semi-sweet or dark chocolate works best because it sets firmer and pairs beautifully with the almond flavor.
Want to try other recipes that use healthy chocolate alternatives? Browse our Pecan Pie Brownie Bombs for more inspo.
Step 6: Coat the Pine Cones in Chocolate (Step by Step)
Take your frozen pine cones out of the freezer and carefully spoon or brush the melted chocolate over each one, making sure to get in between the almond slices. You can also dip them halfway if you prefer a “dipped in snow” look.
Place each finished cone back on the parchment paper to cool and set. If your kitchen is warm or you’re short on time, pop them back in the fridge to speed things up.
Step 7: Dust with Powdered Sugar for a Snowy Finish (Step by Step)
Once the chocolate has set, it’s time for the final festive touch. Lightly dust each pine cone with powdered sugar or powdered monk fruit to give it that snowy, wintry vibe. This step instantly transforms your brownies from “fun treat” to “holiday showstopper.”
For a softer snowfall look, use a small sifter or fine mesh strainer to distribute the sugar evenly. It also makes cleanup easier and avoids clumps.
What to Serve with Viral Pine Cone Brownies
These are begging for a cozy companion. Serve Viral Pine Cone Brownies with hot cocoa, peppermint lattes, or mulled cider. They also pair beautifully with a festive fruit platter or a lighter dessert like Christmas Salmon with Pomegranate Glaze if you’re planning a full holiday spread. They add charm to cookie trays and look downright magical next to a holiday charcuterie board. Bonus: they double as edible place settings—just nestle one next to a napkin with a name tag. Who needs boring name cards when you’ve got chocolate pine cones?
Key Tips for Making Viral Pine Cone Brownies
- Don’t overbake the brownies—underdone is your friend here.
- Work gently when shaping the cones; the brownies will be fragile.
- If the brownie mix crumbles, mix in a spoonful of frosting or melted chocolate to bind.
- Use gloves or damp hands when shaping to avoid a sticky mess.
- Almond slices look beautiful, but cereal flakes (like cornflakes) work too if you need a nut-free option.
- Add more coconut oil to thin out your melted chocolate if needed.
Storage and Reheating Tips for Viral Pine Cone Brownies
Store your Viral Pine Cone Brownies in an airtight container in the fridge for up to 5 days. They also freeze like a dream—just separate layers with parchment paper to avoid almond casualties. To enjoy again, let them thaw at room temp for about 15–20 minutes. No reheating needed. These aren’t lava cakes—they’re more like chocolate sculptures you get to eat. And trust me, no one’s complaining about a cold brownie with a snowy chocolate shell.
FAQs
Can I make these nut-free? Yep! Swap sliced almonds for cereal flakes like cornflakes or bran flakes.
What if my brownie cones fall apart? Mix in a little frosting (store-bought or homemade) to help them bind better.
Do I have to coat them in chocolate? No, but it does help them hold their shape—and adds more chocolate. So… yes.
Can I make these ahead? Totally. Make and freeze them up to a week ahead. Dust with powdered sugar right before serving.
Is there a shortcut version? Yes! Use store-bought brownie bites and reshape them. No shame in that game.
Final Thoughts
Whether you’re a holiday hosting pro or just trying to survive until the school break, Viral Pine Cone Brownies are the kind of treat that makes everyone smile. They’re festive, allergy-friendly, and deceptively simple—which is my favorite kind of dessert. Try them once and you’ll be adding them to your must-make list every December. And if you’re already planning your next baking day, don’t miss our Pumpkin Spice French Toast Casserole or Cranberry and Spinach Stuffed Chicken Breasts for the perfect holiday dinner follow-up.
Visit our Pinterest for regular slow cooker recipe updates, or join our Facebook discussions where cooking fans exchange their favorite hearty meal ideas.
Print
Viral Pine Cone Brownies: The Cutest Holiday Dessert
- Total Time: 3 hours
- Yield: 10 1x
Description
These Pine Cone Brownies are an adorable, festive treat perfect for the holidays. Easy to make using boxed brownie mix and allergy-friendly ingredients, they’re fun for both kids and adults to create and enjoy.
Ingredients
- 1 GF/Grain free boxed brownie mix and whatever ingredients it requires (Simple Mills recommended)
- 1 cup sliced almonds (can substitute with cereal flakes)
- 9 oz chocolate chips
- 1 tsp coconut oil
- Powdered Sugar or Powdered Monk fruit
Instructions
1. Make your brownie mix according to the instructions on the box. Do not overbake – you want the brownies slightly gooey in the middle for easier shaping. Let them cool for about 10 minutes.
2. Take the warm brownies and form them into about 12 cone shapes, similar to cake pops.
3. Carefully insert almond slices or cereal flakes around each cone to mimic pine cone scales. The cones are delicate, so handle gently.
4. Place the completed cones onto a parchment-lined baking sheet and freeze for 30 minutes.
5. Melt chocolate chips with coconut oil in the microwave in 30-second increments or use a double boiler.
6. Remove cones from freezer and gently coat each one with the melted chocolate. Place back onto the parchment paper to set.
7. Dust with powdered sugar for a snowy pine cone effect and serve.
Notes
Every brownie mix behaves differently. Simple Mills is a recommended brand for consistent results.
If the melted chocolate is too thick to coat the cones, add a bit more coconut oil to thin it out.
For a more cohesive brownie texture, especially if it’s crumbly, add a bit of chocolate or cream cheese frosting to help bind the mixture.
Semi-sweet or dark chocolate works better than milk chocolate for flavor and texture.
- Prep Time: 1 hour 15 minutes
- Cook Time: 20 minutes
- Category: Baked Goods, Dessert
- Method: No-bake, Freeze, Bake
- Cuisine: American
Nutrition
- Serving Size: 1 pine cone brownie
- Calories: 180
- Sugar: 8g
- Sodium: 60mg
- Fat: 12g
- Saturated Fat: 5g
- Unsaturated Fat: 6g
- Trans Fat: 0g
- Carbohydrates: 18g
- Fiber: 2g
- Protein: 3g
- Cholesterol: 0mg
")