Lucky Green St. Patrick’s Day Cookies are the kind of whimsical, sugary delight that makes your kitchen feel like the end of a rainbow—minus the leprechaun mischief (hopefully). With a gooey center, crinkled sugar shell, and vibrant green color, these cookies are practically screaming, “It’s party time, lads and lasses!” Whether you’re baking with your little ones or need a quick crowd-pleaser for the office potluck, this recipe is fun, fast, and full of festive cheer.
Bonus? No fancy baking skills required. Just a box of cake mix, a little green food coloring, and a sense of humor if the powdered sugar explodes all over your shirt (it will). Lucky Green St. Patrick’s Day Cookies bring back those nostalgic “holiday baking with mom” vibes, but without the hours of prep. Let’s just say, these cookies are a lucky charm all on their own.
Table of Contents
What are Lucky Green St. Patrick’s Day Cookies?
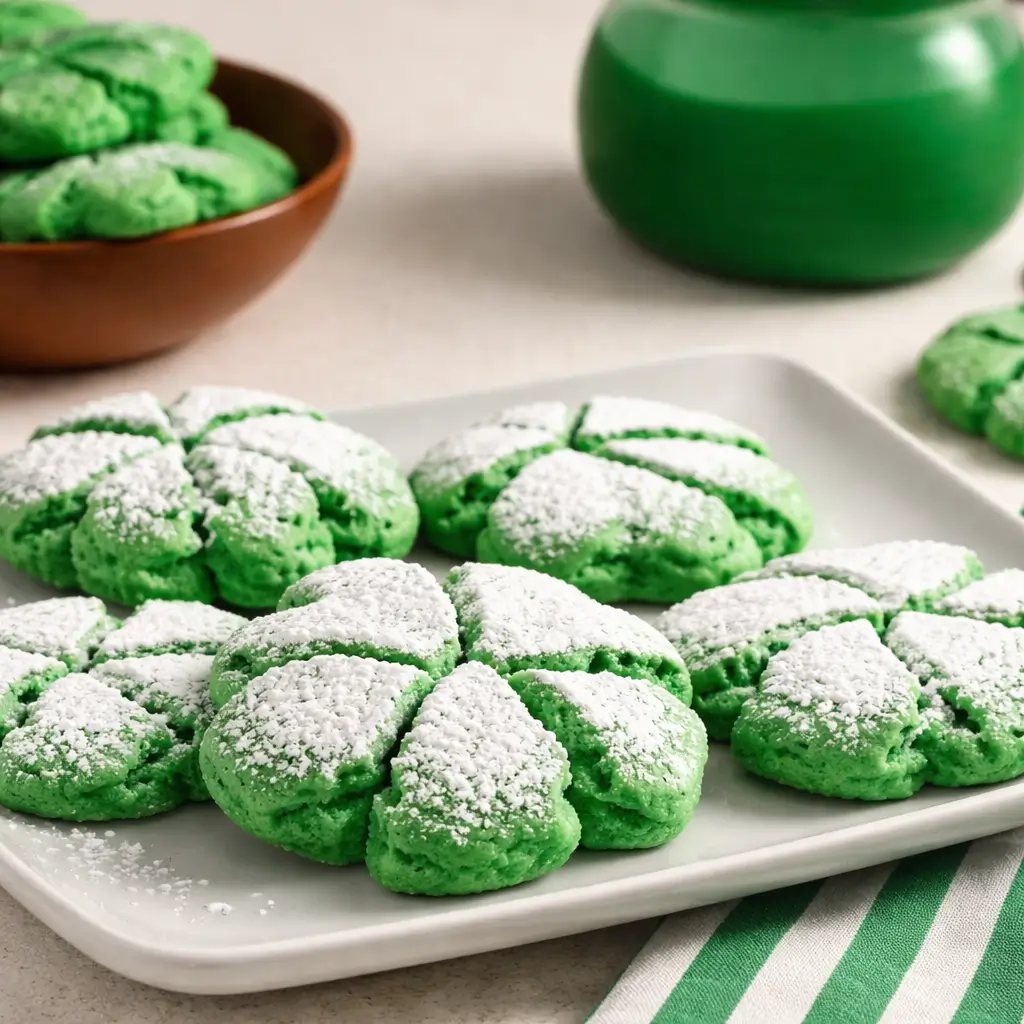
Lucky Green St. Patrick’s Day Cookies are cheerful, cake mix-based crinkle cookies tinted with Kelly green gel food coloring and rolled in not one, but two layers of sugar—first granulated, then powdered. This double-coating creates that beautiful crinkle effect that practically begs for a photo before someone devours them.
They’re soft in the middle, slightly crisp on the edges, and taste like the lovechild of a sugar cookie and a vanilla cake. What sets these cookies apart (aside from their leprechaun-approved color) is how easy they are to make. No creaming butter. No chilling for hours. Just mix, chill briefly, roll in sugar, and bake. They’re ideal for anyone who wants something festive but doesn’t have time to become a pastry chef overnight. Plus, they pair well with hot cocoa, Irish coffee, or a tall glass of milk—green, if you’re feeling bold.
Reasons to Try Lucky Green St. Patrick’s Day Cookies
Let’s be real—Lucky Green St. Patrick’s Day Cookies are a vibe. First off, they’re so dang easy, you could whip them up while binge-watching your favorite rom-com. The cake mix shortcut means no need for a pantry full of ingredients or a degree from the Culinary Institute. Just stir, chill, roll, and bake. Second, the green color adds instant joy to any holiday table. Kids love them.
Grown-ups sneak them. Your picky neighbor might even ask for the recipe (yes, the one who never smiles). They’re festive without being fussy, which is basically the dream, right? And if you’ve got little helpers in the kitchen, this is the perfect “hands-on” project without the chaos of rolling out dough or using cookie cutters shaped like shamrocks. Basically, if you want something festive, fast, and undeniably fun, these cookies are your golden ticket.
Ingredients Needed to Make Lucky Green St. Patrick’s Day Cookies
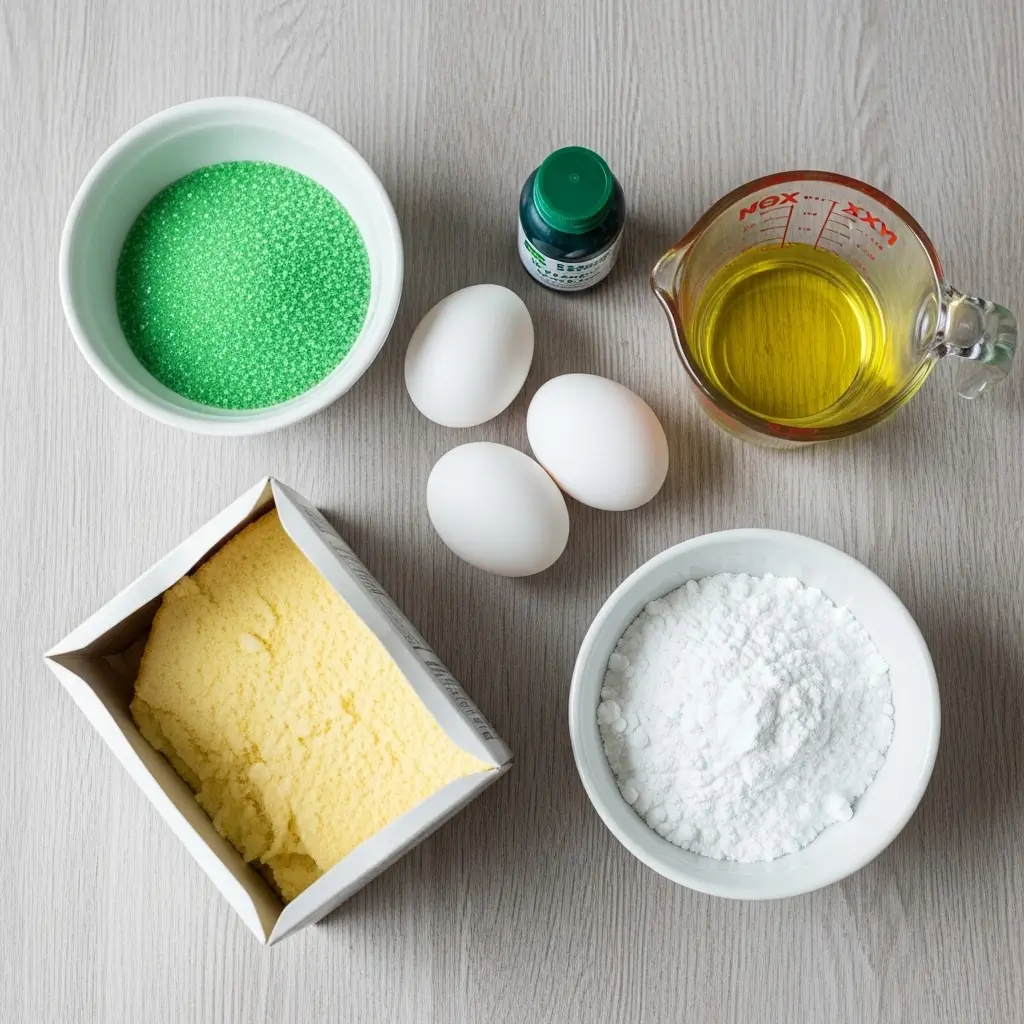
- 1 box (15.25 oz) white cake mix
- 2 large eggs
- ⅓ cup vegetable oil
- ¼ teaspoon Kelly green gel food coloring
- 3 tablespoons granulated sugar
- 6 tablespoons powdered sugar
That’s it. Simple, budget-friendly, and likely stuff you already have—except maybe the green food coloring, but hey, it’s a small price for cookie magic.
Instructions to Make Lucky Green St. Patrick’s Day Cookies
Ready to whip up a batch of deliciously festive cookies? Follow this step-by-step guide to make Lucky Green St. Patrick’s Day Cookies that are soft, chewy, and absolutely stunning. Each part of the process is broken down so even beginner bakers (or distracted moms multitasking dinner) can confidently bake these show-stoppers. Grab your apron and let’s roll—literally.
Step 1: Mix the Dough
Start your step-by-step cookie adventure by grabbing a large mixing bowl. Pour in the entire box of white cake mix—this is the secret shortcut that gives these cookies their soft, cake-like texture. Add two large eggs and ⅓ cup of vegetable oil right into the bowl.
Using a sturdy wooden spoon or a hand mixer, stir the mixture until it turns into a thick, sticky dough. This will take about 1–2 minutes of mixing. It should look glossy and come together like a soft playdough. Now, for the fun part—add ¼ teaspoon of Kelly green gel food coloring. Stir well to evenly distribute the color throughout the dough. You want a bold, vibrant green that screams “St. Patrick’s Day” and not “sad salad.” If it’s not quite bright enough, add a tiny bit more gel and keep mixing.
Need help finding the right food coloring or wondering if you can use liquid dye instead? Check out our ingredient substitution tips for quick kitchen fixes without compromising flavor or texture.
Step 2: Chill the Dough
Once your dough is evenly colored and mixed, cover the bowl with plastic wrap or a reusable silicone lid and pop it into the fridge. Let it chill for 30 minutes. This isn’t just a formality—it’s a crucial step-by-step baking tip that prevents your cookies from spreading too much and losing their shape in the oven.
While the dough is chilling, take this moment to clean up your counter or sneak in a little prep for dinner. Need something cozy and comforting? Check out our crowd-pleasing Easy Creamy Chicken Pot Pie—it pairs well with cookies for dessert.
Step 3: Preheat and Prep Your Coating Bowls
About 10 minutes before the dough is done chilling, go ahead and preheat your oven to 350°F (175°C). Line a baking sheet with parchment paper or a silicone baking mat for easy cleanup.
Now set up your sugar stations:
- In one small bowl, add 3 tablespoons of granulated sugar
- In a second small bowl, add 6 tablespoons of powdered sugar
These two coatings are what give the cookies their signature crinkle look. The granulated sugar helps dry the outside slightly so the powdered sugar sticks beautifully and doesn’t melt into the dough.
Want more cookie coating ideas? You might love our Valentine Day Swirl Cookies—they use colorful sprinkles for a festive twist!
Step 4: Scoop and Roll
Time to get your hands in the dough (or use a cookie scoop if you prefer minimal mess). Scoop out tablespoon-sized portions of chilled dough and gently roll them into balls.
Here’s the step-by-step sugar coating technique:
- First, roll each dough ball in the granulated sugar, coating all sides.
- Then, drop it into the powdered sugar bowl and roll until completely covered. It should look like a little green snowball.
Place each sugar-coated dough ball on your prepared baking sheet, spacing them about 2 inches apart. This gives them room to spread and develop that gorgeous crackled look.
Step 5: Bake to Perfection
Slide your cookie tray into the preheated oven and bake for 9 to 12 minutes. The cookies should be just set around the edges but still look slightly underbaked in the center—that’s the sweet spot for soft, chewy cookies.
Keep an eye on them during the last minute. You’re not looking for browning here. The tops should look crinkled and puffed, not glossy.
If you’re curious about how to adjust baking times or troubleshoot underbaking, explore our holiday baking tips for more helpful insights.
Step 6: Cool and Set
After baking, leave the cookies on the baking sheet for 5 minutes. This allows them to firm up and finish baking gently from the residual heat.
Then, use a spatula to transfer them to a wire cooling rack. Let them cool completely before serving or storing. Although, if one “accidentally” breaks apart and you need to taste test, we’re not judging.
What to Serve with Lucky Green St. Patrick’s Day Cookies
These cookies love to mingle. Serve them with Irish coffee for the adults, or green-tinted milk for the kiddos. A platter of these next to a warm Easy Creamy Chicken Pot Pie makes for a cozy holiday dinner followed by sweet celebration. They also make adorable gifts—just pop a few into a cellophane bag, tie with a green ribbon, and boom, you’re the festive fairy of the block. Want a cozy drink to go with them? Pair them with a warm mug of Cozy Cheeseburger Macaroni Soup for that sweet-meets-savory contrast.
Key Tips for Making Lucky Green St. Patrick’s Day Cookies
Chill the dough! It’s the secret to getting that nice crinkle without the cookie puddles. Use gel food coloring, not liquid, for that vibrant hue—liquid can mess with the texture. When rolling in sugar, be generous, especially with the powdered layer. The more, the better. If you’re feeling fancy, mix in white chocolate chips or a dash of lemon zest. It adds just enough flair without messing up the simplicity. Want to keep the cookies soft? Don’t overbake. Pull them out when the centers still look slightly doughy—they’ll finish baking on the sheet.
Storage and Reheating Tips Lucky Green St. Patrick’s Day Cookies
Store these green beauties in an airtight container at room temp for up to 5 days (but honestly, they won’t last that long). If you want to freeze them, stack them with parchment paper between layers and freeze in a zip-top bag. Reheat briefly in the microwave for that just-baked softness—about 8 seconds does the trick. They also freeze well as dough balls. Just roll in sugars before baking straight from frozen, adding 1-2 extra minutes to the bake time.
FAQs
Can I use a different cake mix? Yes! Yellow or vanilla cake mix works too, but white cake mix keeps the green color nice and bright.
Can I make them ahead? Totally. Make and freeze the dough balls, or bake a day ahead. They stay fresh if stored right.
Can I skip the food coloring? Sure, but then they’re just tasty vanilla cookies—not quite the holiday vibe we’re going for.
Final Thoughts
There’s just something magical about Lucky Green St. Patrick’s Day Cookies. Maybe it’s the vibrant green, or maybe it’s the fact that you can whip them up in under an hour with just a handful of ingredients. Either way, they’re a low-stress, high-reward recipe that brings festive joy to your kitchen. Whether you’re baking with toddlers or bribing your coworkers into liking you more, these cookies are the (lucky) charm you need. Want more easy holiday bakes? Check out our Valentine Day Swirl Cookies or keep exploring our dessert archive for even more festive ideas. Happy baking—and may the cookies be ever in your flavor!
Visit our Pinterest for regular slow cooker recipe updates, or join our Facebook discussions where cooking fans exchange their favorite hearty meal ideas.
Lucky Green St. Patrick’s Day Cookies That Are Pure Holiday Fun
- Total Time: 50 minutes
- Yield: About 24 cookies 1x
Description
These festive crinkle-style cookies bring a burst of color and a sweet taste of tradition to your St. Patrick’s Day celebrations. Soft, chewy, and coated in a crackled sugary finish, these cookies evoke memories of joyful family kitchens and holiday magic—perfect for baking with kids or sharing with friends.
Ingredients
- 1 box (15.25 oz) white cake mix
- 2 large eggs
- ⅓ cup vegetable oil
- ¼ teaspoon Kelly green gel food coloring
- 3 tablespoons granulated sugar
- 6 tablespoons powdered sugar
Instructions
1. In a large bowl, mix the cake mix, eggs, and vegetable oil until a sticky dough forms. Stir in the green food coloring until evenly distributed.
2. Cover the bowl and refrigerate the dough for 30 minutes to firm up and reduce spreading.
3. Preheat oven to 350°F (175°C) and line a baking sheet with parchment paper. Place granulated sugar in one bowl and powdered sugar in another.
4. Scoop tablespoon-sized balls of dough. Roll each first in granulated sugar, then in powdered sugar.
5. Place coated dough balls on prepared baking sheet, spacing about 2 inches apart.
6. Bake for 9–12 minutes until cookies are set and crinkled but still soft in the center.
7. Cool on the baking sheet for 5 minutes before transferring to a wire rack to cool completely.
Notes
The double sugar coating helps create the crackled look and adds a sweet texture.
Try adding white chocolate chips or lemon zest for a fun flavor twist.
Store in an airtight container at room temperature for up to 5 days or freeze for up to 3 months.
- Prep Time: 10 minutes (plus 30 minutes chill time)
- Cook Time: 12 minutes
- Category: Dessert, Cookies, Holiday Treats
- Method: Baking
- Cuisine: American
Nutrition
- Serving Size: 1 cookie
- Calories: 110
- Sugar: 10g
- Sodium: 95mg
- Fat: 5g
- Saturated Fat: 1g
- Unsaturated Fat: 3g
- Trans Fat: 0g
- Carbohydrates: 15g
- Fiber: 0g
- Protein: 1g
- Cholesterol: 15mg
")