
If the words Homemade Danish make you think of lazy weekend mornings, a hot cup of coffee, and the smell of butter drifting through your kitchen—well, you’re in good company. These flaky, golden pastries aren’t just for fancy bakeries; you can absolutely pull them off in your own kitchen. Trust me, I was once the mom who thought laminated dough sounded scarier than teaching teenagers to drive (spoiler: both are doable, with patience and snacks).
And here’s the good news—making a Danish from scratch is more approachable than it looks. With a little folding, chilling, and filling, you’ll have pastries that rival your favorite coffee shop, minus the price tag and long lines.
Table of Contents
Why You’ll Love This Homemade Danish Recipe
- Flaky, buttery layers that practically melt in your mouth.
- A creamy, lightly sweetened cheese center with a hint of vanilla.
- Customizable with fruit preserves, fresh berries, or even a sprinkle of almonds.
- A make-ahead friendly recipe—you can freeze and bake later!
What Does Homemade Danish Taste Like?
Think croissant meets cheesecake. The dough gives you that signature crisp and tender bite, while the cream cheese filling is smooth, tangy, and just sweet enough. Add a drizzle of vanilla glaze and you’ve got a pastry that tastes like it belongs in a little café in Copenhagen.
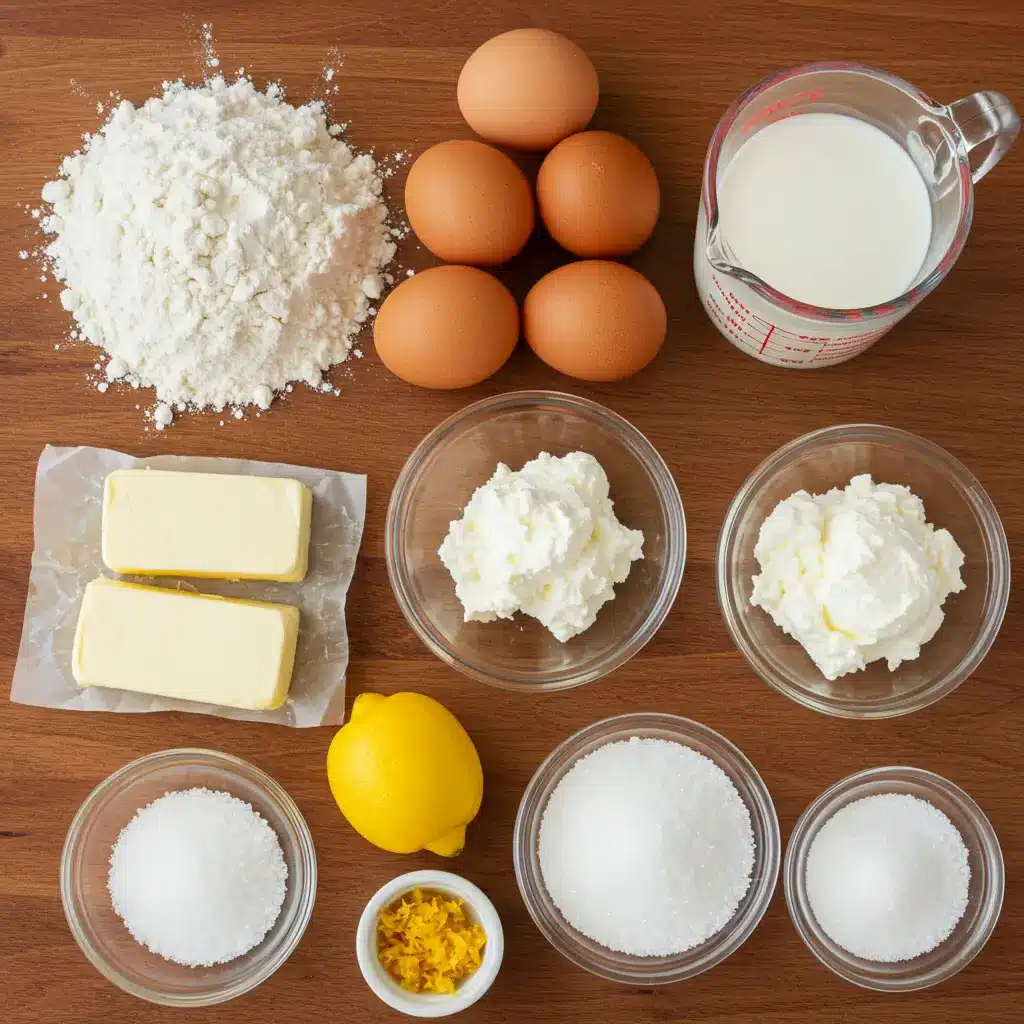
Ingredients for Homemade Danish
Before you dive into rolling, folding, and glazing, let’s talk about what goes into making the perfect Homemade Danish. Every ingredient plays a starring role here, and the best part is—you probably already have most of them sitting in your pantry or fridge. Think of this section as your shopping guide and prep checklist rolled into one.
For the Dough
- All-purpose flour (4 cups / 500g): This is your canvas, the backbone of your pastry. A good quality flour gives structure while keeping the layers light and flaky.
- Granulated sugar (1/3 cup / 75g): Just enough sweetness to balance the tangy cream cheese filling.
- Salt (1 tsp): A pinch of salt doesn’t just season; it also sharpens the buttery flavor.
- Active dry yeast (1 tbsp / 10g): The secret to that pillowy rise and soft, chewy bite. Let it bloom in warm milk before mixing in.
- Whole milk (1 cup / 240ml, warm): Richer than water, milk creates a tender crumb and keeps the dough soft.
- Egg (1 large, room temp): Helps bind the dough and enriches it with flavor.
- Unsalted butter (1 cup + 2 tbsp / 250g, cold): This is what makes or breaks a Danish. You’ll use it for laminating the dough, creating those hypnotic, flaky layers that separate Homemade Danish from ordinary pastries.
For the Cream Cheese Filling
- Cream cheese (7 oz / 200g, softened): Smooth, tangy, and decadent. It’s the heart of that irresistible center.
- Sugar (1/4 cup / 50g): Sweetens the filling without overpowering.
- Vanilla extract (1 tsp): A cozy flavor note that makes your kitchen smell like a bakery.
- Lemon zest (optional): Adds brightness and a hint of citrus, perfect for cutting through richness.
For the Glaze
- Powdered sugar (1 cup / 100g): The base for that shiny drizzle.
- Milk or lemon juice (1–2 tbsp): Thins the glaze—milk for creamy, lemon juice for a fresh twist.
- Vanilla extract (1/2 tsp): A finishing touch that ties all the flavors together.
Optional Toppings
Want to level up your Homemade Danish? Try:
- Fruit preserves: Raspberry, apricot, or strawberry are classic.
- Fresh berries: Blueberries or raspberries add natural sweetness.
- Sliced almonds: A little crunch never hurt!
💡 Pro tip: If you love pairing sweet pastries with something warm and comforting, try serving these alongside a bowl of broccoli potato cheese soup or a creamy tomato tortellini soup. It’s the kind of sweet-meets-savory balance that turns an ordinary meal into a feast.
How to Make Homemade Danish Recipe
Making a Homemade Danish may sound like something reserved for pastry chefs in white coats, but the truth is—you can absolutely do this in your own kitchen with a little patience. Follow these detailed steps, and you’ll end up with golden, flaky pastries that taste straight out of a European café.
Step 1: Prepare the Dough
Start by grabbing a large mixing bowl. Combine the flour, sugar, and salt—this sets the base of your pastry. In a smaller bowl, mix the warm milk with active dry yeast and let it rest for 5–10 minutes until it turns foamy (that’s how you know your yeast is alive and kicking). Add in the egg and pour this mixture into the dry ingredients.
Now comes the fun part: knead the dough until it’s smooth and elastic, about 6–8 minutes. You can do this by hand or with a stand mixer. Once it’s ready, cover the dough and chill it in the fridge for 30 minutes. This quick chill will make it easier to handle later on.
👉 Want another cozy baking project? Try my butternut squash lasagna soup for a savory dish to balance out your sweet pastry craving.
Step 2: Prepare the Butter Block
Take your cold unsalted butter and sandwich it between two sheets of parchment paper. Use a rolling pin (or the bottom of a heavy pan if you’re improvising) to pound it into an 8-inch square. You’re aiming for butter that’s pliable but not melting—firm enough to handle, soft enough to fold.
This step is the heartbeat of laminated dough and what gives your Homemade Danish that signature flakiness.
Step 3: Laminate the Dough
Remove your chilled dough from the fridge and roll it into a 16-inch square. Place the butter block in the center, rotated like a diamond. Fold the corners of the dough over the butter until it’s sealed like a neat little package.
Roll the dough into a long rectangle (about 8×24 inches) and fold it into thirds, like folding a letter. Cover and chill again for 30 minutes. Repeat this rolling and folding process two more times, chilling between each fold. This layering process is where the flaky magic happens.
Step 4: Shape the Danish
Once laminated, roll the dough out to about 1/4-inch thick. Cut it into 4-inch squares. Place a spoonful of the cream cheese filling in the center of each square, then fold or twist the corners to form your desired shape. If you’d like, top with fruit preserves or fresh berries at this stage for a pop of color and flavor.
💡 Pro tip: Don’t stress if your shapes aren’t bakery-perfect—once baked and glazed, they’ll look (and taste) divine.
Step 5: Proof the Danish
Transfer your shaped pastries onto parchment-lined baking sheets. Cover them lightly with a towel and let them rise at room temperature for about 1 hour. They should puff up and look slightly airy.
Step 6: Bake to Golden Perfection
Preheat your oven to 390°F (200°C). Brush the pastries with a little egg wash or milk to help them turn golden brown. Bake for 15–20 minutes, or until the tops are glossy and the bottoms are crisp.
At this point, your kitchen will smell so good your family might start hovering around, asking when they can “taste test.”
Step 7: Glaze and Serve
Once baked, let the Danishes cool completely (yes, I know it’s hard to wait). Whisk together powdered sugar, milk or lemon juice, and vanilla extract to make the glaze. Drizzle generously over your cooled pastries.
And there you have it—the perfect Homemade Danish.
👉 Serve alongside a comforting bowl of creamy chicken noodle soup or easy taco soup for a brunch spread that balances sweet and savory beautifully.
Tips and Tricks for Perfect Homemade Danish
- Chill between folds. Don’t skip this—cold dough = flaky layers.
- Use quality butter. The flavor really shines.
- Filling swap: Mascarpone or ricotta make a lighter variation.
- Fruit lovers: Raspberry or apricot jam adds a pop of color and tartness.
- Make-ahead magic: Freeze unbaked pastries, then bake straight from the freezer with a couple extra minutes.
Storage for Homemade Danish
- Fridge: Keep baked Danishes in an airtight container for up to 5 days.
- Reheat: Pop in the oven at 325°F (160°C) for 5–7 minutes.
- Freezer: Freeze unbaked shaped pastries for 1 month—bake from frozen!
FAQs
Q: Can I make the dough the night before?
A: Yes! Chill it overnight, then pick up with laminating in the morning.
Q: What if I don’t have a stand mixer?
A: No worries—kneading by hand just adds a little workout to your baking.
Q: Do I need the lemon zest?
A: Optional, but it adds brightness that balances the richness.
Conclusion
There you have it: a bakery-style Homemade Danish that’s flaky, creamy, and surprisingly approachable. This recipe will make your kitchen smell like heaven on a Sunday morning, and your family (or brunch guests) will swear you smuggled them home from a bakery. Try it, enjoy it, and maybe keep a few hidden in the freezer for those “just because” mornings.
Visit our Pinterest for regular slow cooker recipe updates, or join our Facebook discussions where cooking fans exchange their favorite hearty meal ideas.
Print
Homemade Danish Recipe
- Total Time: 1 hour 20 minutes
- Yield: 8 to 10 pastries 1x
- Diet: Vegetarian
Description
Flaky, buttery, and sweet—these homemade Cheese Danish pastries bring the bakery to your kitchen. Perfect for breakfast or brunch, they’re filled with a rich cream cheese center and topped with a simple glaze.
Ingredients
For the Dough:
4 cups (500g) all-purpose flour
1/3 cup (75g) granulated sugar
1 tsp salt
1 tbsp (10g) active dry yeast
1 cup (240ml) whole milk, warm
1 large egg, room temperature
1 cup + 2 tbsp (250g) cold unsalted butter, for laminating
For the Cream Cheese Filling:
7 oz (200g) cream cheese, softened
1/4 cup (50g) granulated sugar
1 tsp vanilla extract
Zest of 1 lemon (optional)
For the Glaze:
1 cup (100g) powdered sugar
1–2 tbsp milk or lemon juice
1/2 tsp vanilla extract
Optional:
Fruit preserves, fresh berries, or sliced almonds for topping
Instructions
1. In a large bowl, mix flour, sugar, and salt.
2. In another bowl, combine warm milk and yeast. Let sit for 5–10 minutes until foamy.
3. Add egg and yeast mixture to dry ingredients. Mix and knead until smooth, about 6–8 minutes.
4. Cover the dough and chill for 30 minutes.
5. Place cold butter between parchment paper and shape into an 8-inch square. Chill until firm but pliable.
6. Roll dough into a 16-inch square. Place butter in the center like a diamond.
7. Fold dough corners over butter to seal, then roll into an 8×24-inch rectangle.
8. Fold into thirds like a letter. Chill 30 minutes. Repeat rolling and folding two more times, chilling between each turn.
9. Roll dough to 1/4-inch thickness and cut into 4-inch squares.
10. Place 1 tablespoon cream cheese filling in center of each square. Fold corners or shape as desired.
11. Add fruit or jam, if using.
12. Place on parchment-lined baking sheets. Let rise at room temperature for 1 hour.
13. Preheat oven to 390°F (200°C). Brush pastries with egg wash or milk.
14. Bake for 15–20 minutes until golden brown.
15. Cool completely. Mix glaze ingredients and drizzle over pastries before serving.
Notes
Ricotta or mascarpone can be used in place of cream cheese for a lighter filling.
Be sure to chill dough between folds to create the flaky layers.
Try raspberry or apricot preserves for added flavor and color.
Store baked Danishes in the refrigerator for up to 5 days; reheat at 325°F (160°C) for 5–7 minutes.
You can freeze shaped, unbaked pastries for up to 1 month and bake from frozen, adding a few extra minutes to the baking time.
- Prep Time: 1 hour
- Cook Time: 20 minutes
- Category: Breakfast, Brunch, Dessert
- Method: Baking
- Cuisine: European
Nutrition
- Serving Size: 1 pastry
- Calories: 320
- Sugar: 14g
- Fat: 18g
- Protein: 5g


")