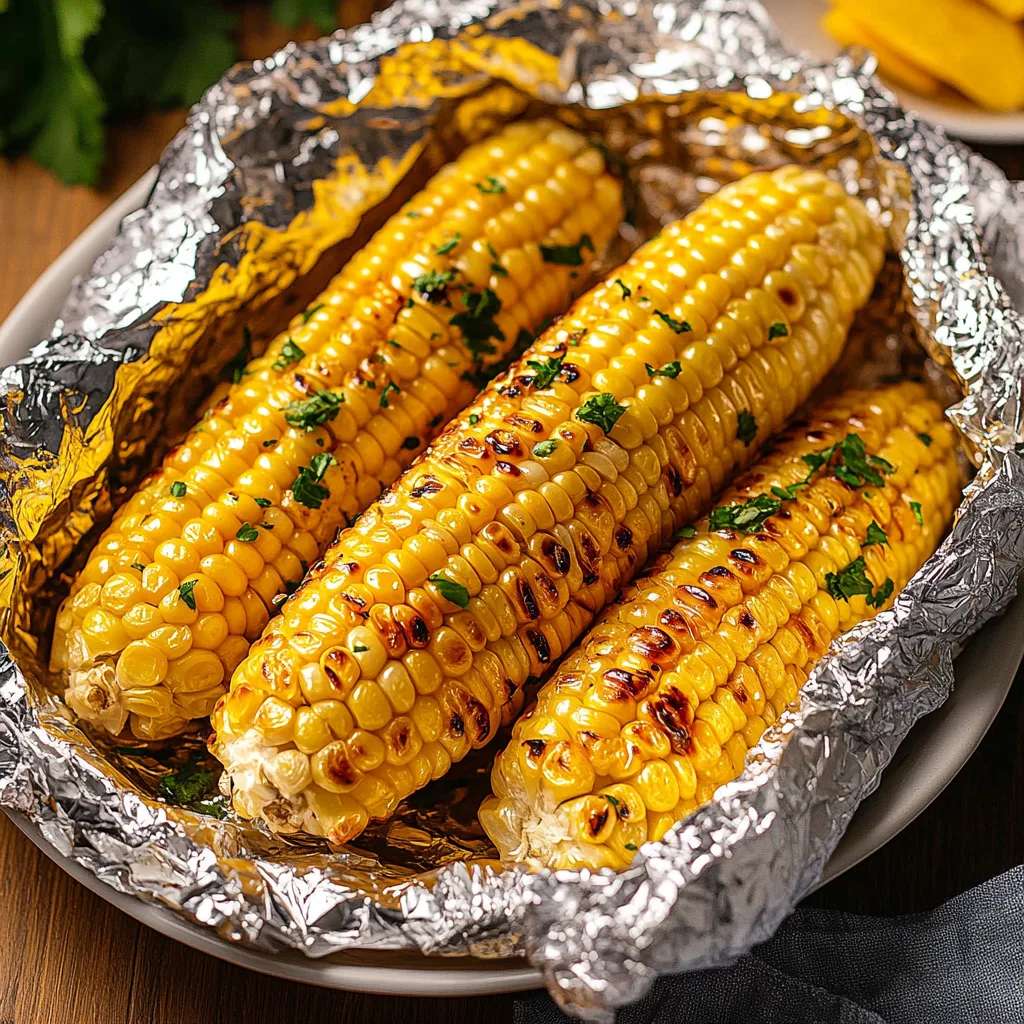
Grilled Corn on the Cob in Foil is a summer staple that brings the smoky, buttery aroma of backyard barbecues straight to your table. Wrapped in a protective foil blanket, this method locks in sweetness and moisture, ensuring perfectly charred kernels without the hassle of peeling silks or battling direct flame. Whether you’re a seasoned grill master or a first-time starter with a mesh screen in hand, this recipe makes every bite tender, juicy, and bursting with Pacific Northwest cornfields’ sunny personality. From Texas farm tables to trendy food trucks, grilled corn in foil bridges the gap between rustic simplicity and modern convenience—no need to worry about shuck-shaped lacerations or over-charred ends.
What makes this technique work so well? The foil acts like a portable sauna, steaming the kernels while gently basting them in seasoned butter. It’s like giving your corn a spa day with a side of grill echoes. You can prep packets the night before, keep them refrigerated, and feel like a culinary wizard when dinner guests marvel at how effortlessly you fixed this seasonal favorite. And if your grill runs hot? No worries—this dish smiles until the last minute, forgiving a few extra minutes under the flame.
What is Grilled Corn on the Cob in Foil?
Picture a summer solstice in hedgerow-choked Kansas, where ear-to-grill tech has been perfected since before tailgates were trendy. Grilled corn in foil is exactly what it sounds like: whole ears wrapped in aluminum to protect them while the grill’s heat works its magic. This method skips the pretentiousness of stand-alone corn cobs and embraces the practicality of grilled sides.Originating from American Southern barbecue culture, it rose to popularity in the 1980s as an accessible way to bring restaurant-quality grilled corn into home kitchens. Unlike its freeform grilled cousins, foil-pack corn asks for nothing but minimal attention and a few pantry staples—butter, salt, and a little forgiveness for burnt kernels gone rogue.
The technique works by creating a steamy microenvironment. As the butter bastes the corn, the wrapped foil prevents moisture loss, maintaining tenderness while allowing for controlled charring. Some call it a lazy man’s side dish; I call it a farmer’s gimmick, borrowed from our great-grandmas who knew every trick to keep meals from falling apart between harvest and dinner. While blackened edges might scream avant-garde, in this case, they’re just nature’s way of saying, “the wrapper is doing its job.”
Reasons to Try Grilled Corn on the Cob in Foil
If you’ve ever stood in the kitchen on a 98°F day only to hear the term “avocado lasagna,” you’ll adore this less-pretentious alternative. This recipe is a cheat’s best friend for summer gatherings, dominating both the “makes-ahead” and “dietitian-approved” columns of any recipe evaluation chart. Kids will slurp up the kernels off the cob, teens will sneer at your technique while secretly nibbling the extra-buttered tips, and grandparents will hoard the charred silks like insider stock tips.
Best of all, it’s the kind of recipe that respects your time. While your smoker hums or your sausages sizzle, these foil packets sit quietly on a corner of the grill, transforming into a canvas of golden perfection with zero babysitting. Need to prep early? These wrap like tiny tupperwares and chill patiently in your fridge until the sun sets and guests demand food that smells like a campfire.
For beginners, the method is shockingly forgiving. No need to balance skewers across grill bars or juggle oil vials to prevent burning. Just snug the foil, remember what your college chemistry class taught you about heat distribution, and trust the process. And when you finish with a side of relish or a drizzle of lime, you’ll realize this isn’t just corn—it’s a whole mood about summer cooking done right.
Ingredients Needed to Make Grilled Corn on the Cob in Foil
- 4 tablespoons unsalted butter, softened (ideally at room temperature to blend smoothly with seasonings)
- ¼ teaspoon salt (for balance, not overkill—hit retirees might thank you later)
- ½ teaspoon dried garlic powder (optional, but worth keeping on hand for its smoky, umami punch)
- ⅛ teaspoon ground black pepper (for that well-rounded, corn-on-the-rock vibes)
- 6 ears fresh corn, shucked (pre-shucked options at the store save your fingers and your patience)
Pro tip: The butter ratio is written for softer summer heat levels. In a grilling-capacity winter, increase to 6 tablespoons to protect against stubborn coals. The key is quantifying your seasonings—no need to “just eyeball it” like you’re a farmer chasing the best harvest ever.
Instructions to Make Grilled Corn on the Cob in Foil – Step by Step
Step 1: Preheat your grill to 400°F. This sets the stage for even cooking. While the grill heats, gather your ear balls (yes, the term is cringe, but keep it) and foil. Double-layer the foil unless you’re cooking for a single person—tragedy waits for no one. Place two ears per packet once the butter mix is ready. Trust the rhythm of the process: two ears per foil, three packets total. Number them in dry-erase marker if you’re crafting like you’re in a reality show kitchen.
Step 2: In a small bowl or even a flatware basin, mash the softened butter with salt, garlic powder, and pepper until smooth. A fork does the trick flawlessly without hassle. Blend it like you’re making the best tupperware for your corn to live in for the next 25 minutes. Toss the garlic powder last—it has a way of escaping if you’re frantic, and it melts like sugar in the butter as it roasts in the foil.
Step 3: Generously rub the butter mixture over each ear, from silk end to nib end. This is where the magic begins. Even if the corn is already sweet as stolen pie sweetness, the butter layer elevates it into a kitchen Zen state. For extra lazy folks, smear half the butter first, wrap, and then brush the remaining while sealed. It works, and no one will judge.
Step 4: Fold the foil tightly around each ear, crimping the edges to create a sealed packet. Leave a little room for air circulation if you’re a nervous cook, but professional cooks will give you that, “trust the foil” look. Lay the packets seam-side up on the preheated grill. No need to oil the surface—foil does the antioxidizing work better than most.
Step 5: Grill for 10 minutes. This is the critical phase where the kernels bloom sweetness. Halfway through, use thick oven mitts to carefully flip the packets without breaching the barrier. Close the grill lid and add another 10–20 minutes of burning love. Pro tip: Check the corn at 18 minutes—it might just be perfect. Use a skewer to pierce the kernels; they should be tender but not mealy.
Step 6: Carefully open the packets (blow out any escaping heat), fluff the foil for a quick blast of char, and return them to the grill for another 5 minutes. Serve immediately with extra butter on the side. Those last few minutes of open-flame action will give your neighbors a reason to miss you on their patios.
Chef’s Tips for a Perfect Result
- — Start with room-temperature butter: It blends with seasonings 30% smoother for an even basting layer.
- — For extra phoniness (flavor!): Brush foil-wrapped ears with a honey-lime glaze in the last 3 minutes of grilling.
- — Rotate grill placement: Corn packets need to spend 10 minutes on each side of the heat zone for even char.
- — Prep in advance: Foil-wrapped corn is perfect for chill storage. Label packets with the best-by date like a single-dad organizer.
- — Watch for foil failures: If you see the butter pooling at the bottom of the packet, flip it immediately to prevent sogginess.
- — Serve with a side of gratitude: This is one of those recipes that bonds families after summer soccer games.
Variations and Substitutions
Vegan Option: Swap butter with vegan margarine or olive oil (avocado oil adds a nice creamy finish). Avoid dried garlic powder if sourcing from overseas.
Gluten-Free Alternative: Use certified gluten-free garlic powder and check spice container labels for cross-contamination triggers.
Budget Swap: Replace butter with canned evaporated milk mixed with olive oil. No choking on expensive sugar here.
Smoky Twist: Add smoked paprika or chipotle powder before wrapping. It’s like giving your corn a foretaste of barbeque immortality.
How to Serve and Pair
Serve Grilled Corn on the Cob in Foil as a standalone side, a BBQ event staple, or a protein-free base for summer salads. To present with style, lightly trim the burned silks with a knife for a polished finish—farm-grown aesthetic but with less backache. Pair it with dishes that crave an extra layer of sweetness and smokiness: grilled salmon, slow-braised pork (or plant-based chops), or a zesty lime-honey chicken twist.
For dipping action, pass along a small ramekin of garlic herb crème fraîche or spicy tahini. The combo creates masterpiece-level eating sessions where people chat less and calorie-count more begrudgingly at dinner. For a more casual spread, pile the kernels into a salad with corn husk chips for crunch—this summer’s equivalent of keto, but better.
Storage and Reheating
Refrigerator: Store cooled leftovers in an airtight container. Use within 3 days—1 day if you’re eating them with kids who take 27 minutes to chew bitten-off kernels.
Freezer: Freeze peel-and-serve packets for up to 3 months. Avoid thawing before reheating; softening in the microwave might make it soggy (unless you’re using a gluten-free substitute, which is tough anyway).
Room Temperature: Keep wrapped cobs at room temperature for up to 2 hours. Avoid direct sunlight unless you’re testing your corn’s endurance in a heatwave.
Reheating: options:
- Oven: Heat at 350°F for 20 minutes. Moonlight cast iron performance.
- Grill: Unwrap and chef’s knife the corn in half to capture steam while toasting skins. Keep an eye in case of burn-through.
- Microwave: Use a damp paper towel and 1 minute per ear—try mixing with popcorn for olfactory deprivation food addiction).
Nutritional Values
Per serving (1 ear of corn):
- Calories: 167
- Protein: 4g
- Carbohydrates: 22g
- Fat: 9g
- Fiber: 3g
Approximate values.
Frequently Asked Questions
Q1: Can I substitute butter with ghee in this recipe?
Yes—it adds an earthy richness that caramelizes beautifully as the corn bastes in it. Ghee also has a higher smoke point, so it’s especially good for the open-flame sear in Step 5.
Q2: How do I know when the corn is fully cooked without cutting into it?
Press the end of the kernel with a spatula. It should offer slight resistance, not give like a deflated tire. A fully cooked corn will feel approximately as firm as your cousin’s handshake on a summer vacation trip.
Q3: My foil packets leaked oil while grilling—what should I have done differently?
Seal the edges carefully using both hands, not one. Foil is not as forgiving as silicone bags. Consider using heat-resistant plastic wrap as a secondary wrap if you’re skeptical of your crimping skills.
Q4: Can I make the foil packets the night before?
Absolutely. Refrigerate the sealed packets at a max of 24 hours. No need to thaw unless you’re using in a winter camping trip—then mimic grilling methods with portable stoves.
Q5: What goes best with this dish for a summer dinner?
Dip in bland Italian dressing and serve with a grilled romaine salad. Adds balance without viscosity drama. Side of refried beans if you want to pat yourself on the back for being a little creative about sides only.
Conclusion
Grilled Corn on the Cob in Foil is sunshine in edible form: simple, satisfying, and impossible to dislike in summer light. With minimal effort and a foil blanket of butter and seasonings, you’ll create a dish that sparks laughter, encourages play with edges, and silences any meat-based side-dish betting games at dinner tables. Between the tenderness and the char marks, it’s a reminder of summer meant for long nights, messy hands, and the kind of homemade warmth that just fits right in a used butter dish.
Print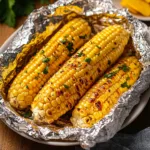
Grilled Corn on the Cob in Foil
- Total Time: 45
- Yield: 4 servings 1x
- Diet: Vegetarian
Description
A smoky, tender grilled corn on the cob wrapped in foil to lock in moisture and flavor. Perfect for summer gatherings, this no-fuss method yields charred, juicy kernels with a buttery finish.
Ingredients
4 ears fresh corn on the cob
4 tablespoons unsalted butter, softened
1/4 teaspoon kosher salt
Freshly ground black pepper, to taste
1/4 teaspoon paprika (optional)
1/4 teaspoon garlic powder (optional)
Instructions
Preheat grill to medium-low heat (~300°F)
Trim 1/2 inch off each end of the corn
Shuck the corn and remove all silks
Divide softened butter among the cobs and coat evenly with a brush
Gently sprinkle salt, pepper, and optional spices over each cob
Wrap each corn cob tightly in aluminum foil, sealing the edges
Place wrapped cobs on the grill and cook for 20-25 minutes, rotating occasionally for even charring
Carefully unwrap and serve immediately or rewrap to finish cooking for a softer texture
Notes
Wrap cobs airtight and refrigerate up to 24 hours before grilling
For extra caramelization, brush cobs with a touch more butter before wrapping
Adjust seasoning to match your preference (herbs like parsley or cilantro enhance freshness)
Use non-stick foil if handling bare ears proves messy
- Prep Time: 15
- Cook Time: 30
- Category: Dinner
- Method: Grilling
- Cuisine: American
Nutrition
- Serving Size: 1 ear of corn
- Calories: 125
- Sugar: 3g
- Sodium: 300mg
- Fat: 10g
- Saturated Fat: 6g
- Carbohydrates: 19g
- Fiber: 2.5g
- Protein: 3g
- Cholesterol: 30mg

")