
Cheesecake Stuffed Baked Apples are the kind of dessert that makes you feel like you’ve got your life together—even if your kitchen looks like a tornado hit it. Imagine warm, tender apples filled with a rich, creamy cheesecake center, topped off with buttery graham cracker crumbs. It’s like your favorite fall flavors had a baby with a slice of cheesecake.
These little beauties bake up in just 30 minutes and look way fancier than the effort it takes. Whether you’re planning a cozy weekend treat or want to impress guests without breaking a sweat, Cheesecake Stuffed Baked Apples are here to save dessert. They’re comforting, crowd-pleasing, and sneakily easy to pull off—just how we like it.
Table of Contents
What are Cheesecake Stuffed Baked Apples?
Cheesecake Stuffed Baked Apples are a sweet mashup between baked apples and classic cheesecake. Think of them as edible apple bowls filled with a luscious cream cheese mixture, sweetened with sugar and vanilla, and then topped with a crunchy graham cracker crumble.
Once baked, the apples soften to that perfect fork-tender texture while the filling sets into a creamy, slightly tangy bite—kind of like if apple pie and cheesecake went on a date and never came back. They’re typically made using apples like Granny Smith or Honeycrisp for their structure and slight tartness, which balances the sweetness of the cheesecake filling. The best part? No crust drama, no water bath, no springform pan—just pure, cozy goodness in every spoonful.
Reasons to Try Cheesecake Stuffed Baked Apples
First off, Cheesecake Stuffed Baked Apples are practically a dessert unicorn: warm, creamy, crunchy, and fruity all in one bite. They’re perfect for when you’re craving cheesecake but don’t want to deal with the whole “make a crust, chill it for 6 hours, and pray it doesn’t crack” situation. Also, these apples are a huge hit with guests because they look super impressive, but they’re a breeze to make (don’t worry, your secret’s safe with me).
They’re also incredibly versatile—you can serve them with ice cream, caramel, or even a dollop of whipped cream. Plus, they’re naturally portioned (hello, built-in serving size!), making them ideal for dinner parties, family gatherings, or a quiet night in when you need something sweet but don’t want a whole cake staring at you from the fridge.
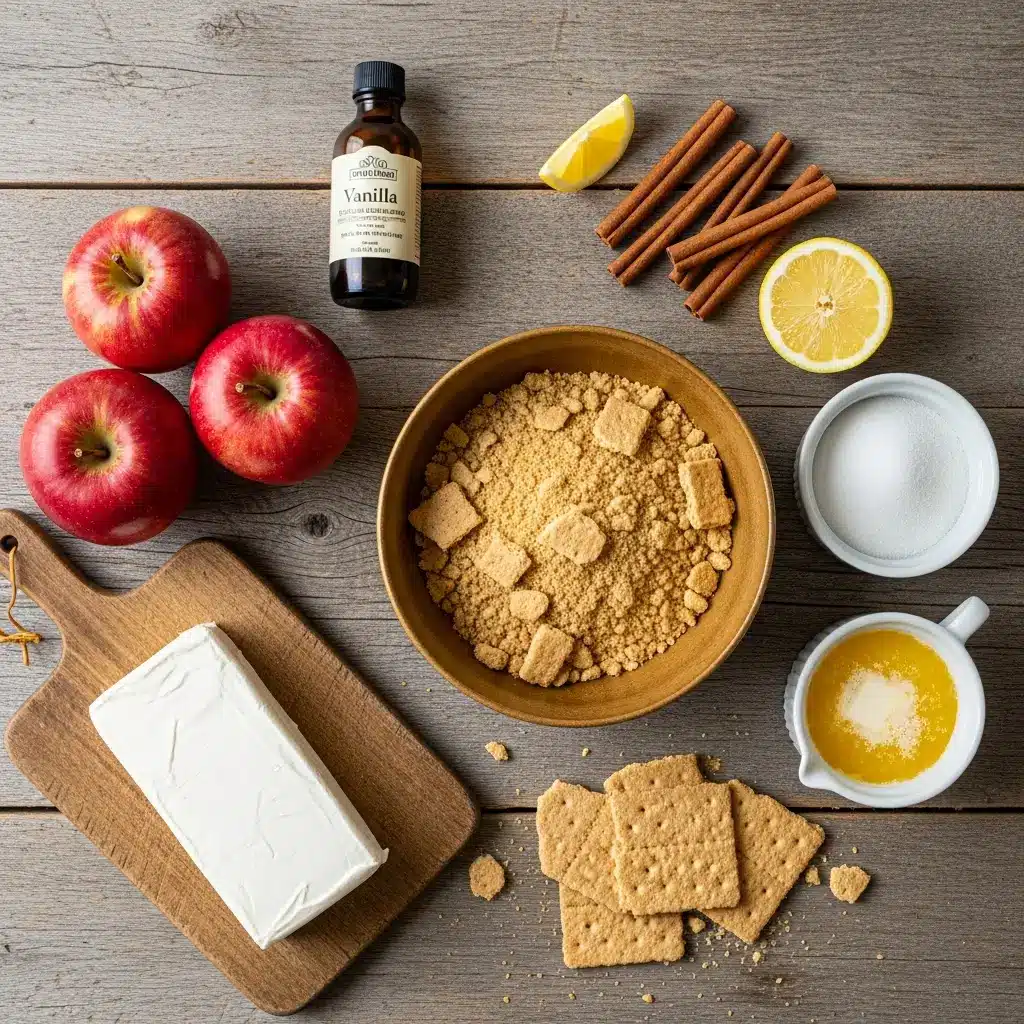
Ingredients Needed to Make Cheesecake Stuffed Baked Apples
- 4 apples (Granny Smith or Honeycrisp recommended)
- 8 oz cream cheese, softened
- 1/4 cup sugar (adjust to taste)
- 1 tsp vanilla extract
- 1 tsp cinnamon
- 1 tbsp lemon juice
- 1/2 cup graham cracker crumbs
- 2 tbsp butter, melted
Instructions to Make Cheesecake Stuffed Baked Apples
Making Cheesecake Stuffed Baked Apples is way easier than it sounds—and way more delicious than you’d expect. Let’s walk through the step by step instructions so you feel totally confident from your first apple slice to your last bite of gooey, creamy goodness. Whether you’re a baking pro or this is your first time stuffing anything into a fruit, you’ve got this!
Step 1: Preheat your oven
Start by preheating your oven to 375°F (190°C). This gives the apples a warm environment to bake evenly and ensures that creamy cheesecake center sets up just right. If you’re new to baking or want to double-check your oven’s accuracy, take a peek at our kitchen prep tips that help make baking foolproof.
Step 2: Wash and core the apples
Give your apples a good rinse to remove any wax or debris. Using a sharp paring knife or an apple corer, carefully core out the center of each apple, being sure to leave the bottom intact. Think of it like creating a little edible cup—you want a deep enough cavity to hold the cheesecake, but not so deep that it leaks. Honeycrisp and Granny Smith apples are ideal because they hold their shape without turning mushy.
Pro Tip: If you accidentally poke through the bottom of an apple, plug it with a small piece of apple flesh or a bit of graham cracker to keep the filling from escaping.
Step 3: Make the cheesecake filling
In a mixing bowl, combine 8 oz of softened cream cheese, 1/4 cup of sugar, 1 teaspoon of vanilla extract, and a pinch of cinnamon. Use a hand mixer or a strong whisk to blend everything together until the mixture is smooth, creamy, and irresistible. It should look like traditional cheesecake batter—thick but spreadable.
If you’re looking for a dairy-free twist, visit our vegan roasted carrot and red pepper soup post for plant-based inspiration (and a few great substitution ideas).
Step 4: Stuff the apples with cheesecake filling
Now for the fun part. Spoon the cream cheese filling into each hollowed-out apple. Don’t be shy—fill it right up to the top, pressing down gently to eliminate air pockets and maximize that creamy core. If you have any leftover filling, feel free to sneak a taste (quality control, right?).
Need a steady hand? Place your apples in a muffin tin while stuffing to keep them from tipping over.
Step 5: Mix the graham cracker topping
In a separate bowl, stir together 1/2 cup of graham cracker crumbs, 2 tablespoons of melted butter, and another light sprinkle of cinnamon. The mixture should resemble sandy cookie dough—it should hold together slightly when pressed. This will give your apples that signature cheesecake crunch on top.
Want to experiment? Try crushed shortbread or gingersnap cookies for a fun spin on the classic. You can find more ideas in our creamy marry me chicken soup post, where we talk all about creative kitchen swaps.
Step 6: Top the apples
Spoon the graham cracker crumble generously over the cheesecake filling in each apple. Press it down lightly so it sticks to the top. Don’t worry about perfection here—some of that topping will fall into the baking dish and crisp up beautifully.
Step 7: Arrange in baking dish and drizzle with lemon juice
Place your apples upright in a baking dish (a small casserole dish works great). Drizzle 1 tablespoon of lemon juice over and around the apples. This adds a subtle brightness that balances the sweetness and keeps your apples from browning too much during baking.
Want to get even more out of this recipe? Place a splash of apple cider in the bottom of the dish to create a lightly flavored steam as the apples bake.
Step 8: Bake to golden perfection
Slide the baking dish into your preheated oven and bake for 25 to 30 minutes. You’ll know they’re ready when the apples are tender but still holding their shape, the cheesecake is puffed slightly and set, and the crumb topping is golden brown. Your kitchen will smell like a warm autumn hug.
If you love cozy aromas, pair this dessert with our fall chicken stew with quinoa—your house will smell like heaven for hours.
Step 9: Cool slightly before serving
Let the apples cool for about 10 minutes before serving. This helps the cheesecake filling firm up and makes them easier (and safer!) to eat. Serve them warm for the best experience. If you’re feeling extra indulgent, top with a scoop of vanilla ice cream or a drizzle of caramel.
What to Serve with Cheesecake Stuffed Baked Apples
Oh, the serving possibilities. These are fantastic all on their own, but they also love a little company. A scoop of vanilla ice cream slowly melting into the warm apple? Heavenly. Or maybe a drizzle of homemade caramel sauce if you’re feeling fancy (or have some leftover from another dessert win). For a fall feast, try serving them after a cozy main dish like Creamy Chicken and Rice or Creamy Garlic Parmesan Tortellini with Chicken. The contrast of sweet and savory makes for a full-circle meal that feels like a hug.
Key Tips for Making Cheesecake Stuffed Baked Apples
Use firm apples that hold their shape—Granny Smith and Honeycrisp are your best bets. Don’t overbake unless you want apple mush (no judgment, just a warning). Make sure your cream cheese is room temperature so it mixes smoothly. Want to mix it up? Toss in a few mini chocolate chips or swirl in some caramel into the cheesecake filling. And if you’re hosting? Bake them just before guests arrive—the smell alone will win you hostess of the year.
Storage and Reheating Tips for Cheesecake Stuffed Baked Apples
If you happen to have leftovers (bless your willpower), store the stuffed apples in an airtight container in the fridge for up to 3 days. Reheat in the microwave for 30–45 seconds, or pop them in the oven at 300°F for about 10 minutes to warm them up gently. They’re also surprisingly good cold, straight from the fridge—almost like a chilled apple cheesecake. Just don’t freeze them; the texture of both the apple and filling won’t survive the thaw.
FAQs
Can I make Cheesecake Stuffed Baked Apples ahead of time?
Yes! You can prep them up to 24 hours in advance and keep them in the fridge unbaked. Bake when ready.
What if I don’t have graham crackers?
Try crushed vanilla wafers, digestive biscuits, or even shortbread cookies.
Can I use a different sweetener?
Sure! Honey, maple syrup, or a sugar substitute can work. Just adjust to your taste.
Can I make these gluten-free?
Absolutely—just use gluten-free graham crackers or a similar substitute.
Do I need to peel the apples?
Nope! Keeping the skin on helps the apples keep their shape and gives you extra fiber. Win-win.
Final Thoughts
Cheesecake Stuffed Baked Apples are proof that comfort food doesn’t have to be complicated. They’re rich, creamy, a little crunchy, and all kinds of cozy. Whether you’re new to baking or just want something that’ll wow with minimal effort, this dessert’s got you covered. It’s the kind of treat you’ll come back to every fall—and maybe a few times in between. For more comfort food vibes, take a peek at our Easy Creamy Chicken Tortilla Soup for a full cozy dinner lineup.
Visit our Pinterest for regular slow cooker recipe updates, or join our Facebook discussions where cooking fans exchange their favorite hearty meal ideas.
Print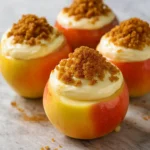
Cheesecake Stuffed Baked Apples – Simple, Sweet & Irresistible
- Total Time: 45 Minutes
- Yield: 4 Servings 1x
- Diet: Vegetarian
Description
Cheesecake Stuffed Baked Apples are a decadent dessert, filled with creamy cheesecake and topped with buttery graham cracker crumbs for the ultimate sweet treat.
Ingredients
- 4 Apples (Granny Smith or Honeycrisp recommended)
- 8 oz Cream cheese, softened
- 1/4 cup Sugar (adjust to taste)
- 1 tsp Vanilla extract
- 1 tsp Cinnamon
- 1 tbsp Lemon juice
- 1/2 cup Graham cracker crumbs
- 2 tbsp Butter, melted
Instructions
1. Preheat your oven to 375°F (190°C).
2. Wash and core the apples, leaving the bottom intact to create a well for the filling.
3. In a bowl, mix together cream cheese, sugar, vanilla extract, and a pinch of cinnamon until smooth.
4. Fill each apple with the cheesecake mixture, pressing down gently to ensure it’s well-packed.
5. In a separate bowl, combine graham cracker crumbs, melted butter, and a sprinkle of cinnamon.
6. Top each stuffed apple with the graham cracker mixture, pressing lightly to adhere.
7. Place the stuffed apples in a baking dish and drizzle with lemon juice to enhance flavor and prevent browning.
8. Bake for 25-30 minutes or until the apples are tender and the cheesecake filling is set.
9. Let the apples cool slightly before serving.
Notes
Serve with a scoop of vanilla ice cream or a drizzle of caramel sauce for an extra indulgent dessert.
To make this recipe gluten-free, use gluten-free graham crackers.
- Prep Time: 15 Minutes
- Cook Time: 30 Minutes
- Category: Desserts
- Method: Baking
- Cuisine: American
Nutrition
- Serving Size: 1 stuffed apple
- Calories: 300
- Sugar: 28g
- Sodium: 120mg
- Fat: 15g
- Saturated Fat: 8g
- Unsaturated Fat: 6g
- Trans Fat: 0g
- Carbohydrates: 40g
- Fiber: 3g
- Protein: 5g
- Cholesterol: 35mg
")