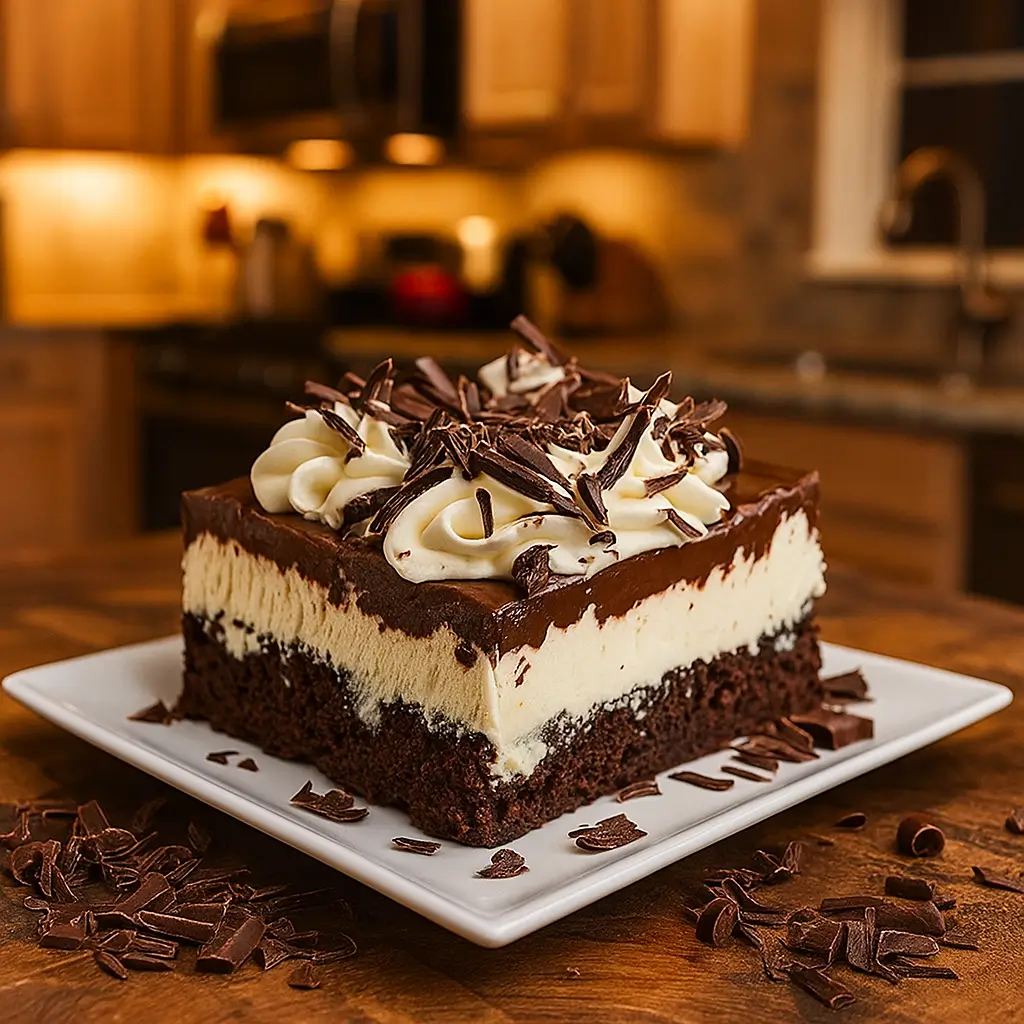
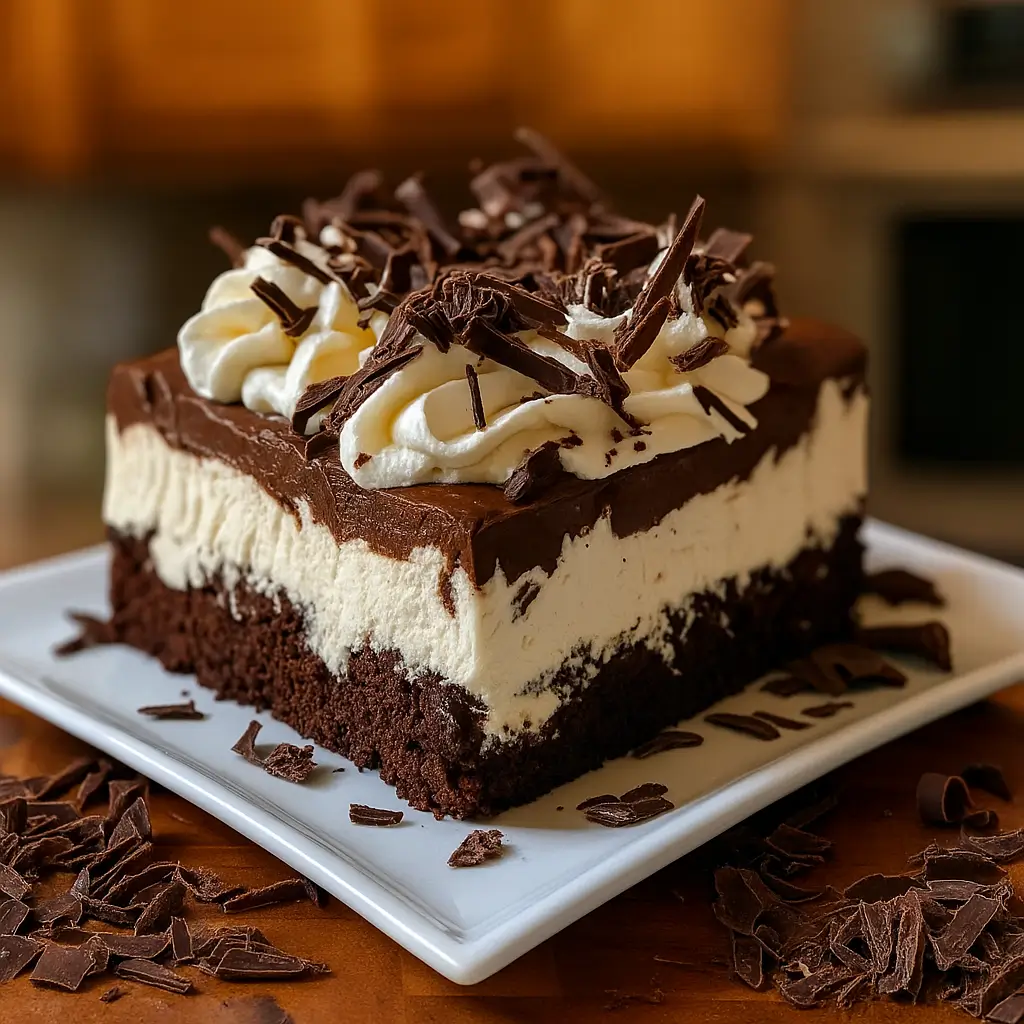
Brownie Refrigerator Cake is the dessert you didn’t know you needed—until now. Imagine a fudgy brownie base topped with layers of fluffy cream cheese filling, rich pudding, and whipped topping. It’s cold, chocolatey, creamy, and requires zero oven stress beyond the initial brownie bake. Perfect for those moments when you want to impress without sweating in the kitchen.
Whether you’re prepping for a potluck, a birthday bash, or just trying to satisfy that 9 p.m. sweet tooth, this cake hits every note. And the best part? It tastes even better the next day. Brownie Refrigerator Cake is the kind of recipe you’ll make once, then again and again because it’s just that good. With every bite, you’ll get that chilled, velvety texture and bold cocoa flavor that dances on your tongue. Let’s dive into dessert heaven, shall we?
Table of Contents
What is Brownie Refrigerator Cake?
Brownie Refrigerator Cake is a no-bake layered dessert (well, technically one bake for the brownie layer) that combines a chewy brownie base with silky layers of whipped topping, pudding, and cream cheese. It’s like a chocolate lasagna—but make it sweet and party-ready. Think of it as a throwback to those retro desserts your grandma used to make, but with a modern creamy twist that feels just right.
It starts with a boxed brownie mix (yes, we’re leaning into convenience), boosted by an extra egg to amp up the fudge factor. Once cooled, it’s slathered with a tangy-sweet cream cheese layer, followed by a dreamy chocolate-vanilla pudding combo, and finished with more whipped topping and chocolate shavings. It’s chilled in the fridge, making it a perfect make-ahead treat. Serve it cold and watch the forks fly.
Reasons to Try Brownie Refrigerator Cake
Brownie Refrigerator Cake is more than just a dessert—it’s a life-saver for busy folks who still want to bring something drool-worthy to the table. First off, it’s super simple. No fancy techniques, no confusing steps—just layers of goodness that come together with mostly store-bought ingredients. Secondly, it’s a hit with all ages. Kids love the chocolate, adults love the creaminess, and picky eaters? Well, they usually ask for seconds.
And let’s not forget: this cake is make-ahead friendly, which means you can whip it up the night before a party or holiday dinner and check dessert off your list early. Plus, it’s highly customizable—swap pudding flavors, add a crunchy layer of crushed cookies or nuts, or drizzle with caramel if you’re feeling fancy. Whether it’s a Tuesday night or Thanksgiving, this dessert brings people back for more.
Ingredients Needed to Make Brownie Refrigerator Cake
- 1 box brownie mix (for a 9×13 pan)
- 1 extra-large egg (for extra fudginess)
- 1 (8 oz) package cream cheese, softened
- 1 cup powdered sugar
- 2 (8 oz) containers whipped topping (like Cool Whip)
- 1 (3 oz) package chocolate instant pudding
- 1 (3 oz) package vanilla instant pudding
- 3½ cups cold milk
- 1 Hershey bar (for shavings) or chocolate syrup (for garnish)
Instructions to Make Brownie Refrigerator Cake (step-by-step and detailed)
If you’ve ever found yourself staring at a boxed brownie mix wondering how to elevate it into something celebration-worthy, this step-by-step guide will walk you through exactly how to turn it into a luscious Brownie Refrigerator Cake. Each step is designed to be beginner-friendly, full of tips, and guaranteed to make the process smooth and enjoyable. Whether you’re prepping for a birthday bash or just need a cold chocolate fix, this recipe is your new go-to. Let’s break it down—step by step.
Step 1: Bake the Fudgy Brownie Base
Start your journey by grabbing your favorite 9×13 box brownie mix. Prepare it according to package instructions but add one extra-large egg to the mix. Why? That extra egg is your secret weapon for a denser, more fudgy texture that won’t get lost under all the creamy layers.
Once mixed, pour it into a greased 9×13 pan and bake as directed. Let it bake until the edges are set and a toothpick inserted into the center comes out with a few moist crumbs—don’t overbake! When done, set the brownie pan aside to cool completely. Trust us, patience here pays off. If the base is warm, the creamy layers won’t hold, and you’ll end up with a gooey mess.
Quick Tip: If you’re unsure about how long brownies should cool before layering, check out our guide to prepping desserts ahead of time for kitchen confidence.
Step 2: Whip Up the Cream Cheese Layer
Once your brownies are cool, it’s time to create the second layer—the creamy, tangy dream that balances all the chocolate.
In a medium mixing bowl, beat one softened 8 oz block of cream cheese with 1 cup of powdered sugar until smooth and lump-free. Let the mixer run for a few minutes—you’re aiming for silky and fluffy. Next, fold in one container (8 oz) of whipped topping. Don’t overmix; you want it to stay light and airy.
Now, gently spread this cream cheese mixture evenly over the cooled brownies. Use a silicone spatula or an offset knife to get it right to the edges.
Need a dairy-free alternative? Learn more about ingredient swaps and substitutions that work great in creamy desserts.
Step 3: Mix the Pudding Layer
Now it’s time to bring in the pudding—our third, ultra-rich layer. In a large bowl, combine one package of chocolate instant pudding and one package of vanilla instant pudding (each 3 oz) with 3½ cups of cold milk. Use a whisk and stir vigorously for about 2 minutes until the mixture thickens. Instant pudding works quickly, so don’t walk away from it.
Once it’s thick and smooth (no lumps allowed), pour it over the cream cheese layer and spread gently with a spatula. This is the heart of the dessert—the layer that brings everything together with that luscious pudding hug.
Pro Tip: Want to swap in other pudding flavors like butterscotch or white chocolate? That’s totally fine! For flavor pairing ideas, browse our dessert customization tips to get inspired.
Step 4: Add the Final Whipped Topping
Now it’s time for the cloud-like finale. Take your second container of whipped topping (8 oz) and gently spread it across the top of the pudding layer. This is where the cake starts to look like a full-blown bakery masterpiece.
Smooth it out with a spatula for an even layer, or get creative and use a spoon to create swirls. Don’t press too hard—you want to keep the whipped topping light and lofty.
This final layer locks in all the deliciousness and gives the dessert that classic no-bake cake look we all love.
Step 5: Garnish Like a Pro
You’ve come this far—now let’s add a little pizzazz. You can go simple with chocolate syrup drizzled over the top, or grab a Hershey bar and shave some curls over the surface for that bakery-style finish. If you’re feeling extra fancy, a sprinkle of mini chocolate chips or even a dusting of cocoa powder will add visual flair and texture.
Looking for more topping ideas? Try crumbled cookies, nuts, or even crushed candy canes if you’re making it around the holidays. For more layering inspiration, visit our holiday recipe collection (yep, even soup lovers love dessert!).
Step 6: Chill Before Serving
Once your masterpiece is assembled, cover it with foil or plastic wrap and pop it into the refrigerator for at least 2 hours. For best results, let it chill overnight—this gives the layers time to firm up and the flavors to mingle beautifully.
When ready to serve, cut into squares using a sharp knife. Wipe the blade clean between cuts for picture-perfect slices every time.
Heads Up: This cake can be made up to 2 days in advance and still taste amazing. For more tips on how to prep dishes early without losing quality, visit our post on meal planning with make-ahead recipes.
What to Serve with Brownie Refrigerator Cake
Brownie Refrigerator Cake is rich and sweet, so pairing it with something lighter works beautifully. A scoop of vanilla bean ice cream can add a creamy contrast, while fresh berries like strawberries or raspberries cut through the sweetness with a pop of freshness. Hosting a dinner party? Serve it after a comforting meal like our Creamy Garlic Parmesan Tortellini with Chicken or a lighter soup like Best Broccoli Cheese Soup. For drinks, coffee or milk is a classic choice—but if you want to make it fancy, a dessert wine or espresso martini would totally work too. This cake plays well with both kid-friendly and grown-up company.
Key Tips for Making Brownie Refrigerator Cake
- Don’t skip the extra egg in the brownie mix—it’s what makes the base extra fudgy and rich.
- Let the brownies cool completely before adding any layers, or you’ll end up with a melted mess.
- For an ultra-smooth cream cheese layer, let your cream cheese sit out until room temp—don’t rush this step.
- Whisk the pudding separately before spreading—it needs time to thicken or it might make the layers soupy.
- Garnish just before serving if using syrup, but you can add chocolate shavings ahead of time.
- Want to make it your own? Try using butterscotch or cheesecake pudding, crushed Oreos between layers, or a peanut butter drizzle on top.
Storage and Reheating Tips for Brownie Refrigerator Cake
Storing this cake is a breeze. Just cover the pan tightly with plastic wrap or foil and refrigerate for up to 4 days. It’s one of those magical desserts that actually tastes better after sitting overnight. You can also freeze it—wrap slices individually in plastic wrap and place them in a zip-top bag for up to 2 months. Thaw in the fridge overnight before serving. Just don’t microwave it—this cake is meant to be eaten cold, like a frosty dream come true. If the layers look a little soft after a couple days, a quick 30-minute chill in the freezer can firm things back up beautifully.
FAQs
Can I use homemade brownies instead of boxed mix?
Absolutely! If you’ve got the time, go for it. Just aim for a 9×13 batch and add an extra egg for that fudgy goodness.
Is it okay to use sugar-free pudding?
Yes, sugar-free pudding works well and can cut down the sweetness a bit. Just make sure the box size is still 3 oz.
Can I make this dairy-free?
With dairy-free cream cheese, plant-based whipped topping, and non-dairy milk, it’s doable! Just double-check the pudding ingredients.
What’s the best way to cut this without a mess?
Use a sharp knife, and wipe it clean between cuts. You can also chill the cake an extra 30 minutes before slicing for cleaner pieces.
Final Thoughts
Brownie Refrigerator Cake is the kind of dessert you make once—and suddenly, everyone’s asking for the recipe. It’s easy, delicious, and makes any day feel like a celebration. Whether you’re prepping for a dinner party or just want something sweet that doesn’t involve turning on the oven again, this is your go-to treat. With layers of creamy, chocolatey goodness and a fudgy brownie base, it’s a total crowd-pleaser. Try it once, and don’t be surprised if it ends up on your regular dessert rotation.
Visit our Pinterest for regular slow cooker recipe updates, or join our Facebook discussions where cooking fans exchange their favorite hearty meal ideas.
Print
Brownie Refrigerator Cake Recipe – No-Bake Dessert Win
- Total Time: 3 hours
- Yield: 12–16 servings 1x
Description
A delicious no-bake layered dessert with fudgy brownies, creamy pudding, and whipped topping.
Ingredients
- 1 brownie mix (9×13 pan size)
- 1 additional extra-large egg
- 1 package cream cheese (8 oz), softened
- 1 cup powdered sugar
- 2 containers whipped topping (8 oz each)
- 1 package chocolate instant pudding (3 oz)
- 1 package vanilla instant pudding (3 oz)
- 3 1/2 cups milk
- 1 Hershey bar (for shavings) or chocolate syrup
Instructions
1. Prepare the brownies according to package directions, adding an extra egg for a fudgier texture. Let cool completely.
2. Make the cream cheese layer by mixing softened cream cheese, powdered sugar, and one container of whipped topping. Spread over the brownies.
3. Prepare the pudding layer by whisking together the chocolate and vanilla pudding mixes with milk until thick. Spread over the cream cheese layer.
4. Top with the remaining whipped topping, smoothing it evenly.
5. Garnish with chocolate shavings or syrup and refrigerate for at least 2 hours before serving.
Notes
Chill overnight for the best flavor.
Can be stored in the refrigerator for up to 4 days or frozen for 2 months.
Swap pudding flavors for a custom twist.
- Prep Time: 20 mins
- Cook Time: 30 mins
- Category: Dessert
- Method: No-Bake
- Cuisine: American
Nutrition
- Serving Size: 1 slice
- Calories: 320
- Sugar: 24g
- Sodium: 210mg
- Fat: 18g
- Saturated Fat: 9g
- Unsaturated Fat: 7g
- Trans Fat: 0g
- Carbohydrates: 36g
- Fiber: 1g
- Protein: 4g
- Cholesterol: 35mg