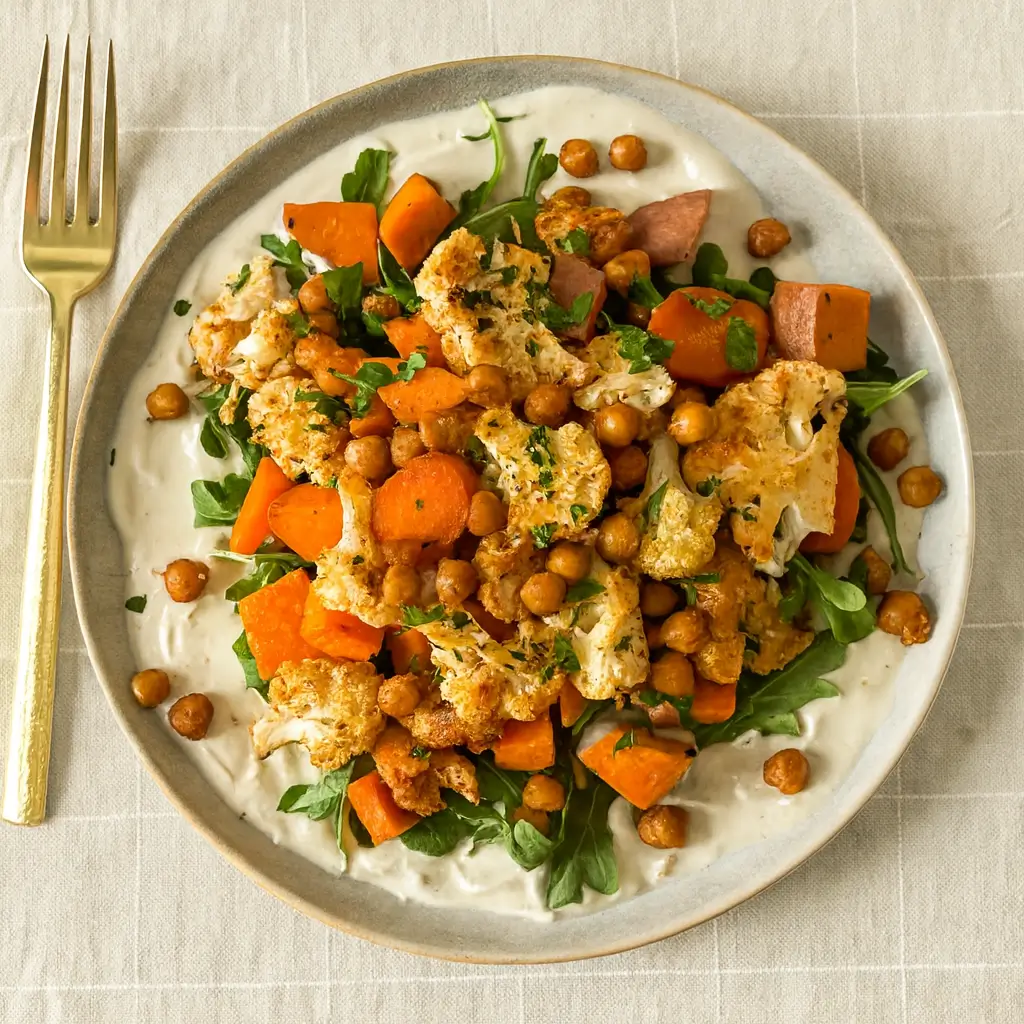
Anti-Inflammatory Harvest Glow Bowl is the cozy, colorful dinner your weeknight dreams are made of. Packed with feel-good ingredients like roasted cauliflower, sweet potatoes, and chickpeas, this bowl doesn’t just look pretty—it’s a powerhouse of anti-inflammatory goodness. And that creamy tahini yogurt sauce? Let’s just say it brings everything together like a warm fall hug in a bowl.
Whether you’re trying to eat cleaner, manage inflammation, or just sneak more veggies into your dinner rotation, this one’s a keeper. Plus, it’s flexible enough to work for meal prep or picky eaters (looking at you, toddlers and skeptical spouses). So next time you’re standing in front of the fridge wondering what to make that’s healthy but not boring—this Anti-Inflammatory Harvest Glow Bowl is your golden ticket.
Table of Contents
What is Anti-Inflammatory Harvest Glow Bowl?
An Anti-Inflammatory Harvest Glow Bowl is a warm, hearty, and nutrient-rich bowl layered with seasonal vegetables like roasted carrots, cauliflower, sweet potatoes, crispy chickpeas, and fresh greens. What really ties it all together is a silky tahini yogurt sauce, loaded with healthy fats and zesty lemon.
This type of bowl isn’t just pretty to look at—it’s filled with ingredients known to help reduce inflammation, support gut health, and give your body a natural boost. Think of it as your dinner doing double-duty: satisfying your cravings and doing a little wellness magic behind the scenes. Inspired by the “buddha bowl” and nourish bowl trend, this one takes a functional-food spin, with every bite working to make you feel good from the inside out.
Reasons to Try Anti-Inflammatory Harvest Glow Bowl
First of all, it’s ridiculously satisfying—crispy chickpeas, tender roasted veggies, creamy sauce… need we say more? But beyond the flavor, this Anti-Inflammatory Harvest Glow Bowl is a weeknight winner because it checks all the boxes: gluten-free, plant-based, meal prep friendly, and packed with good-for-you ingredients.
Tired after a long day? This bowl’s easy prep will feel like a gift to yourself. Trying to eat more whole foods without getting bored? Hello, roasted paprika cauliflower. And if you’re constantly feeding a crew with different preferences, this bowl’s customizable nature (hello, optional toppings and greens!) makes it a life-saver. It’s one of those meals that feels fancy but doesn’t require a culinary degree—or 20 dishes.
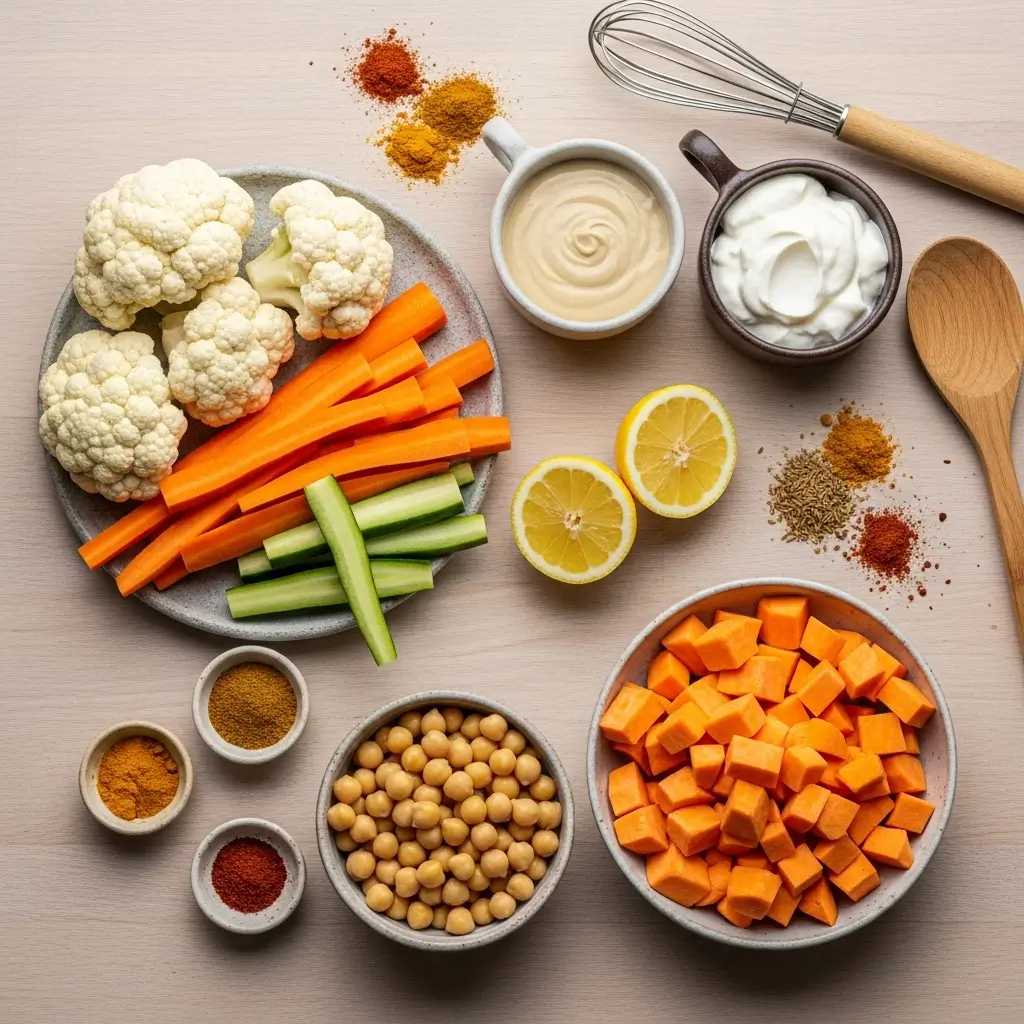
Ingredients Needed to Make Anti-Inflammatory Harvest Glow Bowl
For the Roasted Carrots & Cauliflower:
- 1 head cauliflower (or 12 oz precut florets)
- 3 large carrots, sliced
- 2 tbsp extra virgin olive oil
- ½ tsp garlic powder
- 1 tsp oregano
- 1 tsp paprika
- 1 tsp ground cumin
- ½ tsp salt
- ¼ tsp black pepper
- Juice of ½ lemon
- ¼ cup fresh parsley (optional)
For the Roasted Chickpeas & Sweet Potatoes:
- 1 can chickpeas (15.5 oz–16 oz), rinsed and dried
- 1 sweet potato, diced
- 2 tbsp extra virgin olive oil
- ½ tsp ground cumin
- ½ tsp paprika
- ¼ tsp garlic powder
- ½ tsp salt
- ⅕ tsp black pepper
For the Tahini Yogurt Sauce:
- 1 cup Greek yogurt (or plant-based)
- ¼ cup tahini
- Juice of 1 lemon (about ¼ cup)
- 2 tbsp olive oil
- 1 clove garlic
- ½ tsp ground cumin
- ½ tsp salt
For the Bowl:
- Arugula or greens of choice
- Optional toppings: seeds, nuts, avocado, herbs, or a drizzle of lemon
Instructions to Make Anti-Inflammatory Harvest Glow Bowl
Ready to bring some glow to your dinner routine? Follow this step-by-step guide to make the ultimate Anti-Inflammatory Harvest Glow Bowl. Each part is easy to manage, and when combined, the final result is vibrant, wholesome, and totally worth it. Whether you’re meal prepping or cooking fresh, this method walks you through each phase with clarity (and maybe a little fun too). Let’s dive in—step by step!
Step 1: Prep and Roast the Carrots & Cauliflower
First, preheat your oven to 425℉ (220°C). This higher heat setting helps caramelize the vegetables, giving them that toasty flavor that takes this bowl from “just okay” to “can’t stop eating this.”
Wash and chop your carrots into rounds and break down the cauliflower into small florets (or use pre-cut to save time—here are some handy vegetable prep shortcuts you might love). Place both on a large parchment-lined baking sheet. Don’t overcrowd them—give each piece breathing room so they roast instead of steam.
Drizzle with extra virgin olive oil, then sprinkle on a flavor-packed blend: garlic powder, paprika, cumin, oregano, salt, and pepper. Toss everything directly on the sheet using your hands or tongs until the veggies are evenly coated.
Roast for 25–30 minutes until golden edges appear. At this point, remove from the oven and squeeze on fresh lemon juice for a zesty kick, and sprinkle chopped parsley if using. Pop it back into the oven for another 5–10 minutes to finish roasting. The cauliflower should be lightly browned and fork-tender, and the carrots should be sweet and softened.
Tip: Want even more caramelization? Turn your oven to broil for the last 2 minutes—but don’t walk away!
Step 2: Roast the Chickpeas & Sweet Potatoes
While your carrots and cauliflower are roasting, it’s time for the next step by step process—crispy chickpeas and sweet potatoes.
Drain and rinse your chickpeas, then pat them very dry with a towel (don’t skip this—it’s key to achieving that crispy crunch). Spread them out on one half of another baking sheet.
In a bowl, toss chickpeas with olive oil, cumin, paprika, garlic powder, salt, and pepper. They should be well-coated but not greasy. On the other half of the baking sheet, add your diced sweet potatoes and toss with oil, salt, and pepper.
Slide the tray into the oven (middle rack works best) and roast for 20–28 minutes. Stir halfway through to ensure everything gets an even roast. The sweet potatoes should be soft inside and slightly crisp on the edges, and the chickpeas golden and crunchy.
For more tricks to get perfect texture, check out our roasted veggie tips for crispiness without the grease.
Step 3: Blend the Tahini Yogurt Sauce
As your veggies roast, it’s time to make the creamy dream sauce that ties this bowl together—hello, tahini yogurt bliss. This step by step part is fast but flavorful.
In a blender or food processor, combine:
- Greek yogurt (or plant-based yogurt)
- Tahini
- Lemon juice
- Olive oil
- Fresh garlic
- Ground cumin
- Salt
Blend for about 60 seconds or until the sauce is silky smooth. If it’s too thick, add water a tablespoon at a time until you get a pourable consistency. The flavor should be creamy, nutty, bright, and slightly tangy.
Want to shake things up? Swap lemon for lime or add a pinch of turmeric for even more anti-inflammatory punch. Visit our ingredient substitution guide for more tasty twists.
Store sauce in the fridge while finishing the rest—it also works great as a dip for roasted veggies or wraps later in the week.
Step 4: Assemble Your Glow Bowl
Now for the fun part—assembling your bowl! This final step by step section brings all the components together into one nourishing, flavor-packed meal.
Start with a base of greens—arugula adds a peppery bite, but spinach or massaged kale work beautifully too. Then layer in:
- Roasted carrots and cauliflower
- Sweet potato cubes
- Crispy chickpeas
Spoon or drizzle on that creamy tahini yogurt sauce like the final brushstroke on a masterpiece. Don’t be shy—it’s what brings the “glow” to your Glow Bowl.
Top with anything extra you love—avocado slices, toasted seeds, lemon wedges, or a sprinkle of feta if you’re not strictly plant-based. Need inspiration? Check out our BBQ Chicken and Roasted Sweet Potato Bowls for another bowl-based favorite that layers like a pro.
Bonus tip: Serve it warm, or let everything cool and enjoy it as a lunch prep bowl for the next few days. It’s just as good cold!
What to Serve with Anti-Inflammatory Harvest Glow Bowl
This Anti-Inflammatory Harvest Glow Bowl is pretty complete on its own, but if you’re feeding a hungry crew or want to bulk things up, you’ve got options. A simple side of warm quinoa, brown rice, or farro adds extra fiber and makes it extra satisfying. Craving crunch? Try a side of garlic sesame noodles or a fresh cucumber tomato salad with a little tang. You can also pair this bowl with soup—something like our Anti-Inflammatory Red Lentil Soup makes for a comfort-food combo that’s totally inflammation-friendly.
Key Tips for Making Anti-Inflammatory Harvest Glow Bowl
Roast everything until it’s got that slight caramelized edge—this brings out max flavor. Don’t skip drying the chickpeas; it’s the secret to that crave-worthy crunch. If time is tight, grab pre-chopped veggies or roast everything the night before. The tahini yogurt sauce thickens in the fridge, so thin with a bit of water or lemon juice before using leftovers. Finally, make it your own—swap the cauliflower for broccoli, use kale instead of arugula, or throw in some leftover rotisserie chicken if plant-based isn’t your thing. It’s flexible, forgiving, and fabulous.
Storage and Reheating Tips Anti-Inflammatory Harvest Glow Bowl
Store your roasted veggies and sauce separately in airtight containers. The veggies will stay fresh in the fridge for 4–5 days, while the sauce lasts about the same. Chickpeas stay crispy for up to a week at room temp (loosen that jar lid to keep them crunchy). To reheat, pop veggies and sweet potatoes in the oven or air fryer at 350℉ for 10 minutes or microwave in a pinch. Don’t microwave the sauce—it gets weird. Just stir and drizzle cold, or let it come to room temp.
FAQs
Can I make it dairy-free?
Totally! Just use a plant-based yogurt in the sauce—it works beautifully.
How can I make this ahead of time?
Roast the veggies and blend the sauce in advance. Store separately and assemble when ready.
Is it freezer-friendly?
Not really. The veggies get mushy and the sauce separates. Stick with fridge storage.
Can I add protein?
Yes! Add grilled chicken, tempeh, tofu, or even an egg for a protein boost.
Is it kid-friendly?
With some modifications—skip the arugula (use spinach) and ease up on the spices for picky eaters.
Final Thoughts
This Anti-Inflammatory Harvest Glow Bowl is more than just a pretty plate—it’s comfort food that happens to be good for you. Whether you’re navigating inflammation, looking for a hearty plant-based meal, or just craving something that feels as good as it tastes, this bowl checks every box. So next time you’re stuck in a dinner rut, let this colorful creation light the way. And if you’re into nourishing bowls, you might love our BBQ Chicken and Roasted Sweet Potato Bowls too!
Visit our Pinterest for regular slow cooker recipe updates, or join our Facebook discussions where cooking fans exchange their favorite hearty meal ideas.
Print
Anti-Inflammatory Harvest Glow Bowl: A Nourishing Dinner You’ll Love
- Total Time: 45 minutes
- Yield: 4 servings 1x
- Diet: Vegetarian
Description
This colorful Glow Bowl features roasted cauliflower, carrots, sweet potato, and crispy chickpeas, all topped with a creamy tahini yogurt sauce. Packed with plant-based protein, fiber, and heart-healthy fats—perfect for a vibrant and nourishing meal.
Ingredients
For Roasted Carrots and Cauliflower:
- 1 head cauliflower, cut into florets (or 12 oz precut cauliflower florets)
- 3 large carrots, cut into round pieces
- 2 tablespoons extra virgin olive oil, more as needed
- ½ teaspoon garlic powder
- 1 teaspoon oregano
- 1 teaspoon paprika
- 1 teaspoon ground cumin
- ½ teaspoon salt, more to taste
- ¼ teaspoon ground black pepper
- ½ large lemon, juiced (about 2 Tbsp)
- ¼ cup fresh parsley, chopped (optional)
For Roasted Chickpeas and Sweet Potatoes:
- 1 can (15.5–16 oz) chickpeas, rinsed and drained
- 1 sweet potato, diced
- 2 tablespoons extra virgin olive oil
- ½ teaspoon ground cumin
- ½ teaspoon paprika
- ¼ teaspoon garlic powder
- ½ teaspoon salt, more to taste
- ⅕ teaspoon ground black pepper, more to taste
For Tahini Yogurt Sauce:
- 1 cup Greek yogurt (or plant-based yogurt)
- ¼ cup tahini
- 1 large lemon, juiced (about ¼ cup)
- 2 tablespoons extra virgin olive oil
- 1 clove garlic
- ½ teaspoon ground cumin
- ½ teaspoon salt
For the Bowl:
- Arugula or greens of choice (optional)
- Toppings of choice (optional)
Instructions
1. Preheat oven to 425℉ (220°C). Chop carrots and cauliflower into bite-sized pieces. Line a baking sheet with parchment paper and lightly spray with oil. Toss cauliflower and carrots with olive oil and spices. Roast for 25–30 minutes, remove and toss with lemon juice and parsley. Return to oven for another 5–10 minutes until golden.
2. Line a second baking sheet with parchment paper. Rinse and dry chickpeas thoroughly, discarding any loose skins. Toss chickpeas with olive oil, cumin, paprika, garlic powder, salt, and pepper. Spread in a single layer on half the baking sheet.
3. Add diced sweet potatoes to the other half. Drizzle with olive oil, salt, and pepper. Roast both for 20–28 minutes, until crispy and tender.
4. Make tahini yogurt sauce by blending yogurt, tahini, lemon juice, olive oil, garlic, cumin, and salt in a food processor or blender until smooth. Add water if a thinner consistency is desired.
5. Assemble the bowl by layering greens (if using), roasted cauliflower and carrots, sweet potatoes, and chickpeas. Drizzle with tahini yogurt sauce and add desired toppings. Serve with extra lemon juice if desired.
Notes
Prep vegetables in advance to save time.
Use pre-cut veggies to speed up the process.
Store roasted vegetables and sauce separately in the fridge for up to 4–5 days.
Keep chickpeas at room temperature in a loose-lid container for up to 7 days to maintain crispiness.
Customize toppings with avocado, hemp seeds, or microgreens for extra nutrition.
- Prep Time: 15 minutes
- Cook Time: 30 minutes
- Category: Dinner
- Method: Roasting
- Cuisine: American
Nutrition
- Serving Size: 1 bowl
- Calories: 375
- Sugar: 7g
- Sodium: 320mg
- Fat: 22g
- Saturated Fat: 3.5g
- Unsaturated Fat: 16g
- Trans Fat: 0g
- Carbohydrates: 35g
- Fiber: 9g
- Protein: 12g
- Cholesterol: 5mg

")