Garlic Butter Cheeseburger Rollups are the ultimate comfort food wrapped in a cozy, buttery crust. This delightful spin on the classic cheeseburger skips the buns and packs all that savory goodness into a golden, cheesy roll-up. If you’re juggling work, kids, or just trying to figure out dinner without starting a small kitchen fire (hey, it happens), this recipe is here to save the day.
Garlic Butter Cheeseburger Rollups are quick, satisfying, and have that ooey-gooey, melty cheese factor we all secretly crave. Whether it’s a weeknight dinner or a game-day snack, these rollups come together in under 40 minutes and feel just fancy enough to impress without the stress.
Table of Contents
What is Garlic Butter Cheeseburger Rollups?
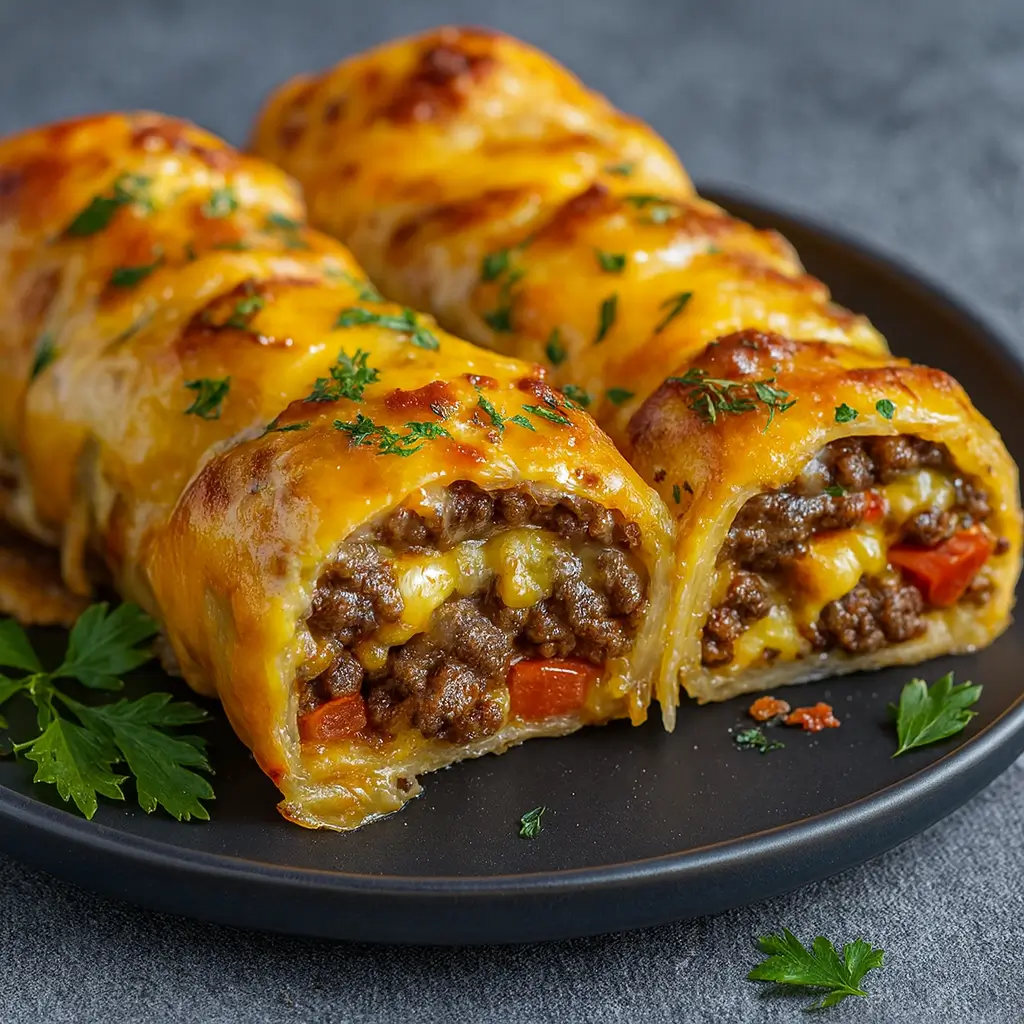
Garlic Butter Cheeseburger Rollups are like the love child of your favorite cheeseburger and a hot, cheesy breadstick. Imagine seasoned ground beef layered with cheddar and mozzarella, all hugged tightly inside pizza dough, then brushed with garlic butter until golden and crisp.
They bake up beautifully and slice into spiraled servings of meaty, cheesy perfection. It’s basically everything you love about burgers—but without the drippy mess or that lonely burger bun that gets left behind. They’re fun to eat, easy to make, and can be customized for picky eaters (looking at you, tomato haters). Think of these rollups as the casserole version of a burger: easy to prep, satisfying to serve, and a total crowd-pleaser.
Reasons to Try Garlic Butter Cheeseburger Rollups
There are so many reasons these Garlic Butter Cheeseburger Rollups might just land a permanent spot in your meal rotation. First, they’re weeknight-friendly—just 15 minutes to prep and 20 to bake. That’s faster than getting through the drive-thru on a Tuesday with cranky kids in the backseat. Second, they’re insanely versatile.
Want to sneak in some veggies? Toss in diced bell peppers. Need something portable for a potluck? These are grab-and-go gold. Third, let’s be real: the garlic butter crust alone is worth it. It’s rich, savory, and makes your kitchen smell like a fancy steakhouse. And if you’re trying to win over a picky eater, tell them it’s a cheeseburger swirl—suddenly, it’s fun food. Plus, leftovers (if there are any) reheat beautifully.
Ingredients Needed to Make Garlic Butter Cheeseburger Rollups
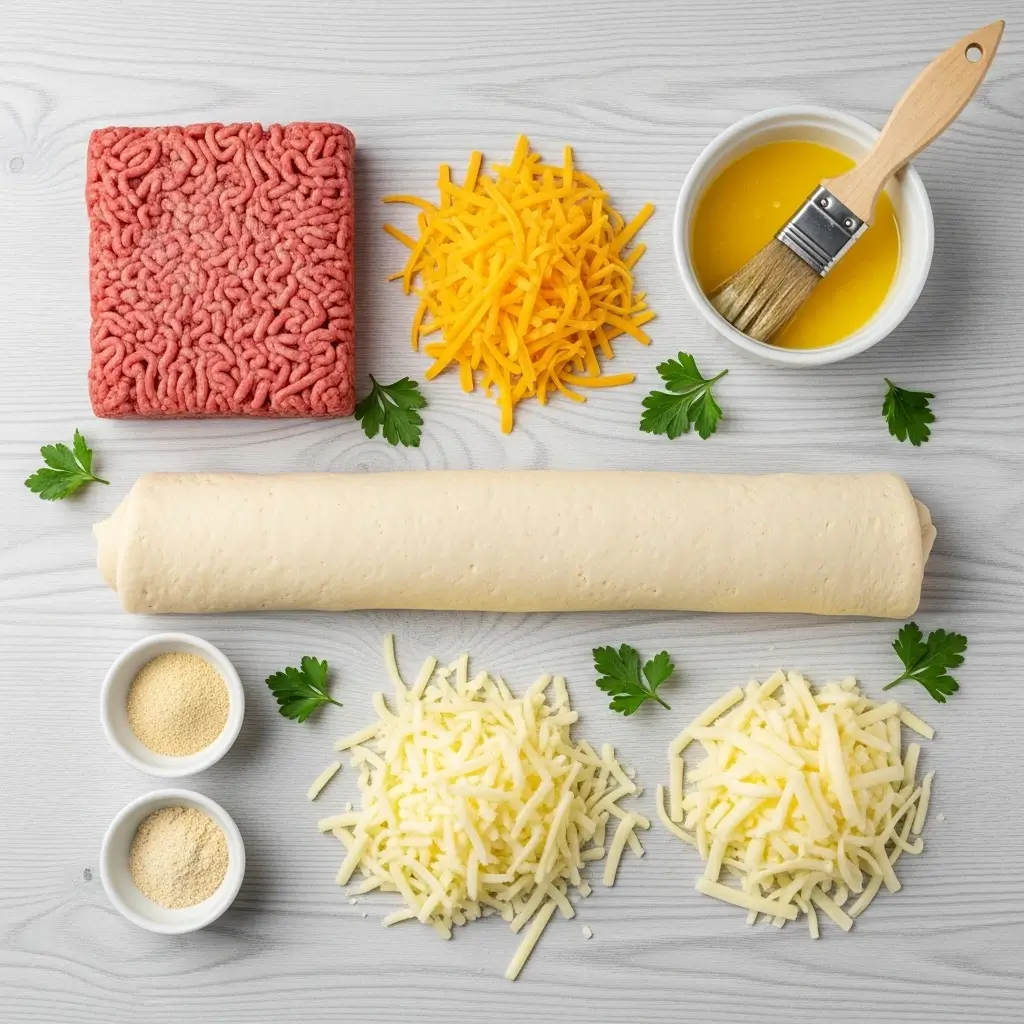
- 1 pound ground beef
- 1 teaspoon garlic powder
- 1 teaspoon onion powder
- Salt and pepper to taste
- 1 cup shredded cheddar cheese
- 1 cup shredded mozzarella cheese
- 2 tablespoons butter
- 1 package refrigerated pizza dough
Instructions to Make Garlic Butter Cheeseburger Rollups
Making Garlic Butter Cheeseburger Rollups step by step is not just simple—it’s downright satisfying. Whether you’re a kitchen pro or still figuring out the difference between parchment paper and wax paper (you’re not alone), this guide breaks it all down with detailed instructions you can trust. From browning the beef to that glorious final slice, here’s how to create cheesy, garlic-butter bliss, one easy step at a time.
Step 1: Brown the Ground Beef
Start by heating a large skillet over medium heat. Add 1 pound of ground beef to the pan and break it up using a spatula. Cook for about 7–9 minutes until it’s fully browned and no longer pink. As the beef cooks, sprinkle in 1 teaspoon garlic powder, 1 teaspoon onion powder, and salt and pepper to taste. Stir frequently so all the seasoning gets evenly distributed. Browning the meat step by step ensures rich, layered flavor in every bite.
Tip: For a leaner twist, check out our beef stir fry with vegetables recipe for inspiration on using ground turkey or lean cuts. Ground turkey also works great here if you’re lightening things up.
Once browned, drain any excess grease. This helps keep your rollups from getting soggy later on. Set the beef aside to cool slightly—it’ll be easier to work with during assembly.
Step 2: Preheat Your Oven
Check the temperature instructions on your refrigerated pizza dough package, and set your oven to preheat accordingly—usually around 375°F to 400°F. A properly preheated oven is essential for baking the rollups evenly and getting that irresistible golden crust.
While the oven heats, line a baking sheet with parchment paper. Not only does this prevent sticking, but it also makes cleanup a breeze.
Pro Tip: If you’re wondering about baking tricks, visit our guide on easy baking recipes for busy nights to learn how to streamline your prep.
Step 3: Roll Out the Dough
Dust a clean surface with a little flour and roll out your refrigerated pizza dough into a large rectangle, about ¼ inch thick. This is your canvas, so aim for even thickness all around—no one wants a lopsided rollup!
If your dough springs back while rolling, let it rest for a minute to relax the gluten. This makes it easier to shape and keeps it from tearing.
Step 4: Add the First Layer of Cheese
Once your dough is rolled out, sprinkle 1 cup of shredded cheddar cheese across the surface, leaving about a half-inch border around the edges. This cheesy foundation melts into the dough while baking, creating that crave-worthy gooey interior.
Cheddar is our go-to, but you can swap it for Monterey Jack or Colby if you prefer. Need help picking cheeses? Our homemade crack chicken tenders also use melty cheeses and offer ideas on substitutions that hold up beautifully when baked.
Step 5: Spread the Ground Beef Evenly
Spoon your seasoned ground beef over the cheddar layer, distributing it as evenly as possible. Again, avoid the edges—this prevents overflow while rolling. Gently press down the beef to help it stick to the cheese layer and form a tight spiral later.
Adding the beef step by step allows for balanced filling in every slice. This is where the rollups become hearty enough to be dinner-worthy, not just a snack.
Step 6: Sprinkle on the Mozzarella
Now for the final touch of cheesy goodness: 1 cup of shredded mozzarella. Sprinkle it generously over the ground beef layer. Mozzarella gives that stringy, pull-apart texture we all secretly live for. Layering cheeses like this adds depth, and using two types really makes a difference.
Want to pack in extra protein while you’re at it? Pair this with our high-protein honey garlic shrimp for a surf-and-turf night that’s anything but boring.
Step 7: Roll It Up Like a Pro
Starting at one short end of the dough, carefully roll it into a log, just like you would a cinnamon roll. Keep the roll tight as you go to avoid air gaps, which can cause uneven baking. Pinch the seam gently to seal the dough.
This step-by-step technique gives you that beautiful spiral effect when sliced. If the roll starts to stretch or tear, don’t panic—patch it gently and keep rolling.
Once rolled, transfer it to the prepared baking sheet, seam-side down. This helps keep everything tucked in while it bakes.
Step 8: Brush with Garlic Butter
Melt 2 tablespoons of butter in a small bowl and, if you love extra garlic flavor (who doesn’t?), stir in a pinch of garlic powder. Use a pastry brush to coat the top and sides of the rolled dough in this buttery goodness. This garlic butter layer turns the crust into a savory, glossy showstopper.
Want more garlic recipes? Try our slow cooker garlic butter beef bites and potatoes—a reader favorite!
Step 9: Bake Until Golden and Bubbling
Place the baking sheet in the oven and bake for 18–22 minutes, or until the crust is a deep golden brown and the cheese is visibly bubbling at the seams. Your kitchen will smell like a garlic butter wonderland—prepare for drool.
If your oven runs hot, start checking at the 18-minute mark. The outer crust should feel firm and slightly crisp, while the inside stays gooey and soft.
Step 10: Let It Cool, Then Slice and Serve
Once baked, remove the roll from the oven and let it rest for about 5 minutes. This gives the cheese time to set a little so it doesn’t ooze out immediately when sliced.
Use a serrated knife to cut the roll into 1½-inch slices. Each one should reveal a gorgeous spiral of beef, cheese, and dough—perfect for dipping, stacking, or devouring straight off the tray.
Serve warm with dipping sauces like ranch, ketchup, or even sriracha mayo for a kick. These rollups are fantastic solo, or as part of a full spread alongside crock pot beef tips and gravy for a cozy, comfort-packed dinner.
What to Serve with Garlic Butter Cheeseburger Rollups
These rollups are already a full-flavor experience, but a few easy sides can round out the meal. A simple green salad with a tangy vinaigrette balances the richness beautifully. Air-fried sweet potato fries or baked waffle fries make it feel like a fun diner night at home. Or serve them alongside healthy easy crockpot chicken tortilla soup for a comfort food combo that checks all the boxes. If you’re feeding a crowd, consider pairing them with BBQ chicken sweet potato bowls for variety. And don’t forget a few dipping sauces—ketchup, ranch, or a smoky aioli can take things to the next level.
Key Tips for Making Garlic Butter Cheeseburger Rollups
A few helpful tips can make this recipe even more foolproof. First, don’t overload the dough with filling—tempting as it is—because it’ll be harder to roll and may burst open while baking. If you’ve got time, chill the rolled dough for 10 minutes before baking for neater slices. Want to make it spicy? Toss in a pinch of red pepper flakes or swap the cheddar for pepper jack. And yes, pre-shredded cheese is convenient, but shredding your own melts better. If the rollup starts to brown too fast in the oven, just cover it loosely with foil for the last 5 minutes. Oh—and always use parchment paper unless you want to chisel cheese off your baking sheet.
Storage and Reheating Tips Garlic Butter Cheeseburger Rollups
If (and it’s a big if) you have leftovers, store them in an airtight container in the fridge for up to 4 days. To reheat, the air fryer is your best friend—just 3–4 minutes at 350°F makes them taste freshly baked again. No air fryer? Pop them in the oven at 375°F for 10 minutes or microwave for about a minute (they’ll still be good, just not as crispy). You can even freeze the baked rollups for up to 2 months. Wrap them tightly in foil and place in a freezer bag. To reheat from frozen, bake at 375°F for 20–25 minutes until hot in the center.
FAQs
Can I use crescent roll dough instead of pizza dough?
Yes! Crescent roll dough gives a softer, flakier texture. It’s a bit sweeter, too—so it’s great if you’re feeding kids or want more of a “cheeseburger pastry” vibe.
Can I prep Garlic Butter Cheeseburger Rollups in advance?
Absolutely. Assemble the roll, wrap it in plastic, and refrigerate up to 24 hours ahead. Brush with butter and bake when ready.
What can I use instead of mozzarella?
Monterey Jack, provolone, or even Swiss work well. Mix and match based on what’s in your fridge!
Are they kid-friendly?
Totally. Just maybe hold the garlic if you’ve got extra-picky little ones.
Final Thoughts
Garlic Butter Cheeseburger Rollups are everything we love about burgers—savory beef, gooey cheese, and toasty bread—but with a comforting, easy twist that fits right into busy weeknights or chill weekends. The garlic butter crust adds a restaurant-level touch without any of the stress, and the roll-up style makes it fun for adults and kids alike. Whether you’re meal prepping for the week, showing off at a potluck, or just solving the eternal “what’s for dinner?” question, this recipe’s got you. And if you loved this, don’t miss our crockpot chicken enchilada casserole or easy ground turkey taco skillet for more weeknight wins.
Visit our Pinterest for regular slow cooker recipe updates, or join our Facebook discussions where cooking fans exchange their favorite hearty meal ideas.
Print
Garlic Butter Cheeseburger Rollups: Easy, Cheesy Dinner Idea
- Total Time: 35 minutes
- Yield: 6 servings 1x
Description
A unique twist on classic cheeseburgers, these Garlic Butter Cheeseburger Rollups are made with ground beef, savory cheeses, and a buttery garlic crust. Perfect for a cozy family dinner or a fun gathering with friends!
Ingredients
- 1 pound ground beef
- 1 teaspoon garlic powder
- 1 teaspoon onion powder
- Salt and pepper to taste
- 1 cup shredded cheddar cheese
- 1 cup shredded mozzarella cheese
- 2 tablespoons butter
- 1 package refrigerated pizza dough
Instructions
1. In a skillet, cook the ground beef over medium heat until browned. Season with garlic powder, onion powder, salt, and pepper. Drain any excess grease.
2. Preheat the oven to the temperature specified on the pizza dough package.
3. Roll out the pizza dough on a lightly floured surface and spread a layer of shredded cheddar cheese on top.
4. Spread the cooked ground beef evenly over the cheese layer, leaving a border around the edges.
5. Sprinkle the mozzarella cheese on top of the beef layer.
6. Starting from one end, tightly roll the dough into a log, enclosing the filling inside.
7. Melt the butter and brush it over the surface of the rolled dough.
8. Bake the rollups in the preheated oven until golden brown and the cheese is melted and bubbly.
9. Slice the rollups into individual portions and serve hot.
Notes
For extra flavor, add pickles, caramelized onions, or jalapeños before rolling.
You can substitute the pizza dough with crescent dough for a flakier texture.
Serve with dipping sauces like ketchup, mustard, or burger sauce.
These also reheat well—just pop in the oven or air fryer to restore crispness.
- Prep Time: 15 minutes
- Cook Time: 20 minutes
- Category: Main Course
- Method: Baking
- Cuisine: American
Nutrition
- Serving Size: 1 rollup
- Calories: 480
- Sugar: 3
- Sodium: 920
- Fat: 26
- Carbohydrates: 32
- Fiber: 2
- Protein: 28

")