Frozen Greek Yogurt Peanut Butter Bites are the snack your 3 PM cravings didn’t know they needed. They’re cold, creamy, just sweet enough, and packed with protein to keep you fueled—without the sugar crash. Whether you’re juggling back-to-back Zoom calls or dodging snack-time negotiations with your toddlers, these bites are a small but mighty win.
And let’s be honest, sometimes you just need a treat that feels indulgent but doesn’t undo your day. Plus, the ingredients are so simple you might already have everything in your fridge. Oh, and the best part? No baking, no mess, and definitely no fancy ingredients that require a Google search or a drive across town.
These Frozen Greek Yogurt Peanut Butter Bites hit that perfect middle ground—healthy-ish, satisfying, and super easy. Whether you’re sneaking one after dinner or offering them up as a freezer-friendly snack for the kiddos, these are about to earn a permanent spot in your meal prep rotation.
Table of Contents
What is Frozen Greek Yogurt Peanut Butter Bites?
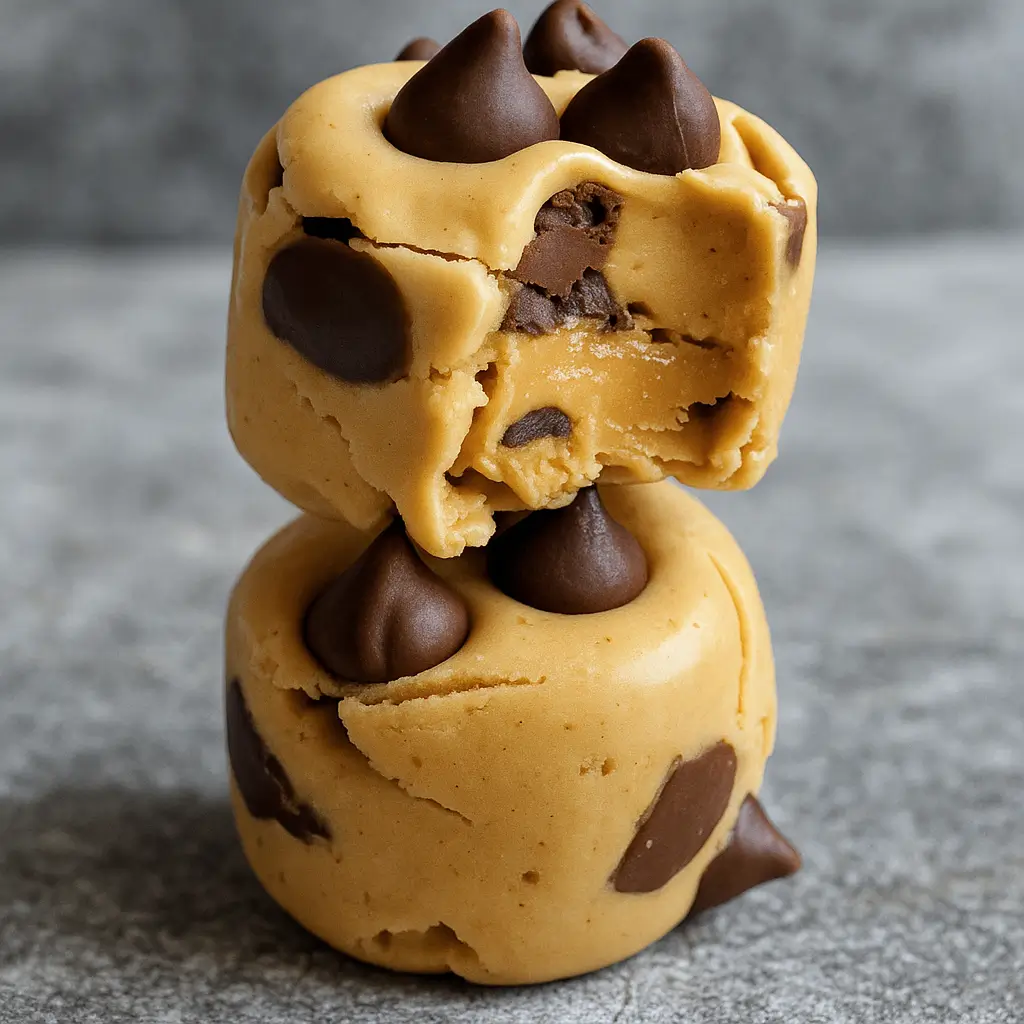
Frozen Greek Yogurt Peanut Butter Bites are the snack version of a mic drop. They’re made by blending creamy Greek yogurt with smooth peanut butter and a touch of honey, then freezing the mixture into bite-sized treats. Think of them like a frozen Reese’s cousin who shops at Trader Joe’s and has a yoga membership. What makes them so loveable (besides how easy they are) is the texture—smooth, cold, and just enough chew thanks to the peanut butter.
You can keep them basic or jazz them up with extras like mini chocolate chips or chia seeds. It’s basically a DIY fro-yo snack that feels like dessert but actually offers protein, calcium, and healthy fats. Plus, they’re endlessly customizable depending on your mood (or your pantry). Moms love them. Kids devour them. Your freezer will never be the same.
Reasons to Try Frozen Greek Yogurt Peanut Butter Bites
These Frozen Greek Yogurt Peanut Butter Bites check so many boxes it’s ridiculous. First off, they’re no-bake. No oven, no sweating over a hot stove—just mix, freeze, and enjoy. Secondly, they’re made with whole, simple ingredients. No mysterious additives or tongue-twisting preservatives. Just good stuff. Third, portion control is built-in. You make them in muffin tins or silicone molds, so you get cute little bites that are easy to grab when hunger (or stress-snacking) hits.
Bonus? They’re actually nourishing. Greek yogurt brings the protein and probiotics, peanut butter gives you healthy fats, and honey adds natural sweetness. And let’s not forget—they’re freezer-friendly, so you can make a batch on Sunday and snack happy all week. Need a healthier treat after dinner? Done. Want a quick snack post-school for the kids? Covered. Need to feel like you have your life together for once? This might do the trick.
Ingredients Needed to Make Frozen Greek Yogurt Peanut Butter Bites
Core Ingredients:
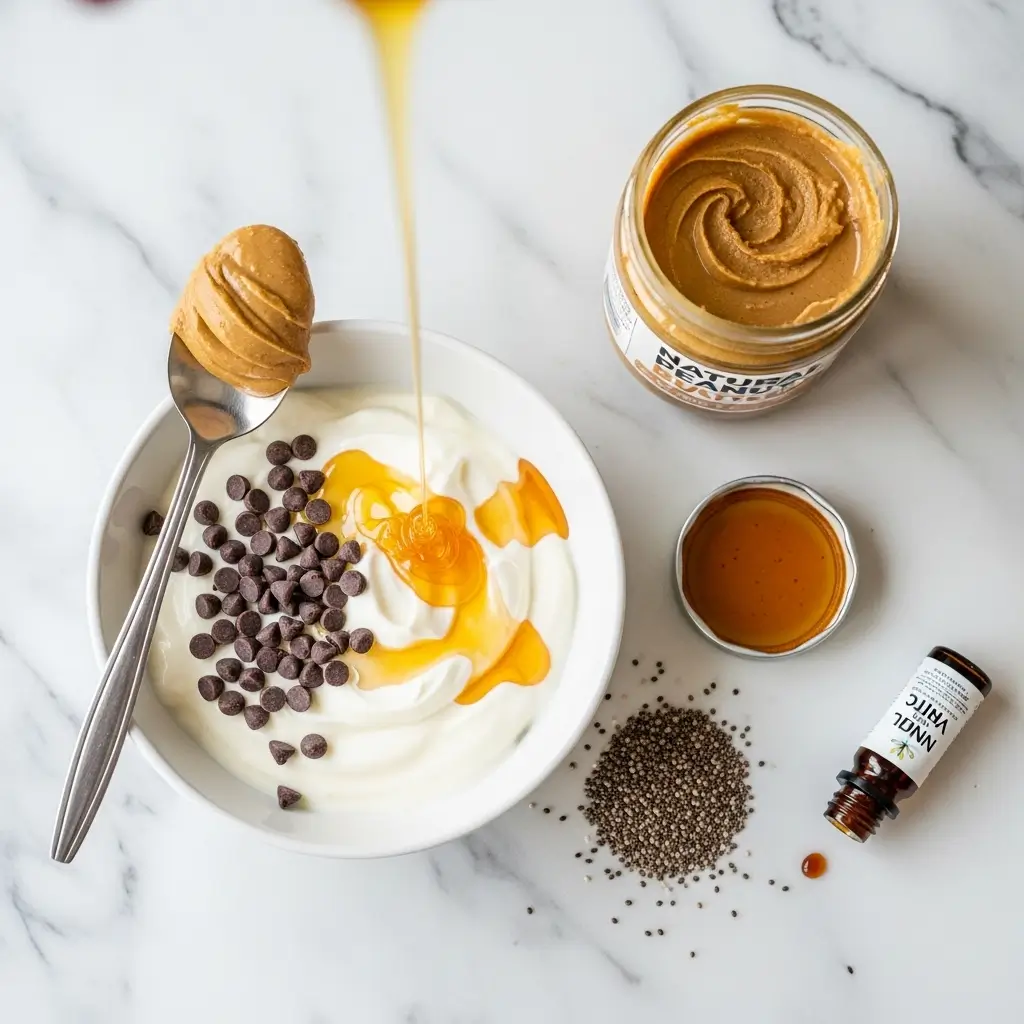
- 1 cup plain Greek yogurt (full-fat for extra creaminess, or low-fat if you prefer)
- ½ cup creamy peanut butter (natural, no added sugar or oils)
- 2 tablespoons honey (or maple syrup for a vegan option)
Optional Flavor Boosters:
- Mini chocolate chips (because… chocolate)
- Chia seeds (for a little crunch + omega-3 boost)
- ½ teaspoon vanilla extract (for warmth and depth)
- A pinch of cinnamon (just because it’s cozy)
Swaps: Almond or cashew butter works too, but peanut butter really nails the flavor and texture combo.
Instructions to Make Frozen Greek Yogurt Peanut Butter Bites
Making Frozen Greek Yogurt Peanut Butter Bites is one of those step by step recipes that feels almost too easy to be this good. Whether you’re a seasoned home cook or a snack-curious newbie, this guide will walk you through each part of the process with simple tips and a few insider tricks to guarantee snack success. Let’s break it down, step by step.
Step 1: Mix the Base Ingredients
Start by grabbing a medium-sized mixing bowl and a sturdy spoon or silicone spatula. Add 1 cup of plain Greek yogurt, ½ cup of creamy peanut butter, and 2 tablespoons of honey (or maple syrup for a vegan option).
Step by Step Tip: If your peanut butter is refrigerated or extra thick, pop it in the microwave for about 10–15 seconds to soften it. This makes mixing smoother and helps everything combine evenly.
Now, stir the mixture until it becomes creamy and uniform in texture. This might take a minute or two, but keep going until the ingredients look like a silky, delicious cloud of peanut-buttery yogurt goodness.
Optional additions: If you’re feeling extra, stir in ½ teaspoon of vanilla extract and a pinch of cinnamon here. Both add warmth and depth to the flavor without overpowering the snack.
Looking for ideas to substitute ingredients or customize flavor? Check out these ingredient swaps and tips for easy snack upgrades.
Step 2: Prepare Your Molds
This step is key to getting perfectly portioned bites. Use a mini muffin tin or silicone mold—something with small cavities works best. Silicone makes it super easy to pop the bites out after freezing (and there’s no weird wrestling with a spoon involved).
Step by Step Tip: If you’re using a metal tin, line each cavity with mini cupcake liners or lightly coat them with nonstick spray to help release the bites later.
Spoon about 1 tablespoon of the mixture into each mold cavity. It doesn’t need to be perfectly leveled—this isn’t a baking competition. Rustic = charming, right?
Step 3: Add Your Toppings
Here’s where you can get a little creative. Sprinkle mini chocolate chips on top of each portion, or add a dash of chia seeds for extra crunch and nutrition. Want to go wild? Do both.
Gently press the toppings into the surface of each bite to help them freeze into place.
For more ideas on protein-rich toppings, check out our Cream Cheese Oreo Protein Balls—they’re packed with mix-in inspiration!
Step 4: Freeze Until Solid
Now it’s time to play the waiting game (ugh, we know). Carefully place your tray or mold in the freezer for at least 2 hours, or until the bites are completely firm.
Step by Step Tip: To avoid spills on the way to the freezer, place your muffin tin on a flat baking sheet first. This keeps everything level and your freezer mess-free.
The longer they freeze, the better the texture. Once set, they’ll have that dreamy bite—cold, creamy, and just soft enough to sink your teeth into without cracking a molar.
Step 5: Release and Store
Once frozen solid, it’s time to remove your treats. If you used a silicone mold, simply push from the bottom to pop them out. For a metal muffin tin, run a little warm water on the underside for about 10 seconds—it’ll help loosen the bites.
Transfer your bites to a freezer-safe zip-top bag or airtight container, label it with the date (they’re good for up to 2 weeks), and pop them back into the freezer.
Want more snack ideas you can make ahead and freeze? Don’t miss our Date Brownie Balls—they’re naturally sweet and freezer-friendly too.
Bonus: Step by Step Serving Tips
When you’re ready to eat one (or three—no judgment), take them out and let them sit for 3 to 5 minutes at room temperature. This little thawing window makes a big difference in texture—turning your bite from ice cube to creamy frozen bliss.
Whether you eat them straight from the bag standing at the freezer (again, relatable) or pair them with fresh fruit, these Frozen Greek Yogurt Peanut Butter Bites are your new go-to freezer win.
What to Serve with Frozen Greek Yogurt Peanut Butter Bites
These bites are little snacks of joy all on their own, but they play nice with others. Try pairing them with fresh fruit like apple slices or strawberries if you’re aiming for a supercharged snack plate. They’re also a great addition to your smoothie bowl routine—just chop a couple and toss them on top for a creamy, frozen surprise. Hosting a casual brunch or mom get-together? Serve them alongside your Healthy Greek Yogurt Banana Muffins for a wholesome spread that feels a little gourmet without the extra work. And hey, if your idea of serving them is just standing by the freezer with the door open and eating one straight from the bag—same, girl, same.
Key Tips for Making Frozen Greek Yogurt Peanut Butter Bites
Use full-fat Greek yogurt if you want your bites extra creamy—they’ll taste more like frozen cheesecake than a “healthy snack.” Stir the mixture really well; if it’s lumpy, it’s probably just the natural peanut butter, so keep mixing until it’s smooth. Don’t skip the silicone mold or mini muffin tin—it makes portioning super easy and cleanup a breeze.
If you’re using toppings, press them gently into the surface so they don’t fall off after freezing. Oh, and don’t overfill the molds—they expand just a smidge when they freeze. Lastly, store them in a zip-top freezer bag with as much air removed as possible to avoid freezer burn. Bonus points if you double the batch. Future You will thank you.
Storage and Reheating Tips for Frozen Greek Yogurt Peanut Butter Bites
These are freezer treats, so they’re happiest when cold. After they’ve set completely, pop them into a freezer-safe bag or container. Keep them stored flat if possible so they don’t get squished. You don’t need to “reheat” them per se, but if they’re rock solid when you pull one out, let it sit on the counter for 3–5 minutes to soften up a bit.
Don’t microwave them—they’ll melt and lose that firm, dreamy bite. Also, keep them away from strong-smelling foods in the freezer (looking at you, leftover fish tacos), since yogurt can pick up flavors. They’re good for up to 2 weeks, though I dare you to make them last that long. They’ve been known to vanish mysteriously within days.
FAQs
Can I make these vegan?
Totally. Just use a plant-based yogurt and swap honey for maple syrup.
Can kids eat these?
Yes! Just skip the chia seeds if you’ve got tiny eaters who aren’t used to them yet.
What if I don’t have mini muffin tins?
Silicone ice cube trays work great too. You can even just plop spoonfuls on a lined baking sheet.
Do I have to use peanut butter?
Nope—almond or cashew butter works. Just know it might slightly change the texture and flavor.
Final Thoughts
Frozen Greek Yogurt Peanut Butter Bites aren’t just a snack—they’re a freezer love language. They’re easy, wholesome, and full of flavor, and they hit that sweet spot between indulgent and nourishing. Whether you’re meal prepping like a boss or just trying to get through another weekday afternoon without raiding the cookie stash, these are your secret weapon. Plus, they’re mom-approved, kid-approved, and let’s be honest—sanity-approved. If you’re loving this kind of healthy, no-fuss recipe, check out our Protein Banana Bread next. Now go make a batch, toss ‘em in the freezer, and treat yourself. You’ve earned it.
Visit our Pinterest for regular slow cooker recipe updates, or join our Facebook discussions where cooking fans exchange their favorite hearty meal ideas.
Print
Frozen Greek Yogurt Peanut Butter Bites – Easy No-Bake Treat
- Total Time: 2 hours 10 minutes
- Yield: 12 bites 1x
Description
Frozen Greek Yogurt Peanut Butter Bites are a creamy, protein-rich treat made with simple ingredients like Greek yogurt, natural peanut butter, and honey. Perfect for meal prep or a quick snack, these bites are freezer-friendly and customizable with chocolate chips, chia seeds, and more.
Ingredients
- 1 cup plain Greek yogurt (full-fat or low-fat)
- ½ cup creamy natural peanut butter
- 2 tablespoons honey (or maple syrup for vegan option)
- ½ teaspoon vanilla extract (optional)
- A pinch of cinnamon (optional)
- Mini chocolate chips (optional topping)
- Chia seeds (optional topping)
Instructions
1. In a bowl, whip together Greek yogurt, peanut butter, and honey until smooth.
2. Add vanilla extract or cinnamon if using, and mix until fully incorporated.
3. Spoon about 1 tablespoon of the mixture into each cavity of a mini muffin tin or silicone mold.
4. Press mini chocolate chips or sprinkle chia seeds on top if desired.
5. Place the tray in the freezer for at least 2 hours or until solid.
6. To remove, run warm water over the bottom of the mold and pop out the bites.
7. Transfer to a freezer-safe bag or container and store in the freezer for up to 2 weeks.
Notes
Use full-fat Greek yogurt for a creamier texture, or low-fat if you prefer fewer calories.
Natural peanut butter works best for smooth mixing and clean ingredients.
Customize the flavor with a dash of cinnamon or a splash of vanilla extract.
These bites are great for meal prep—label your freezer bag with the date to track freshness.
Swap in almond or cashew butter if desired, though peanut butter gives the richest flavor.
- Prep Time: 10 minutes
- Cook Time: 0 minutes
- Category: Snack, Dessert
- Method: Freezing
- Cuisine: American
Nutrition
- Serving Size: 1 bite
- Calories: 90
- Sugar: 4g
- Sodium: 30mg
- Fat: 6g
- Saturated Fat: 1.5g
- Unsaturated Fat: 4.5g
- Trans Fat: 0g
- Carbohydrates: 6g
- Fiber: 1g
- Protein: 5g
- Cholesterol: 2mg
")