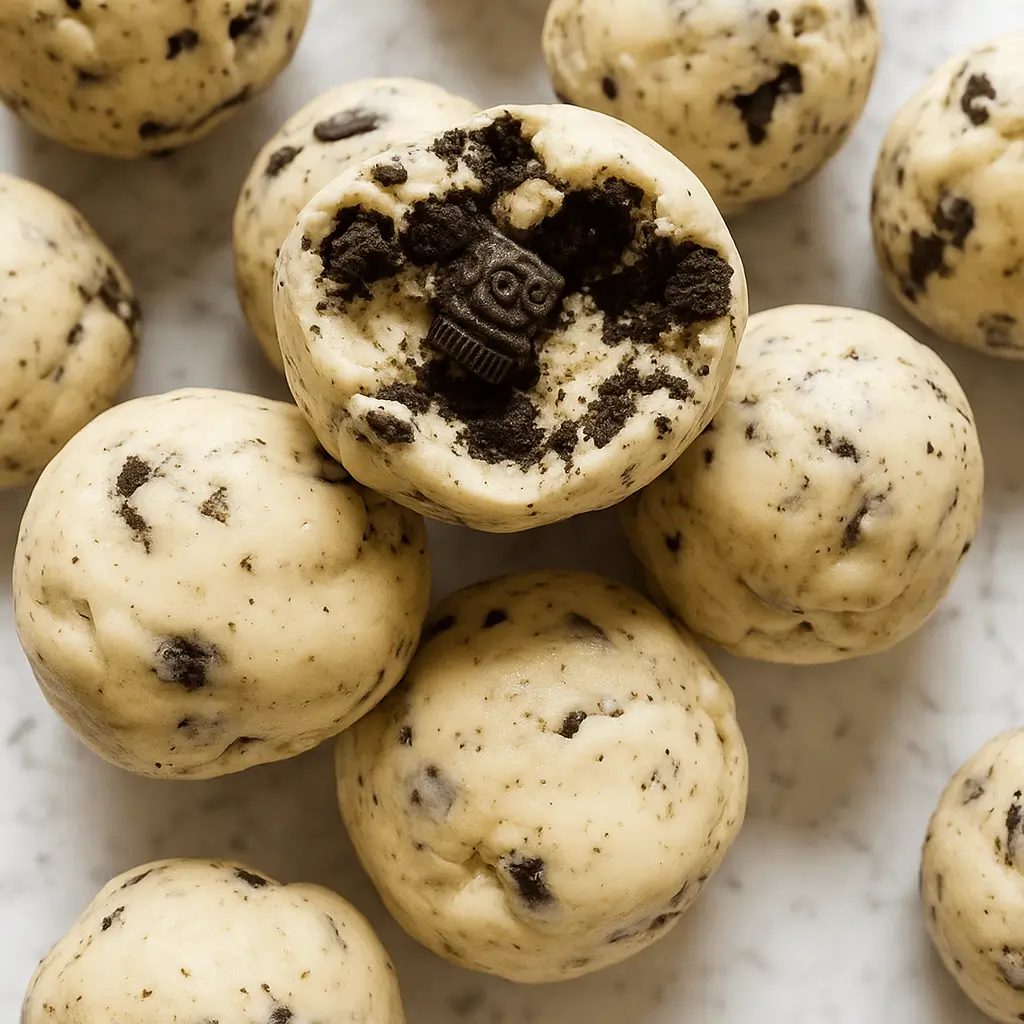
Cream Cheese Oreo Protein Balls are the snack you didn’t know you needed but now absolutely have to try. These no-bake goodies are rich, creamy, slightly crunchy, and packed with protein—which makes them the unicorn of indulgent-yet-smart snacking. Imagine if cheesecake, cookies-and-cream, and a protein bar had a baby.
Yep, that’s the vibe. Whether you’re a busy mom needing a quick energy bite between soccer practices, or a sweet-toothed professional sneaking in a 3 PM treat that doesn’t wreck your macros, this is your go-to. And hey, it even satisfies the picky eaters in the house—mine thought it was dessert (spoiler: it kinda is). Best of all, there’s no oven involved. Just mix, roll, chill, snack, and repeat. If you’re craving a snack that feels indulgent but secretly delivers a protein punch, these cream cheese Oreo protein balls check all the boxes.
Table of Contents
What is Cream Cheese Oreo Protein Balls?
Cream Cheese Oreo Protein Balls are basically the love child of Oreo truffles and protein bites. Think dessert vibes with gym-approved benefits. At their core, they’re made with just a handful of ingredients—cream cheese, Oreo crumbs (yes, cream filling included), protein powder, and a touch of milk. You mix it all into a doughy dream, roll into bite-sized balls, and chill.
That’s it. Some folks go the extra mile with chocolate chips, nuts, or even a coconut dusting, but they’re just as delightful in their simplest form. These little treats are no-bake, fridge-friendly, and portion-perfect. They’re designed for people who want to treat themselves without blowing up their meal plan. If you’ve ever wished your protein powder could double as a dessert, here’s your answer—soft, chewy, sweet, and just enough crunch to keep things interesting.
Reasons to Try Cream Cheese Oreo Protein Balls
Let’s be real—most protein snacks are either cardboard disguised as food or so sugary they cancel out the benefits. But Cream Cheese Oreo Protein Balls? Total game-changer. First, they’re actually tasty—like dessert-worthy tasty. No chalky protein bar aftertaste. Second, they’re no-bake, which means no oven, no fuss, no kitchen meltdown.
Just mix, roll, and chill. Third, they’re crazy versatile. Swap the protein powder flavor, toss in some chocolate chips, roll them in coconut—you do you. Fourth, portion control is built-in. One ball is enough to calm a craving, two if you’ve had “that kind of day.” And finally, they’re secretly helpful for picky eaters (hello, protein sneak attack). Bonus: they’re fridge-stable for days, and freezer-friendly for weeks, so you’ve always got backup when the snack attack hits.
Ingredients Needed to Make Cream Cheese Oreo Protein Balls
Here’s what you’ll need to make about 20 balls:
- 8 oz (227g) cream cheese, softened
- 15–20 Oreo cookies, crushed (yes, the filling too!)
- 1 cup (30g) vanilla protein powder (chocolate works too)
- 2–3 tbsp milk (any kind—dairy or plant-based)
- 1 tsp vanilla extract (optional but recommended)
- Pinch of salt (because balance is key)
Optional Mix-ins:
- Mini chocolate chips
- Chopped nuts (walnuts or almonds)
- Shredded coconut
Optional Coating:
- Extra crushed Oreos
- Cocoa powder
- Unsweetened shredded coconut
Pro Tip: Trying to cut sugar? Use reduced-fat Oreos or swap in a low-carb cookie alternative. Still sweet. Still satisfying.
Instructions to Make Cream Cheese Oreo Protein Balls
Ready to whip up these decadent Cream Cheese Oreo Protein Balls? Follow this step-by-step guide to take your ingredients from a loose pile of crumbs to perfectly poppable treats. Whether it’s your first time or your 50th, these detailed directions will make the process easy, fun, and nearly foolproof.
Step 1: Crush the Oreos (But Not Your Soul)
Let’s kick things off by tackling those Oreos. Place 15 to 20 cookies (yes, filling and all!) into a large zip-top bag. Seal it tight and take out any lingering frustrations by smashing them with a rolling pin. You’re aiming for a texture that’s mostly fine crumbs with a few little chunks sprinkled in—kind of like the gravel road to snack heaven.
Prefer a shortcut? Toss them into a food processor and pulse until you get a sandy blend. Just don’t overdo it—you want texture, not dust. If you’re wondering about alternatives, reduced-sugar or gluten-free sandwich cookies work well too. For more ideas, check out our guide on ingredient swaps and healthy cookie options.
Step 2: Soften the Cream Cheese Just Right
Next up in our step-by-step recipe: bring the cream cheese to room temperature. You can leave it on the counter for about 20–30 minutes, or microwave it in 10-second bursts until it’s spreadable but not melted.
This step matters more than you’d think—too cold, and it won’t mix properly; too warm, and things get gloopy fast. Think of it like Goldilocks in the kitchen: it has to be just right. This is a good time to prep your work surface and grab a large mixing bowl.
Step 3: Mix the Cream Cheese and Oreo Crumbs
Now, add the crushed Oreos into the bowl with your softened cream cheese. Using a sturdy spatula or wooden spoon, begin mixing the two together. This part takes a bit of elbow grease—don’t be surprised if it looks a little like wet gravel at first.
Keep mixing until the color becomes a uniform cookies-and-cream gray. It should look like thick frosting or edible play dough. This base is where all the flavor magic starts, and trust me—it’s worth the stir.
Step 4: Add the Protein Powder Gradually
Here comes the “protein” part of these Cream Cheese Oreo Protein Balls. Gradually add 1 cup of vanilla protein powder to the mix. Sprinkle it in slowly, stirring as you go, so it incorporates evenly.
If the mixture becomes too dry or crumbly, add a splash of milk—start with 1 tablespoon and increase as needed. You’re aiming for a thick, pliable dough that holds together when pressed but doesn’t stick to everything in sight.
Want a flavor twist? Try chocolate protein powder for a deeper, brownie-like bite. You can explore more ways to use flavored protein in snacks by visiting our crockpot chocolate dessert series.
Step 5: Add Vanilla, Salt, and Optional Mix-Ins
Now it’s time to flavor it up. Stir in 1 teaspoon of vanilla extract and a pinch of salt. This combo helps balance the sweetness and enhances the rich flavor of the Oreos and cream cheese.
Feeling extra? This is your moment to add mini chocolate chips, chopped nuts (almonds or walnuts are great), or even shredded coconut. Fold them in gently so you don’t crush the dream (or the mix-ins).
Step 6: Roll the Dough into Balls
Using a cookie scoop or a tablespoon, portion out the dough. Roll each scoop between your palms until it forms a smooth ball, about 1 inch in size. If the mixture sticks to your hands like a toddler with syrup, wet your palms lightly with water to keep things tidy.
Place the rolled balls on a parchment-lined tray or plate. Make sure they’re not touching—you want them to chill evenly, not turn into one giant protein blob.
Step 7: Chill the Balls to Set
Pop the tray into the fridge and let the balls chill for at least 1 hour. This helps them firm up, hold their shape, and develop a satisfyingly chewy bite. Short on time? You can freeze them for 30 minutes, but beware the icy bite if you can’t wait.
This step-by-step chill time isn’t just about texture—it also helps the flavors meld. Consider this the snack version of “resting the dough.” And yes, it’s worth the wait.
Step 8: Optional Final Coating
If you want to make these look bakery-level fancy, roll the chilled balls in extra crushed Oreos, cocoa powder, or shredded coconut. It adds visual appeal and a little extra flavor and texture.
These make beautiful additions to dessert boards or gift boxes, too—no one has to know they started with protein powder. If you love dressing up your snacks, you’ll also enjoy our epic beef nachos supreme for savory snack styling inspiration.
What to Serve with Cream Cheese Oreo Protein Balls
Honestly, these are pretty perfect solo. But if you’re building a snack board or treating guests, they pair beautifully with fresh berries, a drizzle of dark chocolate, or a cold glass of milk. For a brunch-style spread, add them alongside yogurt parfaits, banana bread, or crockpot cheesy chicken broccoli for that sweet-and-savory contrast. Hosting a girls’ night or a holiday party? Stack them high on a plate with a side of coffee or chai latte. Kids’ birthday? Pop them on skewers for an easy grab-and-go treat. However you serve them, they disappear fast.
Key Tips for Making Cream Cheese Oreo Protein Balls
- Soften that cream cheese—cold cream cheese won’t mix properly and will test your patience.
- Don’t overdo the milk—add just a splash at a time. You want dough, not batter.
- Chill before you roll (and after)—warm mixture = sticky mess. Cool mixture = neat little spheres.
- Wet your hands while rolling to prevent sticking. Trust me, it’s a small trick with big payoff.
- Use a cookie scoop for evenly sized balls. Makes them look more polished (and helps with portion control).
- Go wild with coatings—extra Oreo crumbs, cocoa, or coconut give bakery-level vibes.
- Want a chocolate version? Use chocolate protein powder instead of vanilla. Boom: flavor twist.
Storage and Reheating Tips for Cream Cheese Oreo Protein Balls
These little bites are made for make-ahead life. Store them in an airtight container in the fridge for up to 5 days. If you want to stash some for later (or prevent midnight snacking sabotage), freeze them for up to 3 months. Just let them thaw in the fridge or at room temp for a few minutes before eating. Pro tip: keep a stash in the freezer and grab one when the sweet craving hits—it’s like biting into a mini ice cream truffle. Avoid microwaving, though. The cream cheese texture gets weird and sad. And no one wants sad snacks.
FAQs
Can I make these dairy-free?
Yes! Use dairy-free cream cheese (like Kite Hill or Tofutti) and plant-based milk.
What kind of protein powder works best?
Whey or plant-based—just avoid gritty ones. Vanilla is classic, but chocolate or cookies-and-cream are fun, too.
Can I skip the protein powder?
Sure, but they’ll be more dessert than snack. Try subbing in oat flour or almond flour.
Do I have to use Oreos?
Nope. Try reduced-sugar cookies or grain-free alternatives for a healthier version.
Can I make these ahead for meal prep?
Absolutely! They’re fridge- and freezer-friendly, and perfect for grab-and-go snacks.
Final Thoughts
Cream Cheese Oreo Protein Balls are the definition of a win-win—treat yourself and sneak in some protein. Whether you’re trying to eat smarter, keep the kids happy, or just want something yummy without turning on the oven, this recipe delivers. Soft, sweet, satisfying, and just a little bit addictive. You’ll make these once, and then wonder why you didn’t do it sooner. Snack smarter, my friend—and if you need something savory to go with it, check out our chicken marsala orzo for a balanced meal idea.
Visit our Pinterest for regular slow cooker recipe updates, or join our Facebook discussions where cooking fans exchange their favorite hearty meal ideas.
Print
Cream Cheese Oreo Protein Balls: Sweet No-Bake Power Bites
- Total Time: 1 hour 10 minutes
- Yield: 20 balls 1x
- Diet: Vegetarian
Description
Cream Cheese Oreo Protein Balls are soft, sweet, no-bake treats that combine the irresistible flavor of cookies and cream with a protein boost. These bite-sized snacks are perfect for meal prep, dessert, or a post-workout indulgence.
Ingredients
- 8 oz (227g) Cream Cheese, softened to room temperature
- 15–20 Oreo Cookies, crushed into fine crumbs (cream filling included)
- 1 cup (30g) Vanilla Protein Powder (or chocolate)
- 2–3 tbsp Milk (dairy or plant-based)
- 1 tsp Vanilla Extract (optional)
- Pinch of Salt
- Optional Mix-ins:
- • Mini chocolate chips
- • Chopped nuts (almonds, walnuts)
- • Shredded coconut
Instructions
1. Crush the Oreos into fine crumbs using a food processor or by bashing them in a resealable bag with a rolling pin. Leave a few small chunks for texture if desired.
2. Soften the cream cheese by letting it sit at room temperature or microwaving in 10-second bursts until spreadable but not runny.
3. In a mixing bowl, combine the softened cream cheese and crushed Oreos. Stir until fully blended into a uniform mixture.
4. Gradually mix in the protein powder. If the mixture is too dry, add milk one tablespoon at a time until the dough comes together.
5. Stir in vanilla extract and a pinch of salt. Add any optional mix-ins like chocolate chips or chopped nuts at this stage.
6. Scoop about 1 tablespoon of the mixture and roll it into balls using your hands. Wetting your hands slightly helps prevent sticking.
7. Place the balls on a parchment-lined tray or plate.
8. Refrigerate for at least 1 hour, or freeze for 30 minutes if short on time.
9. Optional: Roll the chilled balls in extra crushed Oreos, cocoa powder, or shredded coconut for a decorative finish.
Notes
Use reduced-fat Oreos or low-sugar alternatives to cut down on sweetness.
Softened cream cheese blends best—avoid using it straight from the fridge.
Store the protein balls in an airtight container in the fridge for up to 1 week, or freeze for up to 2 months.
These are great for meal prep, potlucks, or whenever your sweet tooth strikes.
For extra richness, swap vanilla extract with almond or peppermint extract.
- Prep Time: 10 minutes
- Cook Time: 0 minutes
- Category: Dessert, Snack
- Method: No-Bake
- Cuisine: American
Nutrition
- Serving Size: 1 ball
- Calories: 120
- Sugar: 6g
- Sodium: 80mg
- Fat: 7g
- Saturated Fat: 3.5g
- Unsaturated Fat: 3g
- Trans Fat: 0g
- Carbohydrates: 10g
- Fiber: 1g
- Protein: 5g
- Cholesterol: 10mg

")