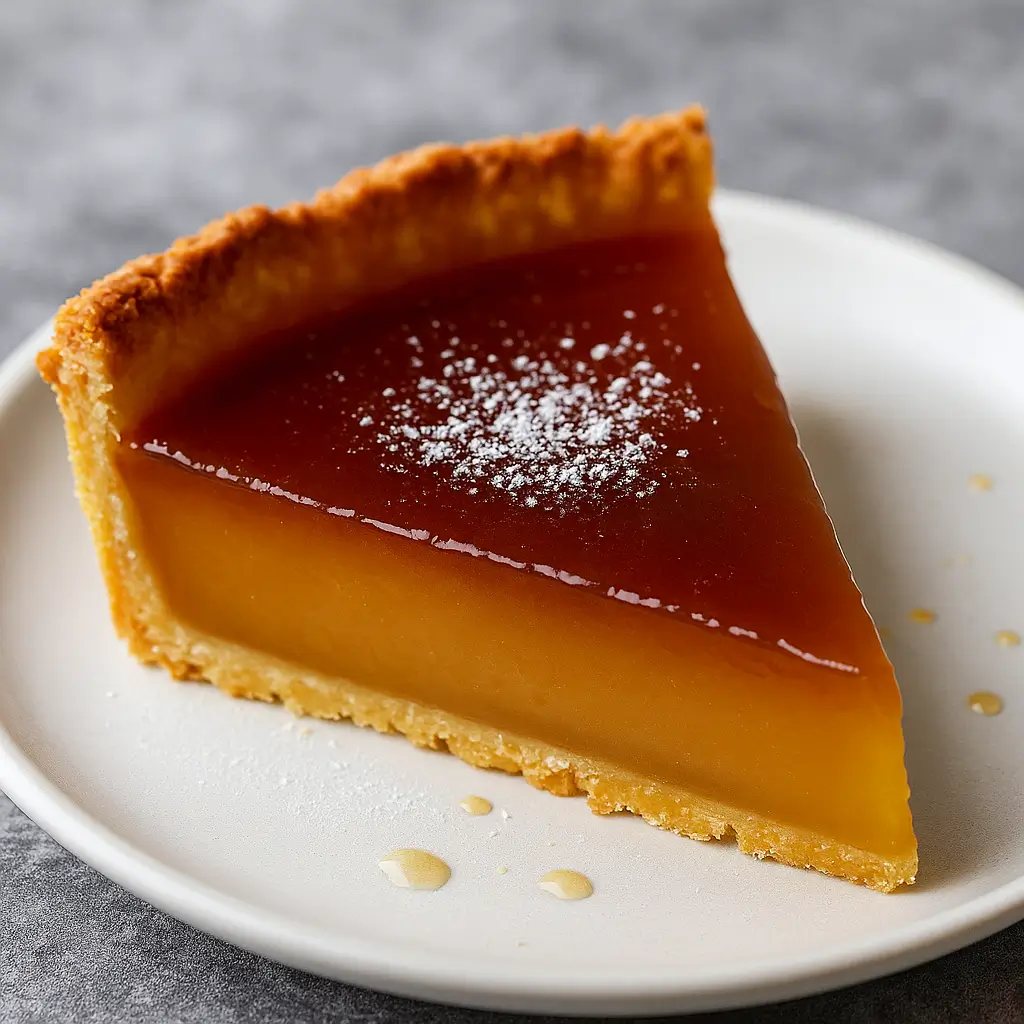
Salted Honey Pie is your new dessert obsession waiting to happen. If you’ve ever wanted a pie that’s creamy, dreamy, and just a little bit sassy, this is it. The rich custard base is loaded with caramelized honey goodness, tucked inside a flaky butter crust, and finished off with a sprinkle of flaky sea salt that makes the whole thing sing.
It’s the perfect balance of sweet and salty—kind of like that one friend who gives great advice and brings wine. Whether you’re impressing guests at Thanksgiving or just need something indulgent after a long Tuesday, this Salted Honey Pie comes through every single time. And let’s be honest, there’s something soul-soothing about making a pie from scratch that doesn’t feel like a culinary triathlon. This recipe is easy enough for beginners, but the result feels gourmet. Let’s dive into your new favorite comfort dessert.
Table of Contents
What is Salted Honey Pie?
Salted Honey Pie is a custard-style pie that leans into its Southern roots while giving you that trendy, modern bakery vibe. Imagine a smooth, almost butterscotch-like filling thanks to brown sugar and honey, hugged by a golden, flaky pie crust. Then—because life’s better with contrast—it’s topped with flaky sea salt to cut through the sweetness.
It’s got that nostalgic “Grandma’s pie” energy but with a grown-up twist. You don’t need a special occasion to whip this up either—though it’s a showstopper on any dessert table. What makes it special is its texture: creamy, firm, and sliceable, like a custard tart but with the deep caramel notes only honey and brown sugar can give. If pecan pie and crème brûlée had a love child, Salted Honey Pie would be it. Trust me—it’s every bit as good as it sounds.
Reasons to Try Salted Honey Pie
First off, Salted Honey Pie is not just a dessert—it’s a moment. It’s the kind of pie that makes people close their eyes mid-bite. For busy home cooks and moms alike, it checks all the boxes: minimal ingredients, big payoff, and make-ahead friendly. Got picky eaters? Even those who “don’t like pie” (they exist!) find themselves going back for seconds.
The flavor combo is what makes it shine—honey brings this deep, floral sweetness while sea salt adds just enough edge to keep things interesting. And unlike fruit pies, there’s no chopping, peeling, or crying over imperfect peaches. Plus, the ingredients are pantry staples: eggs, cream, honey, brown sugar. You might not even need to run to the store. It’s the pie you bake when you want something different but not weird. The pie that feels fancy, but is secretly foolproof.
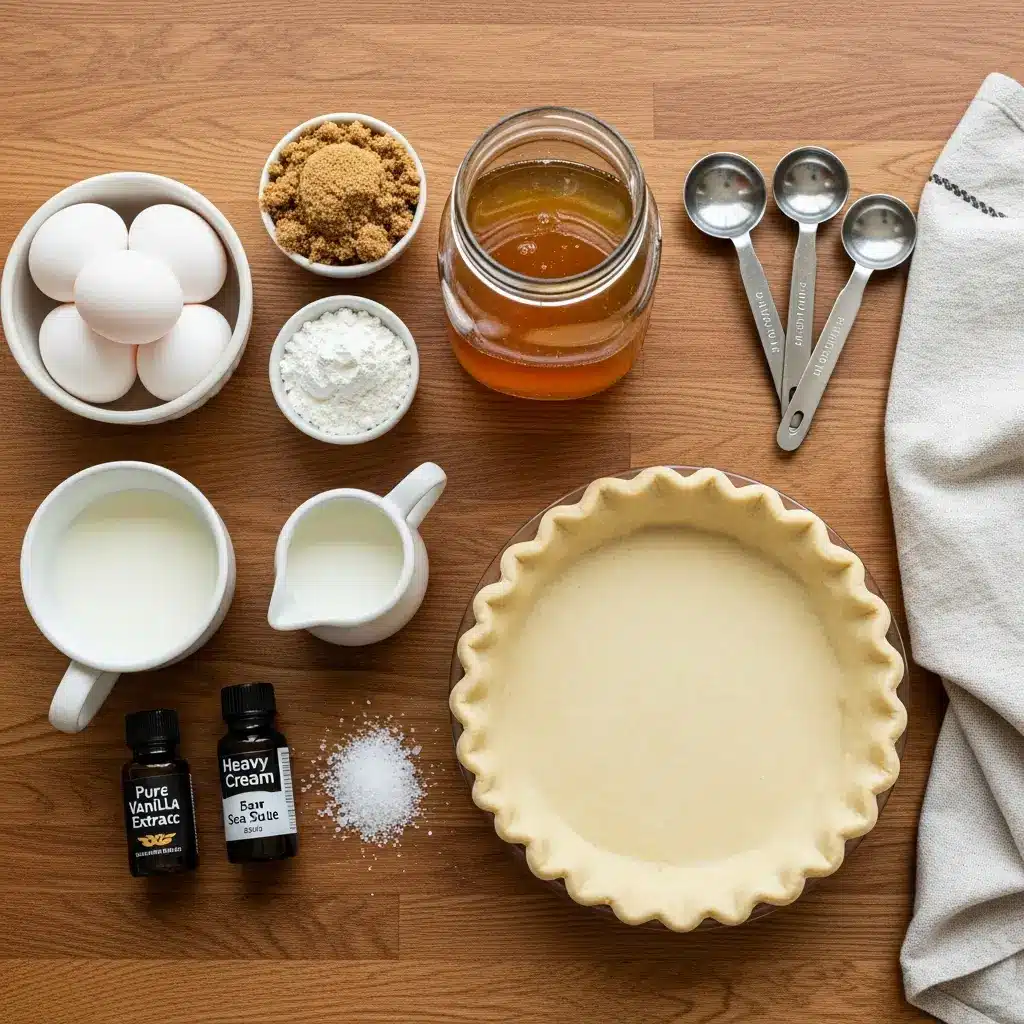
Ingredients Needed to Make Salted Honey Pie
- 1 deep dish 8-inch or regular 9-inch pie crust (store-bought or homemade)
- 4 large egg yolks, lightly beaten
- 2½ cups (600 ml) heavy whipping cream
- ⅔ cup (150 g) packed light brown sugar
- ⅓ cup (45 g) cornstarch, sifted
- ½ teaspoon salt
- ½ cup (120 ml) honey (clover, wildflower, or your fave)
- 2 teaspoons vanilla extract
- Flaky sea salt, for topping
Instructions to Make Salted Honey Pie
Making Salted Honey Pie may sound fancy, but don’t worry—it’s totally doable, even if this is your first time baking a custard pie. In this detailed step-by-step breakdown, you’ll go from crust to cooling with confidence. Each part walks you through exactly what to do, how to do it, and why it matters. Let’s bake this sweet and salty masterpiece together.
Step 1: Prep the Pie Crust
Start your step-by-step journey by prepping the pie crust. If you’re using a store-bought refrigerated crust, roll it out and gently press it into a deep dish 8-inch or a standard 9-inch pie pan. Don’t stretch it—just ease it in. Got a little extra hanging over the edge? Tuck or crimp it for a decorative finish. There’s no need to blind bake for this recipe, which makes life easier!
If you’re going the homemade route, I salute you. Just be sure to chill the dough for at least 30 minutes after shaping it in the pie dish. Cold dough is key to preventing shrinkage and creating that buttery, flaky texture. Want to learn how to make a simple flaky crust from scratch? Check out our pie crust preparation tips (yes, it’s in a soup post—but scroll down, it’s worth it).
Place the crust in the fridge while you work on the filling. A chilled crust holds up better to the warm custard and helps it bake evenly.
Step 2: Heat the Cream Mixture
In a medium saucepan, whisk together the heavy whipping cream, brown sugar, sifted cornstarch, and salt. Set the heat to medium and stir constantly with a silicone spatula or whisk. Don’t walk away—this part happens fast!
As the mixture warms, it will begin to thicken and take on a glossy, golden look. You’ll start to smell the deep, warm scent of caramelizing sugar, which is your cue that the flavors are building. Keep stirring until the mixture reaches a gentle rolling boil. This is a step-by-step must—boiling activates the cornstarch, thickening the custard base and setting the stage for that creamy texture we love.
Step 3: Temper the Egg Yolks
Next up: tempering the eggs. This is the part that might seem intimidating, but it’s simpler than it sounds—and a vital step for a silky-smooth custard. If you skip or rush it, you risk ending up with scrambled eggs in your pie. (Let’s not.)
In a separate bowl, have your lightly beaten egg yolks ready. Slowly ladle about half a cup of the hot cream mixture into the eggs while whisking vigorously. This gradually raises their temperature without shocking them. Repeat this step-by-step process a couple more times, adding a bit more of the hot mixture while whisking.
Once the yolks are warmed up, pour them back into the saucepan with the rest of the cream mixture. Stir constantly to combine everything into a unified, creamy blend. You’re nearly there!
Step 4: Add Honey and Vanilla
Now’s the time to bring in the stars of the show: honey and vanilla extract. Pour both into the warm custard mixture and stir until fully incorporated. The honey adds richness and depth, while the vanilla smooths it out with warm, aromatic notes.
Want to play with flavor variations? Try using a darker honey or mix in a touch of maple syrup. You can explore more ideas in our ingredient substitution guide (which includes dessert swaps too!).
You’ll notice the custard becomes even glossier and starts to smell like dessert heaven. This is where the step-by-step work pays off—it’s luscious, creamy, and ready to shine.
Step 5: Fill the Pie Crust
Remove your pie crust from the fridge and set it on a baking sheet (for easy handling and spill prevention). Pour the custard into the crust—it should be thick but still pourable. Use a spatula to smooth the top so it’s even. This ensures every slice will have consistent texture and flavor.
If you see bubbles on the surface, gently tap the pan on the counter to release them. This step-by-step attention to detail gives your pie that polished, bakery-fresh look.
Step 6: Bake the Pie
Preheat your oven to 375°F (190°C) and carefully place the pie (still on the baking sheet) in the center rack. Bake for 40–45 minutes. Around the 30-minute mark, start checking the edges—they should be golden, and the filling will puff slightly and start to brown on top.
It’s okay if the center jiggles just a bit when you gently shake the pan. That’s actually what you want! The custard will finish setting as it cools. Overbaking can cause cracks or a grainy texture, so err on the side of caution.
Need more oven know-how? Browse our kitchen troubleshooting tips for common baking mishaps and how to fix them.
Step 7: Cool the Pie Completely
Once out of the oven, set the pie on a wire rack or stovetop to cool at room temperature. Let it rest for at least 1–2 hours before transferring to the fridge. This step-by-step cooling process is crucial—cutting too early will make the filling run.
After it reaches room temperature, cover loosely with plastic wrap and refrigerate for 3–4 hours or overnight. Patience here leads to a pie that slices beautifully and tastes even better chilled.
Step 8: Sprinkle with Flaky Sea Salt
Just before serving, give your Salted Honey Pie its signature finish: a sprinkle of flaky sea salt. Maldon or fleur de sel works best. The large crystals offer a satisfying crunch and bring out the sweet, buttery notes of the custard.
This final step-by-step flourish is more than just garnish—it’s the magic that makes this pie unforgettable.
Step 9: Slice, Serve, and Savor
Using a sharp knife, slice the pie into 8–10 portions. Wipe the knife between cuts for clean edges. Serve chilled, or let slices rest at room temp for 10 minutes if you prefer a softer texture.
Pair your Salted Honey Pie with a dollop of whipped cream, a scoop of vanilla bean ice cream, or even a drizzle of caramel sauce. For savory pairings, check out our Creamy Mushroom Chicken or Marry Me Chicken Soup—both make excellent companions for this indulgent dessert.
What to Serve with Salted Honey Pie
Salted Honey Pie doesn’t need much, but if you’re feeling fancy, serve it with whipped cream or a scoop of vanilla ice cream. The creamy topping complements the custard beautifully. A drizzle of caramel or a handful of toasted pecans also works wonders. For drinks, a hot cup of coffee or a chilled glass of white dessert wine (think Riesling or Moscato) balances the richness. If you’re serving it at a dinner party, pair it with a simple main like Creamy Chicken and Rice or Hearty Chicken Broccoli Pasta Bake. This pie really shines when it’s the star of the show, so keep the rest of the meal simple and let that salty-sweet magic take center stage.
Key Tips for Making Salted Honey Pie
Chill the crust before baking—this helps it hold its shape. When heating the cream mixture, stir constantly to avoid scorching the bottom. Tempering the eggs is crucial—don’t rush it, or you’ll end up with scrambled bits. Use good-quality honey since it’s the flavor star here; wildflower or clover works beautifully. Don’t skip the chilling step after baking; it needs time to set or the filling might be too loose. Use flaky sea salt (not table salt!) for topping—the texture and flavor make a big difference. And if you’re short on time, you can use a graham cracker crust for a shortcut version that still delivers on flavor.
Storage and Reheating Tips for Salted Honey Pie
Salted Honey Pie stores like a dream. Just cover it tightly with plastic wrap or foil and keep it in the fridge for up to 4 days. The flavors actually deepen over time, so day two might be even better than day one. If you’re bringing it to a party, you can make it the night before and store it chilled.
This pie is best served cold or at room temp—no need to reheat. But if you do prefer it warm, pop a slice in the microwave for 10–15 seconds (just enough to take the chill off). Want to freeze it? Wrap it well and freeze for up to 1 month, though the texture might be slightly softer when thawed.
FAQs
Can I use a different sweetener instead of honey?
You can try maple syrup, but it’ll change the flavor. Stick with honey for that signature taste.
Can I make it dairy-free?
Yes! Full-fat coconut milk is a great substitute. It adds a subtle coconut note that works well with the honey.
Can I use whole eggs instead of yolks?
Stick with yolks for a richer, creamier texture. Using whole eggs can make the filling firmer and less custardy.
Why is my filling lumpy?
That’s likely from rushing the egg tempering step or not stirring enough during cooking. Go slow and steady!
Does it have to be refrigerated?
Yes, the custard needs to stay chilled to hold its shape and keep fresh.
Final Thoughts
Salted Honey Pie is one of those desserts that feels nostalgic and elevated at the same time. With a creamy, honey-kissed filling and that crave-worthy pop of sea salt, it’s the kind of pie people talk about long after the plates are cleared. Whether you’re making it for the holidays, a dinner party, or just because Tuesday needs a pick-me-up, this pie brings comfort and wow-factor all in one. Try it once, and it might just become your signature dessert.
Visit our Pinterest for regular slow cooker recipe updates, or join our Facebook discussions where cooking fans exchange their favorite hearty meal ideas.
Print
Salted Honey Pie Recipe: A Sweet and Salty Delight
- Total Time: 1 hour 15 minutes
- Yield: 8–10 slices 1x
- Diet: Vegetarian
Description
There’s something irresistibly comforting about a pie that combines the best of both worlds—sweet and salty. This Salted Honey Pie features a luscious, creamy custard filling with a caramelized flavor, finished with a sprinkle of flaky sea salt for balance.
Ingredients
- Pie crust (refrigerated or homemade)
- 4 large egg yolks, lightly beaten
- 2 1/2 cups (600 ml) heavy whipping cream
- 2/3 cup (150 g) packed light brown sugar
- 1/3 cup (45 g) cornstarch, sifted
- 1/2 tsp salt
- 1/2 cup (120 ml) honey
- 2 tsp vanilla extract
- Flaky sea salt, for sprinkling
Instructions
1. Prepare the Pie Crust: Begin by preparing the pie crust in either a deep dish 8-inch pie pan or a 9-inch pie pan. Place it in the fridge to chill while you prepare the filling.
2. Heat the Cream Mixture: In a medium saucepan, combine heavy cream, brown sugar, cornstarch, and salt. Set over medium heat and stir constantly until it reaches a rolling boil and begins to thicken.
3. Temper the Eggs: Remove the cream mixture from heat. Slowly whisk some of the hot mixture into the egg yolks to temper. Gradually combine all and whisk until smooth.
4. Combine the Mixture: Return the egg mixture to the saucepan. Stir in honey and vanilla extract until fully combined and smooth.
5. Fill the Pie Crust: Pour the warm custard mixture into the chilled pie crust and spread evenly.
6. Bake the Pie: Bake at 375°F (190°C) for 40–45 minutes, until the filling is set and the top is golden. It should still jiggle slightly in the center.
7. Cool and Set: Let the pie cool to room temperature, then refrigerate until fully chilled and firm.
8. Finish with Sea Salt: Before serving, sprinkle a generous pinch of flaky sea salt on top of the pie.
9. Serve and Enjoy: Slice into 8–10 portions and serve chilled for best texture and flavor.
Notes
If you don’t have heavy cream, substitute with full-fat coconut milk for a dairy-free version.
Try different types of honey (like wildflower or clover) for flavor variation.
This pie pairs well with whipped cream, toasted nuts, or a drizzle of caramel.
For a gluten-free option, use a gluten-free pie crust or graham cracker crust.
- Prep Time: 35 minutes
- Cook Time: 40 minutes
- Category: Dessert
- Method: Oven
- Cuisine: American
Nutrition
- Serving Size: 1 slice
- Calories: 410
- Sugar: 28g
- Sodium: 240mg
- Fat: 28g
- Saturated Fat: 17g
- Unsaturated Fat: 9g
- Trans Fat: 0g
- Carbohydrates: 38g
- Fiber: 0g
- Protein: 5g
- Cholesterol: 160mg


")