Pineapple Chicken and Rice is the kind of meal that makes me feel like I’ve actually got my life together, even when the laundry pile is reaching sentient levels of height. I remember the first time I tried combining sweet fruit with savory poultry back on the farm; my kids looked at me like I had grown a second head, but one bite later, they were hooked. This Pineapple Chicken and Rice dish is a total lifesaver for those Tuesday nights when you’re exhausted but want something that tastes like a vacation in a bowl. You get that beautiful zing from the ginger, the sweetness of the fruit, and the comfort of fluffy jasmine rice all in one go. Honestly, cooking shouldn’t be a chore that drains your soul, and this recipe proves that you can put a vibrant, healthy meal on the table without losing your mind or spending three hours at the stove. It’s simple, it’s hearty, and it’s become an absolute staple in my Texas kitchen because it satisfies the “honest taste testers” in my house every single time.
What is Pineapple Chicken and Rice?
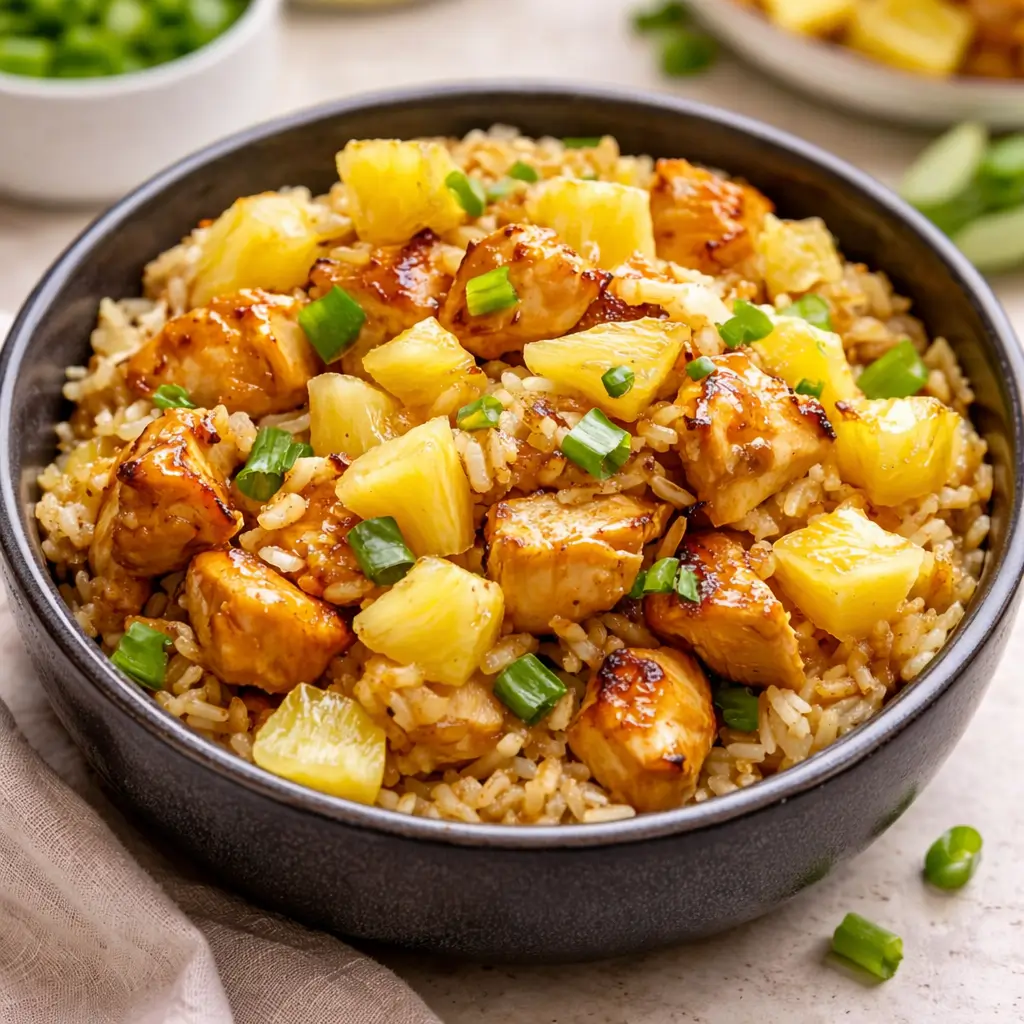
At its heart, Pineapple Chicken and Rice is a harmonious blend of protein, aromatics, and tropical sweetness that creates a complete meal in a single skillet. It draws inspiration from Pacific-rim flavors where the acidity of the pineapple helps tenderize the chicken while providing a natural sugar that caramelizes beautifully against the salty notes of soy sauce. Unlike a heavy takeout version, this homemade take is light, fresh, and relies on the natural juices of the fruit to infuse the jasmine rice with a subtle, fragrant aroma. It is essentially a “dump and simmer” masterpiece that looks much more sophisticated than it actually is to prepare.
Reasons to Try Pineapple Chicken and Rice
You should definitely give Pineapple Chicken and Rice a shot because it solves the ultimate “what’s for dinner” dilemma with minimal cleanup. First off, it’s a one-pan meal, which means you aren’t stuck scrubbing five different pots while your favorite show is starting. Secondly, it is incredibly kid-friendly; the sweetness of the pineapple usually wins over even the pickiest eaters who might otherwise turn their noses up at bell peppers or onions. Additionally, it is a nutritional powerhouse, offering lean protein, complex carbohydrates, and a healthy dose of Vitamin C. It’s also a fantastic way to use up that half-can of pineapple or the stray bell pepper lurking in the back of your crisper drawer.
Ingredients Needed to Make Pineapple Chicken and Rice
- 1 pound chicken breast, cubed: This provides your lean protein base.
- 1 cup pineapple, cubed: Fresh is great for texture, but canned works in a pinch for that sweet burst.
- 1 tablespoon olive oil: Essential for getting that golden sear on your chicken.
- 1 onion, chopped: This creates the savory foundation of the entire dish.
- 2 cloves garlic, minced: Because no good story or recipe ever started without garlic.
- 1 red bell pepper, diced: For a pop of color and a mild, sweet crunch.
- 1 cup jasmine rice: I love jasmine for its floral scent and perfect fluffy texture.
- 2 cups chicken broth: This is the liquid gold that cooks the rice and adds depth.
- 1 tablespoon soy sauce: Adds that crucial umami and saltiness to balance the fruit.
- 1 teaspoon ginger, grated: Fresh ginger gives a spicy, aromatic kick that makes the dish sing.
- Salt and pepper to taste: To help all those other flavors wake up and shine.
- 1/4 cup green onions, sliced: For a fresh, sharp garnish at the end.
- 1 tablespoon sesame seeds: These add a little nutty crunch and make the plate look professional.
Instructions to Make Pineapple Chicken and Rice – Step by Step
Step 1: Prep and Sear the Chicken
The first phase of our Step by Step journey begins with getting your skillet nice and hot over medium heat. You want to swirl in that tablespoon of olive oil until it shimmers, which is the secret to preventing the meat from sticking to the pan. Once the oil is ready, carefully add your cubed chicken breast pieces. I always recommend seasoning the chicken with a little salt and pepper right as it hits the pan to build layers of flavor. Let the chicken cook undisturbed for a few minutes to develop a beautiful golden-brown crust. You don’t need to worry about cooking it 100% through at this stage since it will finish later, but getting that sear is vital for a savory depth. Once the chicken is browned on all sides, scoop it out and set it aside on a plate, making sure to keep those tasty brown bits in the pan for the next step.
Step 2: Sauté the Aromatics and Veggies
Now that your pan is seasoned with chicken juices, it is time to move to the next phase of the Step by Step process by tossing in your chopped onion, minced garlic, and diced red bell pepper. This is where your kitchen starts smelling like a five-star restaurant. You want to sauté these until the onions become translucent and the peppers start to soften just a bit. If the pan looks a little dry, don’t be afraid to add a tiny splash of broth or another teaspoon of oil. These vegetables provide the structural flavor of the meal, so give them the three or four minutes they need to sweat out their sweetness. Watching the vibrant red of the pepper mix with the aromatics is honestly one of my favorite parts of cooking.
Step 3: Caramelize the Pineapple
Following our Step by Step guide, you will now introduce the star of the show: the cubed pineapple. Toss it right into the skillet with the softened vegetables. You only need to cook it for about two minutes, but this short time allows the natural sugars in the pineapple to react with the heat. You’ll notice the edges of the fruit getting slightly golden and the juices starting to release. This creates a natural glaze in the pan that will eventually coat every single grain of rice. It’s a small step that makes a massive difference in the final flavor profile of the dish.
Step 4: Toast the Rice and Add Liquids
In this crucial part of the Step by Step method, you’re going to stir in the dry jasmine rice. Before adding the liquids, I like to let the rice sit in the pan with the veggies and pineapple for about sixty seconds. This lightly toasts the grains, which helps them stay separate and fluffy later on. After that brief toast, pour in your two cups of chicken broth, the soy sauce, and that zesty grated ginger. Give everything a good stir to ensure the rice is submerged and the ginger is evenly distributed. This is the moment where all the individual components start to become a cohesive meal.
Step 5: The Gentle Simmer
The next move in our Step by Step instructions is to bring the liquid to a rolling boil. Once you see those big bubbles, immediately turn the heat down to low and cover the skillet with a tight-fitting lid. This is where the magic happens. You’ll want to let it simmer for about 18 to 20 minutes. Whatever you do, resist the urge to peek! Lifting the lid lets out the steam that is essential for cooking the rice perfectly. While the rice is absorbing all that ginger-infused broth, you can take a moment to breathe, check your social media, or finally put those stray socks in the hamper.
Step 6: Combine and Finish
For the final active phase of the Step by Step process, remove the lid and check if the rice is tender and the liquid is absorbed. If it looks good, return your browned chicken pieces (and any juices that collected on the plate) back into the skillet. Fold the chicken into the rice gently so you don’t mush the grains. Let it sit on the low heat for another two or three minutes just to ensure the chicken is heated through and has reached a safe internal temperature. This resting period also allows the flavors to meld together one last time before serving.
Step 7: Garnish and Serve
The last bit of the Step by Step guide is all about the presentation. Cooking is an art, and every artist needs a finishing touch. Sprinkle your sliced green onions and sesame seeds over the top of the skillet. The green onions add a necessary bite of freshness to cut through the sweetness, while the sesame seeds provide a delicate crunch. I usually just bring the whole skillet to the table and let everyone dig in. It looks impressive, tastes incredible, and feels like a genuine win for the home cook.
What to Serve with Pineapple Chicken and Rice
Since this dish already contains your protein, starch, and fruit/veg, it is pretty much a complete meal on its own. However, if you want to stretch it further, a side of steamed snap peas or a simple cucumber salad with rice vinegar and chili flakes works wonders. For a bit of extra crunch, some toasted cashews on top are a phenomenal addition. If you’re feeling extra fancy, serve it inside a hollowed-out pineapple half—my kids absolutely lose their minds for that, and it makes a standard Tuesday feel like a tropical party.
Key Tips for Making Pineapple Chicken and Rice
One of the biggest tips I can give you is to use long-grain jasmine rice specifically; other varieties can sometimes turn out too sticky or take longer to cook, throwing off the timing. Also, if you’re using canned pineapple, make sure to drain it well so you don’t end up with soggy rice from the extra syrup. If you like a little heat, feel free to add a pinch of red pepper flakes when you’re sautéing the garlic. Lastly, don’t over-stir the rice once it starts cooking, as this releases starch and can make the dish gummy rather than fluffy.
Storage and Reheating Tips Pineapple Chicken and Rice
This meal keeps beautifully in the fridge for up to three or four days, making it an elite choice for meal prep. Just store it in an airtight container once it has cooled down. When you’re ready to eat it again, I recommend reheating it in a skillet with a tiny splash of water or broth to loosen up the rice. If you’re using a microwave, cover the bowl with a damp paper towel to keep the steam in so the chicken stays juicy and the rice doesn’t dry out.
FAQs
Can I use brown rice instead? You can, but keep in mind that brown rice requires more liquid and a much longer cooking time (usually 40-45 minutes), so you’ll need to adjust the recipe significantly. Is this recipe gluten-free? As long as you use a certified gluten-free soy sauce or tamari, the rest of the ingredients are naturally gluten-free. Can I use frozen pineapple? Absolutely! Just let it thaw slightly or expect to sauté it a minute longer to get rid of the excess moisture.
Final Thoughts
Making Pineapple Chicken and Rice is more than just a way to fill bellies; it’s about bringing a little bit of joy and color into your daily routine. Cooking shouldn’t be a source of stress, and I hope this recipe gives you the confidence to experiment and have fun in your own kitchen. Remember, it doesn’t have to be perfect—it just has to be yours. Whether you’re a beginner or a seasoned pro, there’s always something new to discover in a single pan of food. So, grab your skillet, turn on some music, and let’s get cooking.
Print
Pineapple Chicken and Rice
- Total Time: 40 minutes
- Yield: 4 servings 1x
Description
A quick and flavorful pineapple chicken and rice dish with sweet and savory notes, perfect for an easy weeknight meal.
Ingredients
- 1 pound chicken breast (cubed)
- 1 cup pineapple (cubed)
- 1 tablespoon olive oil
- 1 onion (chopped)
- 2 cloves garlic (minced)
- 1 red bell pepper (diced)
- 1 cup jasmine rice
- 2 cups chicken broth
- 1 tablespoon soy sauce
- 1 teaspoon grated ginger
- Salt and pepper (to taste)
- 1/4 cup green onions (sliced)
- 1 tablespoon sesame seeds
Instructions
1. Heat olive oil in a large skillet over medium heat. Add cubed chicken and cook until golden brown and fully cooked. Remove and set aside.
2. In the same skillet, sauté onion, garlic, and red bell pepper until softened.
3. Add cubed pineapple and cook for 2 minutes.
4. Stir in jasmine rice, chicken broth, soy sauce, grated ginger, salt, and pepper. Bring to a boil.
5. Reduce heat to low, cover, and simmer for 18–20 minutes until rice is fully cooked.
6. Return cooked chicken to the skillet and mix well. Heat through.
7. Serve garnished with green onions and sesame seeds.
Notes
For extra flavor, use fresh pineapple instead of canned.
Rinse rice before cooking for a fluffier texture.
You can add a splash of sesame oil for added depth.
Store leftovers in the refrigerator for up to 3 days.
- Prep Time: 10 minutes
- Cook Time: 30 minutes
- Category: Main Course
- Method: Skillet
- Cuisine: Asian-Inspired
Nutrition
- Serving Size: 1 serving
- Calories: 350 kcal
- Sugar: 10 g
- Sodium: 520 mg
- Fat: 10 g
- Saturated Fat: 2 g
- Unsaturated Fat: 7 g
- Trans Fat: 0 g
- Carbohydrates: 40 g
- Fiber: 3 g
- Protein: 28 g
- Cholesterol: 70 mg
")