Homemade Protein Snickers Bars are your new not-so-guilty pleasure. They’re chewy, crunchy, chocolatey, and packed with protein—aka your 3 p.m. snack attack’s dream come true. If you’re someone who’s constantly trying to eat better but still wants to eat something that tastes, you know, actually good, then these are for you.
They hit that sweet-salty balance just right, without making you feel like you need to run a marathon afterward (unless you want to, in which case, go you). And the best part? No baking. No drama. Just a few pantry staples and a little fridge magic. Protein Snickers bars make staying on track feel like a treat—because, honestly, it is.
Table of Contents
What is Homemade Protein Snickers Bars?
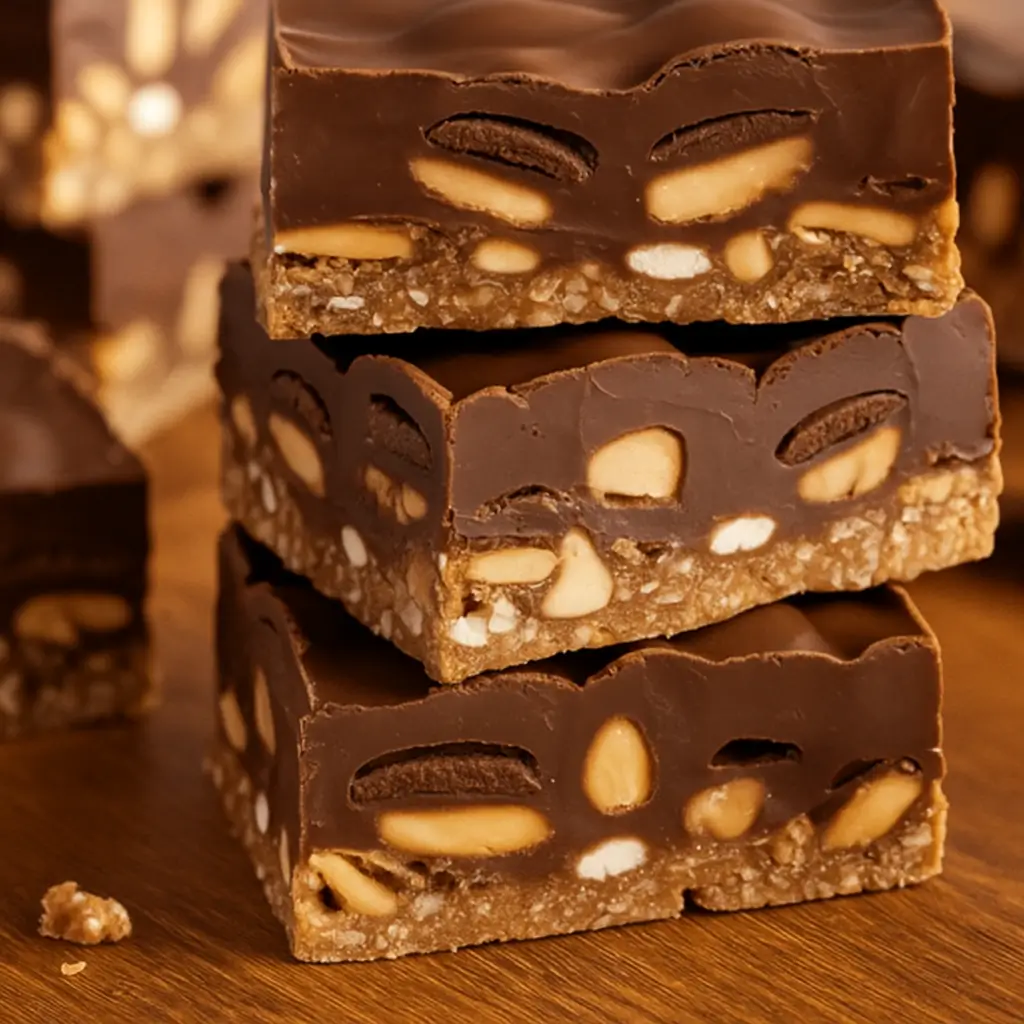
Homemade Protein Snickers Bars are a healthier, DIY version of the classic candy bar—but with a big upgrade in the nutrition department. You start with a soft nougat base made from Medjool dates and protein powder (yes, really), add a luscious layer of creamy peanut butter (or almond butter if that’s your jam), sprinkle on roasted peanuts for a little crunch, and finish with a silky dark chocolate shell.
It’s a satisfying trifecta of chewy, crunchy, and melty that gives you all the Snickers vibes without the sugar crash. Whether you’re low-key obsessed with meal prepping or just trying to cut back on store-bought sweets, this recipe gives you full control over ingredients, flavor, and that crucial protein punch. They store well, travel well, and—bonus—they make you look like a kitchen genius even if your “baking” experience is mostly cereal and milk.
Reasons to Try Homemade Protein Snickers Bars
There are a million snack bars out there, but few feel as indulgent and nourishing as these Homemade Protein Snickers Bars. First off, they taste like candy—but they’re filled with real ingredients, no weird stuff. If you’re trying to squeeze more protein into your day (hello post-workout fuel or mom-on-the-go munchie), these bars have your back with 15–20 grams per piece.
They’re no-bake, which is a win for anyone who’s allergic to turning on the oven in summer. Also, they’re freezer-friendly, meaning you can make a batch on Sunday and ride that snack wave all week long. Plus, if your household is full of picky eaters or “selective snackers” (looking at you, toddlers and husbands), these are sweet enough to pass as dessert—but secretly packed with protein and fiber. And let’s be real: making a homemade snack bar that looks this pretty and tastes this good? Major main-character energy.
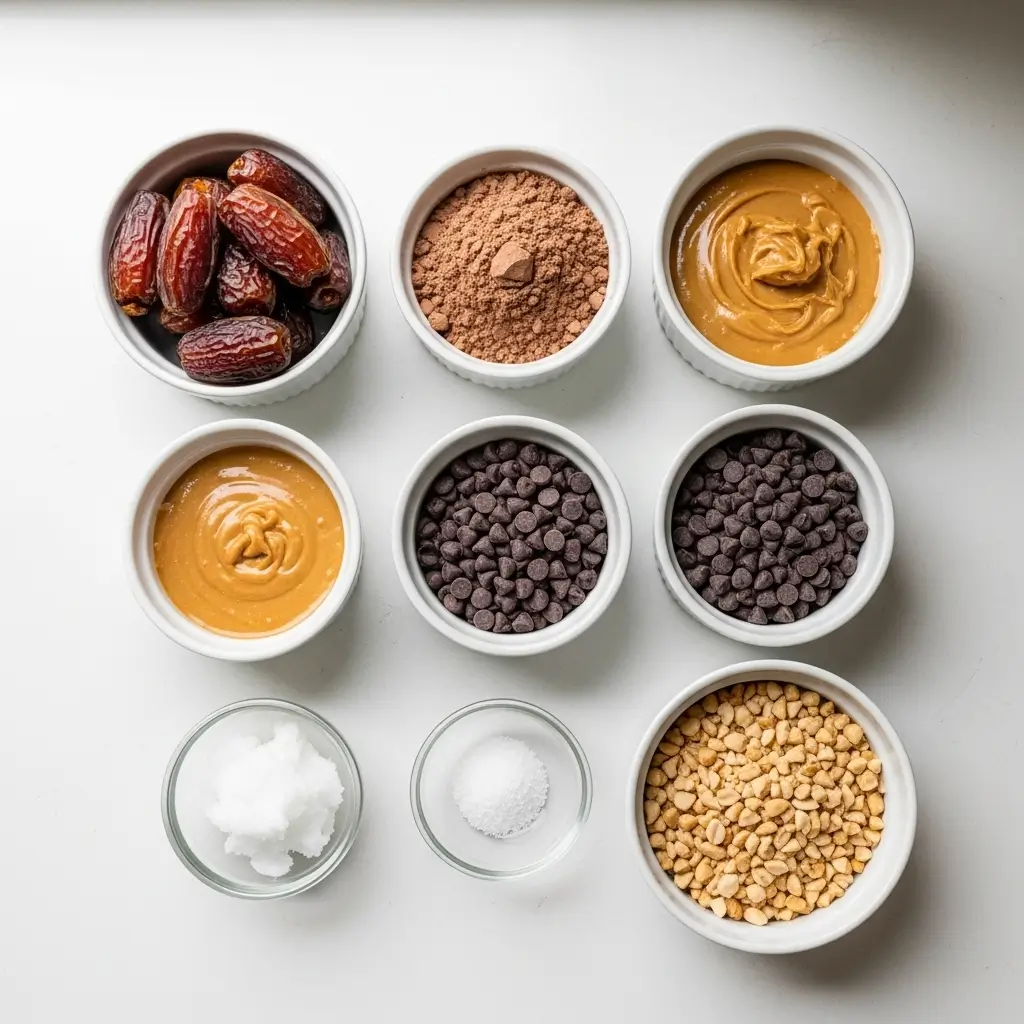
Ingredients Needed to Make Homemade Protein Snickers Bars
Nougat Base:
- 12 pitted Medjool dates (about 200 g)
- 1 heaping scoop (30 g) vanilla or chocolate whey or plant-based protein powder
- 1–2 Tbsp milk (dairy or plant‑based)
Peanut Layer:
- 1/2 cup (120 g) creamy peanut butter (or almond butter)
- Optional: 1/4 cup (30 g) chopped roasted peanuts
Chocolate Coating:
- 1 cup (170 g) dark chocolate chips or chopped chocolate bars (70% cocoa or higher)
- 1 Tbsp coconut oil (optional, adds shine and smooth melt)
Optional Toppings:
- Sea salt flakes
- Mini pretzel bits
- Extra chopped peanuts
- Mini chocolate chips
Equipment:
- Food processor or high-speed blender
- 8×8‑inch baking or loaf pan
- Parchment paper
- Double-boiler or microwave-safe bowl
- Rubber spatula
- Sharp knife
- Measuring cups/spoons
Instructions to Make Homemade Protein Snickers Bars
Ready to dive into these decadent, protein-packed bars? Follow this step-by-step guide to make your very own Homemade Protein Snickers Bars right in your kitchen—no baking, no stress, and absolutely no regrets. Each step is easy to follow and full of helpful tips to make sure your bars turn out perfect, even if you’re new to the no-bake dessert scene.
Step 1: Prep Your Pan and Soften the Dates
Before you get into mixing magic, start by prepping your 8×8-inch baking pan. Cut a sheet of parchment paper to fit the bottom, but leave about 1–2 inches of overhang on two sides. This acts as a handy pull-tab so you can easily lift the bars out later without prying them like a toddler with a stuck LEGO brick.
Next, check your Medjool dates. Are they plump and soft, or a little shriveled like they’ve been hiding in the back of your pantry? If they’re on the drier side, soak them in warm water for 5–10 minutes. Drain and pat dry—this makes them blend into a smoother nougat layer. (You can find more date-softening tricks in our ingredient prep guide for sticky or dry foods.)
Step 2: Make the Nougat Base (a.k.a. the “fakeout fudge”)
Add your pitted dates to a food processor or high-speed blender and pulse until they break down into a thick, sticky paste. Scrape down the sides as needed—this is where the patience pays off. Once the paste looks mostly smooth, sprinkle in your protein powder (vanilla or chocolate both work great).
Continue pulsing until everything starts to come together. The mix should look a bit crumbly at this stage. While the processor is running, slowly add 1 tablespoon of milk at a time (dairy or plant-based both work). You’re aiming for a dough-like texture that sticks together when pressed but isn’t wet or gooey.
Once you’ve reached that sweet spot, scoop the nougat mixture into your prepared pan. Press it down firmly using a rubber spatula or your (clean) hands. Tip: Wet your hands slightly if the mixture is too sticky. Press evenly until it fills the base in a smooth, even layer.
Step 3: Add the Creamy Peanut Layer (and some crunch, if you like)
In a small bowl, warm your peanut butter in the microwave for 20–30 seconds or until it becomes pourable and silky. This makes it easier to spread and keeps your nougat layer intact.
Pour the warmed peanut butter over the nougat and use a spatula to spread it evenly. Don’t worry about getting it perfect—just try to cover the surface without it running over the edges. If you’re a texture lover, this is your moment to shine. Sprinkle chopped roasted peanuts on top and gently press them into the peanut butter.
Prefer almond or sunflower seed butter? Totally doable. Check out our ingredient substitutions page for allergy-friendly swaps and ideas.
Step 4: Melt and Pour the Chocolate Layer (a.k.a. dessert armor)
Now comes the most satisfying part: the chocolate shell. In a microwave-safe bowl or double boiler, melt your dark chocolate chips and optional coconut oil. If you’re using the microwave, heat in 30-second bursts, stirring in between to avoid burning. Coconut oil adds that glossy finish, but it’s optional if you want a firmer bite.
Once melted and smooth, pour the chocolate over your peanut layer. Spread it out gently with an offset spatula or the back of a spoon. Work quickly before it sets! Want to get fancy? Sprinkle flaky sea salt, mini pretzels, or even mini chocolate chips on top while the chocolate is still soft. These toppings not only look impressive—they add serious flavor and texture.
Step 5: Chill and Slice Like a Pro
Place the pan in the fridge for at least 1–2 hours, or until the chocolate is fully set and firm to the touch. If you’re short on time, you can stick it in the freezer for 30–45 minutes (just don’t forget about it!).
Once chilled, lift the entire bar slab out using your parchment handles. Grab a sharp knife and trim the edges if you want clean, bakery-style bars. Then slice into 12–16 pieces, depending on how generous you’re feeling. Wipe the knife between cuts for the best results—it helps keep the lines crisp and clean.
And there you have it: Homemade Protein Snickers Bars step by step, made entirely by you. If you loved how easy these were, you’ll want to try our no-fuss creamy white chicken lasagna soup or Sweet and Spicy Honey Pepper Chicken next for another crowd-pleaser.
These bars are perfect for post-workout treats, afternoon snack cravings, or those “I just need a little something sweet” moments. And since they’re full of real ingredients and protein, they’ll actually leave you feeling satisfied—no sugar crash in sight.
Looking for more step-by-step recipes like this one? Head to our Healthy Treats and Snacks section for more ideas that make eating well feel like a joy, not a job.
What to Serve with Homemade Protein Snickers Bars
These bars are snack royalty, but they also play well with others. Pair one with your afternoon iced coffee for a not-so-basic pick-me-up. Need breakfast on the go? Grab a bar, a banana, and a cold brew. Hosting a casual brunch or game night? Cut them into smaller squares and serve them on a platter alongside Sweet and Spicy Thai Chicken or even a savory bite like Chicken Sausage and Broccoli Orzo. They also make a cute edible gift—just wrap a few in parchment and tie with twine. Homemade and Pinterest-level? Yes, please.
Key Tips for Making Homemade Protein Snickers Bars
- Soak Your Dates: If they feel hard like little sugar rocks, soak ’em! Moist dates make a much creamier nougat base.
- Consistency Check: When blending the base, you want it to stick together when pressed, not ooze or crumble. Adjust milk accordingly.
- Chill Out: Don’t rush the chilling time. Chocolate needs time to set properly. Patience = clean cuts.
- Get Creative: Use almond butter, add crushed pretzels, or top with a pinch of cayenne for a spicy kick. These bars are super adaptable.
- Clean Knife = Clean Bars: Wipe your knife between each slice for those sharp edges that look bakery-made.
Storage and Reheating Tips for Homemade Protein Snickers Bars
These bars are low-maintenance, which we love. Store them in an airtight container in the fridge for up to one week. If you want to keep them longer, pop them in the freezer—just layer with parchment so they don’t stick. They’re actually delicious straight from the freezer (think fudgy texture), but you can let them sit at room temp for 5–10 minutes if you prefer a softer bite. No reheating required. If you’re packing one to-go, just wrap it in foil or a snack bag. Heads-up: on a hot day, the chocolate might get a little melty, so stash with an ice pack if you’re bringing it on the road.
FAQs
Can I use a different protein powder?
Totally. Plant-based or whey, chocolate or vanilla—it all works. Just note the flavor will vary slightly.
Do I have to use Medjool dates?
They’re best because they’re softer and sweeter. If using other dates, soak them longer to get that creamy texture.
Can I make these nut-free?
Yep! Use sunflower seed butter and skip the peanuts or replace with toasted pumpkin seeds for crunch.
How much protein per bar?
Depending on your protein powder and how many bars you cut, you’re looking at 15–20 grams of protein per piece.
Can I double the recipe?
Absolutely. Just use a larger pan (like 9×13″) and watch the chill time—it may take a little longer to set.
Final Thoughts
Homemade Protein Snickers Bars are the no-fuss, high-reward snack that proves you don’t need to choose between health and flavor. Whether you’re trying to fuel your day, beat that 3 p.m. slump, or just want a sweet treat that doesn’t derail your goals, these bars deliver. And let’s be honest—anything that feels like candy but acts like a protein bar is a snack win in our book. Want more recipes with bold flavor and big comfort? Check out more easy meals for busy weeknights or protein-packed dinners like this one. Now go on—get snacking.
Visit our Pinterest for regular slow cooker recipe updates, or join our Facebook discussions where cooking fans exchange their favorite hearty meal ideas.
Print
Homemade Protein Snickers Bars: Quick Win for Your Snack Routine
- Total Time: 25 minutes
- Yield: 12–16 bars 1x
- Diet: Gluten Free
Description
These Homemade Protein Snickers Bars are rich, chewy, and packed with layered goodness — featuring a protein-packed nougat base, creamy peanut layer, and a dark chocolate coating. A nutritious twist on the classic treat, perfect for a satisfying post-workout snack or guilt-free dessert.
Ingredients
Nougat Base:
- 12 pitted Medjool dates (about 200 g)
- 1 heaping scoop (30 g) vanilla or chocolate whey or plant-based protein powder
- 1–2 Tbsp milk (dairy or plant‑based)
Peanut Layer:
- 1/2 cup (120 g) creamy peanut butter (or almond butter)
- Optional: 1/4 cup (30 g) chopped roasted peanuts
Chocolate Coating:
- 1 cup (170 g) dark chocolate chips or chopped chocolate bars (70% cocoa or higher)
- 1 Tbsp coconut oil (optional, adds shine and smooth melt)
Optional Toppings:
- Sea salt flakes
- Mini pretzel bits
- Extra chopped peanuts
- Mini chocolate chips
Equipment:
- Food processor or high-speed blender
- 8×8‑inch baking or loaf pan
- Parchment paper
- Double-boiler or microwave-safe bowl
- Rubber spatula
- Sharp knife
- Measuring cups/spoons
Instructions
1. Line an 8×8-inch pan with parchment paper, leaving an overhang on two opposite sides for easy lifting later.
2. If dates are dry, soak them in warm water for 5–10 minutes, then drain and pat dry.
3. Add pitted dates to a food processor and pulse until a sticky paste forms.
4. Add protein powder and blend until fully incorporated.
5. While blending, add milk 1 tablespoon at a time until a dough-like consistency forms that holds its shape when pressed.
6. Transfer nougat to the lined pan and press evenly into the base using a spatula or clean hands.
7. Warm peanut butter in the microwave for 20–30 seconds until spreadable.
8. Spread peanut butter over the nougat layer, leaving a small border around the edges.
9. Sprinkle optional chopped peanuts over the peanut butter and press gently to adhere.
10. Melt chocolate chips and coconut oil in a double boiler or microwave in 30-second intervals, stirring until smooth.
11. Pour melted chocolate over the peanut layer and spread to cover completely.
12. Add optional toppings like sea salt flakes or pretzel bits on top of the chocolate before it sets.
13. Refrigerate the pan for 1–2 hours until the chocolate layer is firm.
14. Lift the bars out using the parchment overhang.
15. Use a sharp knife to slice into 12–16 bars, wiping the blade between cuts for clean edges.
Notes
Use soft Medjool dates for a smoother nougat base—if needed, soak them briefly in warm water.
Swap peanut butter with almond or sunflower seed butter for dietary needs.
Customize the topping with coconut flakes, pretzel bits, or a drizzle of white chocolate.
Bars can be stored in the fridge for up to 2 weeks or frozen for up to 3 months.
Perfect for pre- or post-workout energy or a healthy dessert alternative.
- Prep Time: 10 minutes
- Cook Time: 5 minutes
- Category: Dessert, Snack
- Method: No-Bake
- Cuisine: American
Nutrition
- Serving Size: 1 bar
- Calories: 230
- Sugar: 14g
- Sodium: 80mg
- Fat: 14g
- Saturated Fat: 5g
- Unsaturated Fat: 8g
- Trans Fat: 0g
- Carbohydrates: 20g
- Fiber: 3g
- Protein: 15g
- Cholesterol: 0mg
")